

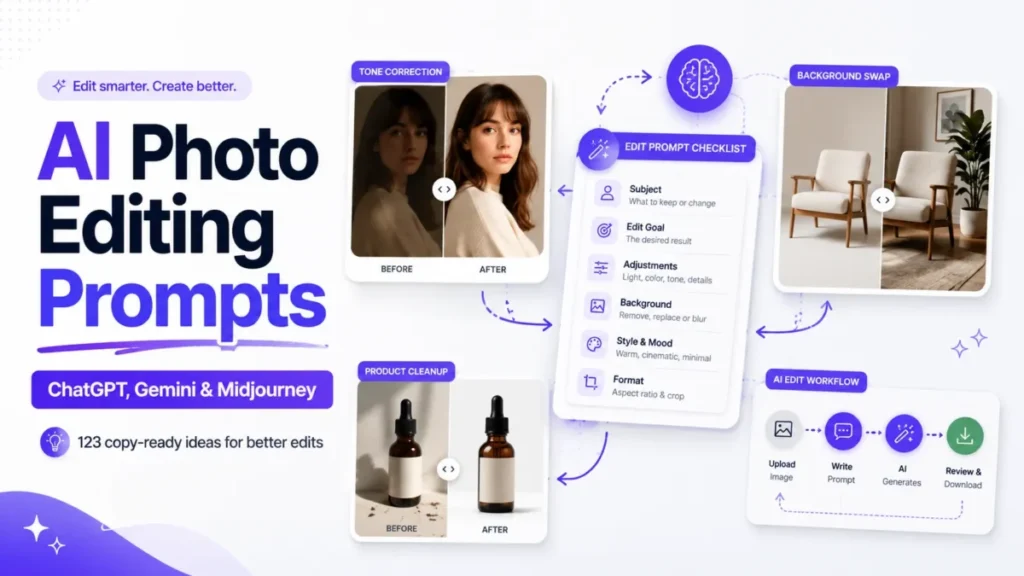
Most AI photo editing prompts fail in the same place. The instruction says what to change and says nothing about what has to survive, so the model repaints a face, rewrites a label, or shifts a horizon that was never part of the request.
This library fixes that at the prompt level. Every one of the 123 templates below names one editing job, one target area, and an explicit preserve list, then routes you to the workflow in ChatGPT, Gemini, or Midjourney that can actually run it.
Copy a prompt, replace the capitalized variables, run one change, and compare the result against your source image before you keep it.
In This Article (13 sections)
Quick Copy: The 12-Point Prompt Build Checklist
Paste this next to your editing window and work down it before you press send.
AI PHOTO EDITING PROMPT CHECKLIST

1.  One editing job per prompt. Two changes means two runs.
2.  Name the exact target area: the background, the left sleeve, the sign above the door.
3.  Describe the finished state, not an adjective. "Warm low-angle sunlight," not "cinematic."
4.  Write a PRESERVE list of everything that must come back unchanged.
5.  Lock identity by name where a person, pet, or product is visible: face, age, markings, geometry.
6.  Place things with left, right, foreground, background, not with "there" or "nearby."
7.  Match light direction and color temperature for anything you add or replace.
8.  Match camera angle, horizon height, and depth of field for any background swap.
9.  Put exact text in quotation marks and state its placement, size relationship, and color.
10. Say whether an aspect-ratio change is a crop or a background extension.
11. Delete instructions that contradict each other before you run.
12. Compare output against source for identity, text, geometry, edges, shadows, and stray changes.
Nine of those twelve points exist to protect something the reader never asked to change. That is the whole difference between a prompt that edits a photo and a prompt that regenerates one.
How to Use AI Photo Editing Prompts
Use case: you have a photo that is mostly right and one thing that is wrong, and you want the model to change that one thing.
Required input: the source image, one named editing job, and a list of what must survive the edit.
Example output: the same photograph with the named region changed and identity, text, geometry and light unchanged.
Common error: a prompt that states the change and leaves the no-change list implied, which lets the model renegotiate the whole frame.
Tool workflow: pick the mode before the wording, then apply the template and customize its capitalized variables to your image.
A prompt for an existing photo is a contract with two halves: what moves and what stays. Competing prompt libraries write the first half well and leave the second half implied, which is why so many edits come back with a different face attached to the right jacket.
The prompt anatomy every template below reuses
OpenAI’s image guidance asks for the purpose, subject, action, location, and visual style, with framing, lighting, and constraints added when they matter, in one to three clear sentences. Google’s Nano Banana guidance asks for subject, composition, action, location, and style, and says that for modifying an existing image you should be direct and specific.
Both lists describe creation. Editing needs two fields neither list makes mandatory, and those two fields are where most edits break.
| Field | What it does |
|---|---|
PLATFORM_MODE | Names the actual editing path: ChatGPT conversational or selected edit, Gemini image edit, Midjourney Editor region edit, Midjourney Image Prompt. |
EDIT_JOB | One primary action: correct exposure, replace background, remove object, recolor a garment, repair damage, extend the canvas. |
TARGET_AREA | The only region allowed to change. |
DESIRED_RESULT | The visible finished state, described concretely. |
PRESERVE_ELEMENTS | The no-change list. This is the field competing libraries omit. |
SUBJECT_IDENTITY | Face, age, skin tone, markings, body proportions, or product geometry that must stay recognizable. |
COMPOSITION_AND_CAMERA | Crop, subject position, angle, perspective, horizon, depth of field, aspect ratio. |
LIGHTING | Direction, softness, time of day, color temperature, and how shadows should behave. |
COLOR_AND_TEXTURE | Required color treatment and the textures that must stay natural. |
TEXT_REQUIREMENTS | Exact wording in quotation marks, plus placement, typography character, size relationship, and color. |
EXCLUSIONS | Changes that must not happen at all. |
OUTPUT_CHECK | What you compare against the source before accepting. |
You will not fill all twelve on every run. Exposure correction needs four of them; a background swap on a product shot needs nine.
Delete the fields you do not use rather than leaving a capitalized token in the prompt. A stray TARGET_AREA reads to the model as a word, not a blank.
What your source image has to give the model first
No prompt recovers information the source never had. A generative editor rebuilds pixels from what it can see, so the quality of the input sets the ceiling on every template below it.
Four properties decide whether an edit is even possible.
| Source property | Why it decides the edit | Fails when |
|---|---|---|
| Detail on the thing you are changing | The model reconstructs from surrounding pixels, so it needs some to work from | The target region is a soft blur or a few dark pixels |
| Sharp, readable edges on what must survive | Preservation depends on the boundary being findable | Hair, fur or a product edge is smeared by motion |
| Legible text if text must stay exact | Character shapes cannot be preserved if they were never resolved | Label wording is already unreadable at full size |
| One coherent light source | A composite can only match a direction the source actually shows | Mixed lighting leaves no single direction to match |
A photo that fails two or more of these is a reshoot, not an editing job. Running twenty prompts against it produces twenty variations of the same missing information.
Seven steps from goal to accepted output
- Name the job before you pick adjectives. “Fix the color cast” and “make it look editorial” are different jobs with different risk, and mixing them in one prompt is how a white-balance fix turns into a restyle.
- Pick the workflow, then the prompt. The routing section below decides this. A correctly written instruction pasted into the wrong mode still produces a new image instead of an edited one.
- Replace every capitalized variable that applies. Be specific enough that a stranger could check your work: “the navy blazer sleeve,” not “the jacket area.”
- Keep the preserve sentence. For faces, products, labels, and anything outside a local edit, this sentence does more work than every style word in the prompt combined.
- Add only the constraints that change acceptance. Light direction matters for a background swap and matters not at all for noise reduction.
- Run one change, then look at the source and the output side by side. Check identity, text, geometry, edge quality, shadow direction, perspective, and anything that moved without being asked.
- Repair the failed area only. Rewriting the whole prompt after a partial success throws away the parts that worked. The repair ladder further down is the faster path.
Generative editing rebuilds pixels rather than adjusting them, which is why a preserve list is a request and not a guarantee. If you are new to why that distinction exists, how generative AI works covers the underlying behavior.
ChatGPT vs Gemini vs Midjourney: Use the Right Editing Workflow
These three products do not expose the same editing path, and one of them treats a reference image in a way that will surprise you. Route the job first.
| Editing job | ChatGPT Images | Gemini Apps | Midjourney |
|---|---|---|---|
| Change one small region | Select the region, then describe the change in chat | Describe the region directly in the edit request | Editor: Smart Select or Erase the region, then prompt |
| Change the whole scene mood | Describe the change on the uploaded image | Describe the change on the uploaded image | Editor Retexture, which keeps the original structure |
| Combine several source photos | Describe the relationship in spatial terms | Upload multiple images and describe the result | Image Prompt with two or more references |
| Extend the frame to a new ratio | State the aspect ratio in the prompt or use the picker | Describe the extension in the edit request | Pan or Zoom Out to add canvas |
| Guarantee an untouched region | Not available; verify after every run | Not available; verify after every run | Not available; verify after every run |
Source: official OpenAI, Google, and Midjourney product documentation.
The last row is the one worth reading twice. No documented mode in any of the three products promises that pixels outside your target survive untouched, which is why the validation pass later in this article is not optional politeness.
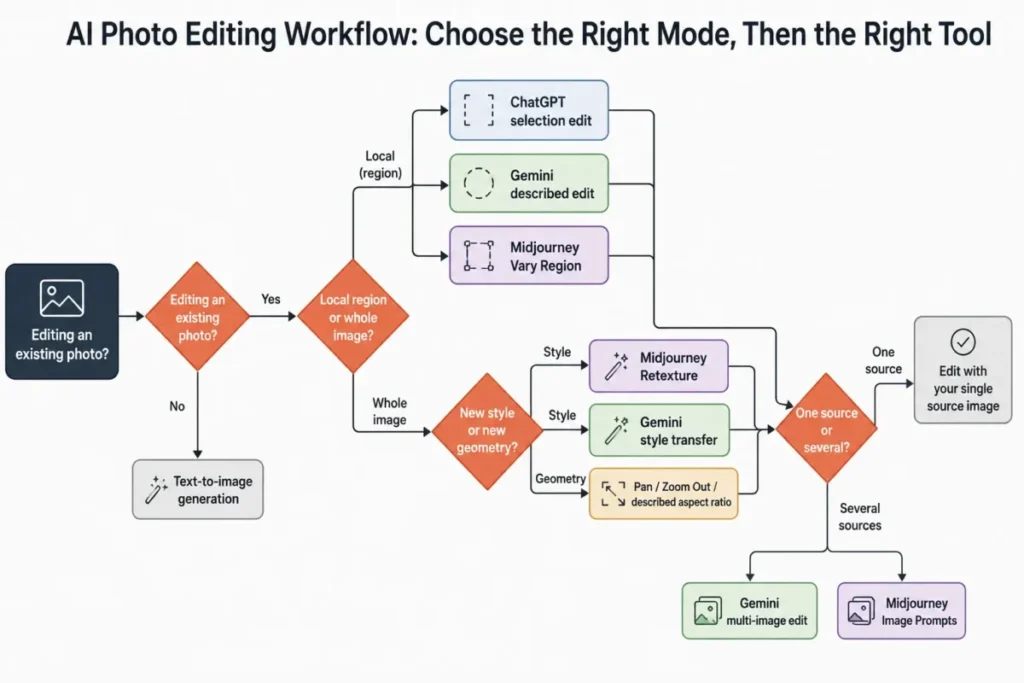
Read the tree once and the shape of the decision is clear: the question is never which product is better, it is whether your job is local, global, or multi-source, and which of the three exposes a mode for that shape.
ChatGPT Images: describe the edit, or select the area and then describe it
You can upload an existing image and describe the changes you want, or select part of the image with the selection tool and describe the change in chat. Aspect ratio can be set with the picker or stated inside the prompt itself.
Then comes the sentence that should change how you write every local edit. OpenAI states plainly that highlights are not always precise and that edits may extend beyond the area you selected.
That is a documented behavior, not a rumor from a forum thread. Selecting a region narrows intent; it does not build a hard boundary, so a selected sleeve edit can still reach the hand, the background seam, or the face.
The practical consequence: keep the preserve sentence in the prompt even when you have made a selection, and inspect the ring of pixels just outside your selection before you accept anything. For prompts written specifically around this workflow, the dedicated ChatGPT photo editing prompts collection goes deeper on that one product.
Gemini Apps: generated images, uploaded images, and multi-image edits
Gemini’s help page documents three entry points: editing an image you generated in Gemini, uploading an image and asking for edits, and uploading multiple images to build a new image from them. You must be signed in, and image editing carries an 18-or-over requirement that image generation alone does not.
Model choice is a real decision here rather than a badge. Google positions Nano Banana 2 Lite for speed and quick ideas.
Nano Banana 2 is described as balancing speed with higher quality, broader world knowledge, and reliable text rendering. Nano Banana Pro sits above both on world knowledge, advanced text handling, consistency, and precise creative control.
Google identifies Nano Banana 2 as Gemini 3.1 Flash Image and describes it as built for rapid edits and iteration. The same page claims subject consistency across multiple characters and objects held together in one workflow, plus stricter adherence to complex instructions.
Route by what the job demands, not by what sounds strongest. A single exposure fix on one photo does not benefit from the highest-control model; a five-reference composite with readable text on a label does.
Google also describes the editor as designed to keep photos of people and pets looking consistently like themselves, and to blend several uploaded photos into one scene. It adds multi-turn editing, where you keep adjusting the same image, and style transfer from one image onto an object in another.
Blending two portraits of two different people is the hardest version of that job, and the two-person photo prompts for Gemini library is written around it.
Every image created or edited in the Gemini app carries a visible watermark plus the invisible SynthID watermark.
Treat consistency as the editor’s design goal and your acceptance test, not as a guarantee you can skip checking. Vendor capability language describes what a model aims to do, and your source photo, your prompt, and the run all still get a vote.
The 64-prompt Nano Banana prompt library covers this product family in more depth.
Midjourney: Editor for edits, Image Prompts for something else entirely
Midjourney’s Editor is a web interface for editing images, and it accepts an image uploaded from your device or pasted as a URL, so it is not restricted to your own Midjourney creations. It combines Remix, inpainting through Vary Region, Pan, and Zoom Out, plus Smart Select, a Paint panel with Erase and Restore brushes, Layers, and Retexture.
The working pattern is physical rather than verbal: erase or select the area where the change belongs, then write a prompt describing what should appear there. Retexture works the other way around, overlaying new styles and details across the whole image while keeping the structure of the original.
Each submitted edit returns four images in the results panel, so you are choosing from options rather than accepting one output.
The mode names map cleanly onto jobs. Vary Region edits a specific part without changing the rest, and Remix iterates by changing the prompt text and parameters.
Pan expands the canvas in one direction and changes the aspect ratio. Zoom Out adds context around all four sides.
Now the trap. Midjourney’s Image Prompts documentation states that your text prompt should include everything you want in the final image, rather than instructions for changing the reference image.
An Image Prompt is guided generation, not editing. Paste “change the background to an office and keep the person identical” into that mode and the reference steers a new image; it does not protect your subject.
So the rule for this product is short: use the Editor when the source photo must survive, and rewrite any imperative edit sentence into a full description of the desired final image when you use an Image Prompt.
123 AI Photo Editing Prompts
The library is ordered by editing job, not by aesthetic, so the technical work sits in front of the styling. Capitalized words are variables you replace; delete any that do not apply to your image.
Every template is written for a direct editing workflow. In a Midjourney Image Prompt, rewrite the instruction as a description of the finished image before you run it.
Foundation corrections and cleanup (P001 to P015)
Start here when the photo is right and the file is wrong. These are the lowest-risk edits in the library because none of them asks the model to invent content, and every one of them still carries a preserve sentence so a tonal fix does not quietly become a retouch.
P001. Exposure balance
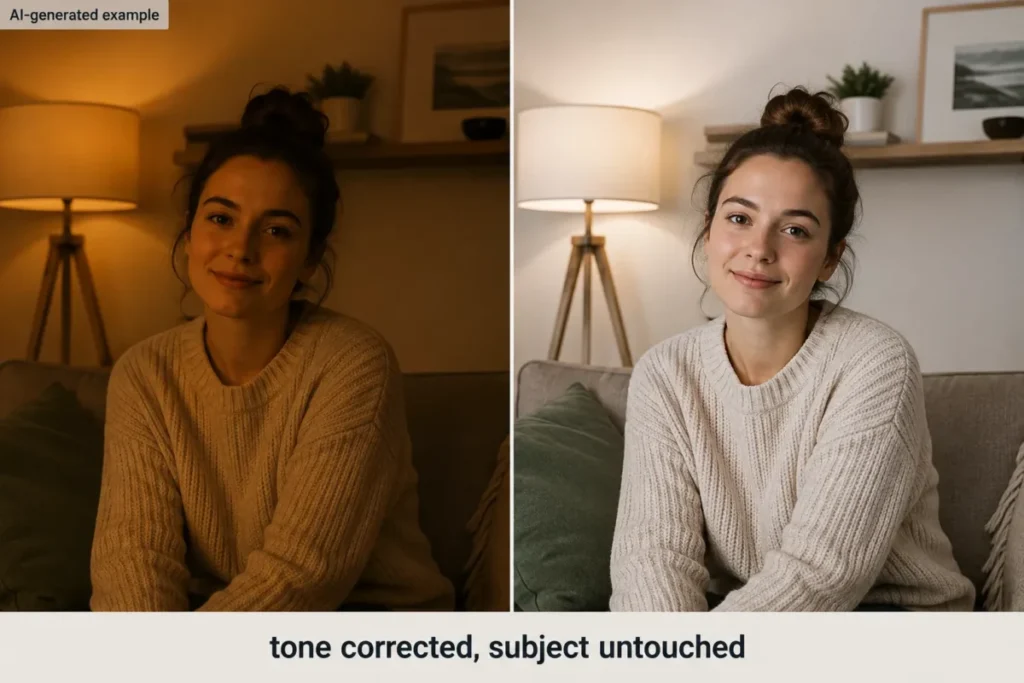
Edit the uploaded photo to correct overall exposure. Recover detail in bright highlights and deep shadows while preserving natural contrast, original skin tones, subject identity, framing, and all existing objects. Do not add or remove anything.
P002. White balance
Correct the white balance in the uploaded photo so neutral areas look neutral and skin tones remain believable. Remove the unwanted COLOR_CAST without changing wardrobe colors, product colors, background content, facial features, or composition.
P003. Color cast removal
Remove the COLOR_CAST from the uploaded photo and restore realistic color relationships. Keep the original subject, lighting direction, texture, camera perspective, crop, and object placement unchanged.
P004. Contrast refinement
Improve tonal contrast in the uploaded photo with clean blacks, readable midtones, and protected highlights. Preserve the original mood, skin texture, facial identity, colors, crop, and background details.
P005. Shadow recovery
Lift blocked shadows only where detail is lost, keeping the scene dimensional and realistic. Do not flatten the lighting or alter the subject, face, clothing, background, color palette, or framing.
P006. Highlight recovery
Reduce clipped-looking highlights and restore plausible detail in bright areas while preserving the original light source and scene. Keep the subject, skin texture, colors, composition, and background unchanged.
P007. Noise reduction
Reduce visible digital noise and chroma speckling while preserving fine texture, hair strands, skin detail, fabric weave, edge sharpness, and facial identity. Avoid plastic-looking smoothing or invented detail.
P008. Sharpen a soft photo
Improve perceived sharpness in the uploaded photo without creating halos or changing facial features. Prioritize eyes, hair, and important subject edges while preserving natural skin texture, original lighting, crop, and background.
P009. Lens distortion correction
Correct obvious wide-angle or perspective distortion while keeping the subject proportionate and the composition as close as possible to the source. Do not redesign the scene or change facial identity.
P010. Horizon straightening
Straighten the visible horizon and make only the minimum crop needed. Preserve the subject scale, scene content, lighting, colors, and perspective; do not add new objects.
P011. Perspective correction
Correct converging verticals and perspective skew in the ARCHITECTURE_OR_INTERIOR while retaining a natural camera viewpoint. Preserve furniture, signage, textures, lighting, and scene content.
P012. Dust and sensor spot cleanup
Remove small dust spots and sensor marks from smooth areas such as sky or walls. Reconstruct only the affected pixels and keep every intentional object, texture, edge, and lighting gradient unchanged.
P013. Minor blemish cleanup
Remove only TEMPORARY_BLEMISHES and stray distractions from the subject while preserving pores, freckles, moles, facial structure, age cues, identity, makeup, and natural skin texture.
P014. Compression artifact cleanup
Reduce blockiness, ringing, and compression artifacts in the uploaded image while preserving real edges, text, facial identity, fine texture, colors, and original composition.
P015. Natural overall enhancement
Make a restrained overall enhancement: balanced exposure, neutral color, clean contrast, and subtle clarity. Preserve the photograph's identity, subject, textures, lighting direction, crop, background, and documentary character.
Portraits, headshots, people, and pets (P016 to P035)
Every prompt in this group names the face before it names the change, because identity is the first thing a generative edit gives away. Read the preserve clauses as the working part of the instruction and the style words as the decoration.
If the target is a professional profile photo rather than a portrait in general, the headshot-specific prompts and LinkedIn specs set narrows this group to that one job.
P016. Professional headshot cleanup
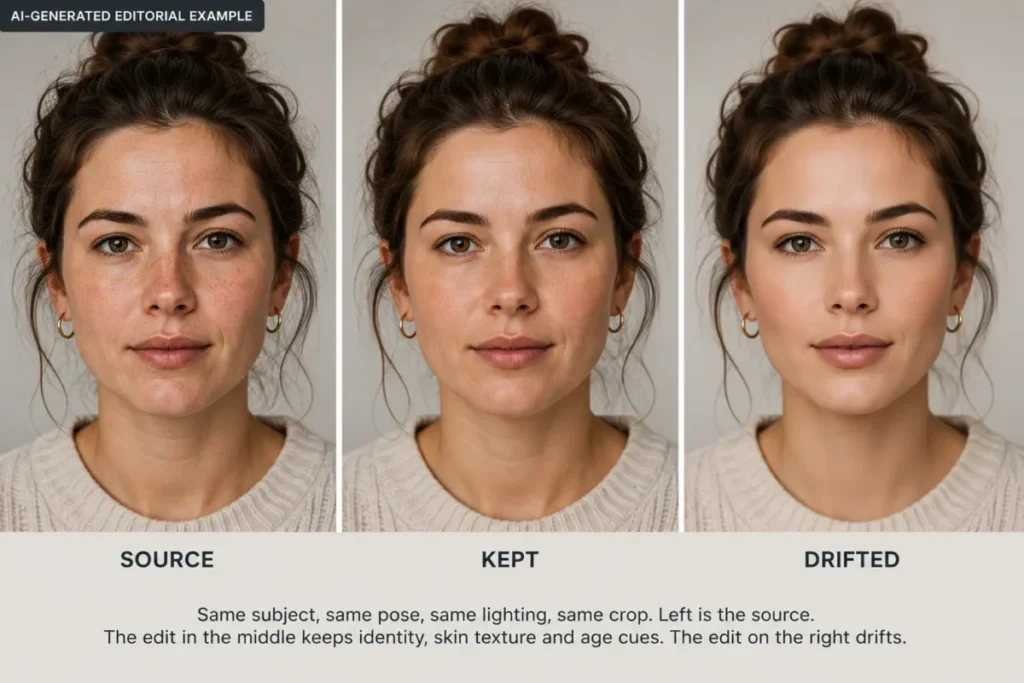
Refine this portrait into a polished professional headshot. Keep the person's exact facial identity, age, skin tone, hairstyle, expression, clothing, and body proportions. Clean minor distractions, balance light, and use a simple BACKGROUND_STYLE without over-retouching.
P017. Natural skin retouch
Retouch the portrait naturally. Reduce temporary blemishes and uneven redness while preserving pores, fine lines, freckles, facial structure, skin tone, and identity. Do not reshape the face or create glossy plastic skin.
P018. Under-eye correction
Soften temporary under-eye darkness slightly while preserving natural eye shape, eyelids, wrinkles, skin texture, age cues, and facial identity. Keep the original lighting believable and avoid a beauty-filter look.
P019. Flyaway hair cleanup
Remove only distracting flyaway hairs that cross the face or background. Preserve the hairstyle, hairline, texture, curl pattern, color, facial identity, and original lighting.
P020. Teeth tone correction
Reduce unnatural yellow color cast on the visible teeth very subtly. Preserve tooth shape, spacing, texture, lips, facial features, skin tone, and identity; do not make the teeth unnaturally bright.
P021. Glasses glare reduction
Reduce distracting glare on the eyeglass lenses while preserving the exact frames, eye shape, iris color, facial identity, reflections that make sense, and the original lighting direction.
P022. Portrait background blur
Add a realistic shallow depth-of-field effect to the background only, as if photographed at APERTURE_LOOK. Keep the subject edges, hair detail, face, clothing, lighting, and foreground sharp and unchanged.
P023. Studio gray backdrop
Replace only the background with a continuous neutral gray studio backdrop. Preserve the person exactly, including face, hair, clothing, pose, body proportions, edge detail, and original key-light direction. Add only a subtle believable contact shadow if needed.
P024. Warm editorial portrait
Give the portrait a restrained warm editorial grade with soft highlights and rich but natural skin tones. Preserve facial identity, texture, expression, clothing colors, composition, and lighting direction.
P025. Cool corporate portrait
Apply a clean cool-neutral corporate color grade without making skin gray or cyan. Preserve facial identity, natural skin texture, wardrobe color, background geometry, crop, and expression.
P026. Square profile crop
Reframe this portrait for a professional 1:1 profile image with comfortable headroom and a centered eye line. Do not alter facial features, expression, hairstyle, clothing, or lighting; extend background only if needed.
P027. Resume headshot at 4:5
Create a 4:5 professional headshot crop with the face and shoulders naturally framed. Preserve identity, proportions, expression, hairstyle, wardrobe, and lighting; do not invent formal clothing.
P028. Remove temporary facial shine
Reduce only distracting specular shine on the forehead, nose, or cheeks while retaining realistic highlights, pores, skin texture, skin tone, facial identity, and original light direction.
P029. Beard and hair detail recovery
Improve definition in beard and hair texture without changing hairline, density, color, facial structure, or identity. Avoid invented strands, painted texture, or excessive sharpening.
P030. Makeup color correction
Correct makeup color so it looks consistent with the original lighting and skin tone. Preserve the exact makeup design, facial structure, skin texture, identity, and expression.
P031. Eye brightness correction
Increase catchlight clarity and eye brightness subtly while preserving iris color, pupil shape, eyelids, eye size, expression, facial identity, and natural lighting.
P032. Plain ID-style background
Replace only the background with a plain BACKGROUND_COLOR suitable for a simple ID-style portrait. Preserve the person's face, hair, skin tone, expression, clothing, proportions, and edge detail exactly.
P033. Outdoor portrait relight
Balance harsh outdoor portrait lighting by softening deep facial shadows and controlling highlights while preserving sun direction, facial identity, skin texture, background, clothing colors, and scene realism.
P034. Group portrait consistency
Balance exposure and color across every person in this group portrait. Preserve each person's face, age, skin tone, expression, body shape, clothing, position, and relationship to others. Do not merge, remove, or duplicate people.
P035. Pet portrait cleanup
Clean distractions and improve light in this pet portrait while preserving the animal's exact markings, eye color, fur pattern, body shape, pose, collar, and background relationship. Avoid changing breed-specific features.
Background replacement, compositing, and object edits (P036 to P050)
A background swap is a compositing job wearing a one-line disguise. Each template below carries the four constraints that decide whether the result reads as one photograph: subject scale, camera angle, light direction, and contact shadow.
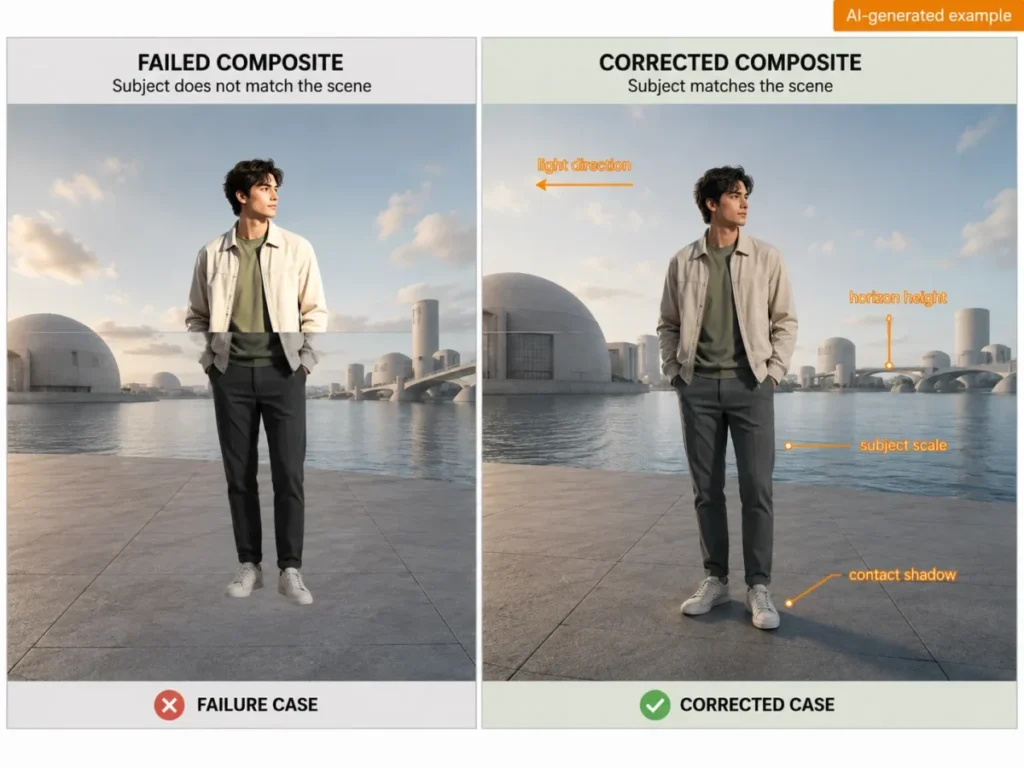
P036. Clean background replacement
Replace only the existing background with DESIRED_BACKGROUND. Preserve the main subject exactly, including face, hair, pose, clothing, scale, edge detail, and camera perspective. Match background lighting, depth of field, color temperature, and contact shadows to the subject.
P037. Office background
Place the unchanged subject in a modern professional office with subtle depth of field. Keep facial identity, clothing, pose, proportions, edge detail, and camera angle unchanged; match the office lighting and perspective to the original subject.
P038. Outdoor park background
Replace the background with a realistic leafy park at TIME_OF_DAY while preserving the subject exactly. Match light direction, color temperature, lens depth, horizon level, and contact shadows so the composite looks photographed in one scene.
P039. Studio paper backdrop
Replace the background with a continuous BACKDROP_COLOR paper sweep. Preserve subject edges, hair strands, face, product shape, pose, and original perspective. Add only physically plausible floor and contact shadows.
P040. Beach background
Place the unchanged subject on a realistic BEACH_DESCRIPTION. Keep facial identity, clothing, pose, proportions, camera angle, and scale fixed. Match sun direction, ambient color, horizon height, depth of field, and contact shadows.
P041. Urban night background
Replace only the background with a realistic CITY_NIGHT_SCENE with controlled bokeh. Preserve the subject, face, clothing, pose, sharpness, and scale. Match key-light direction, ambient reflections, perspective, and lens depth.
P042. Remove background to plain white
Replace the entire background with clean white while preserving the subject silhouette, transparent or reflective edges, hair detail, product geometry, texture, and original color. Do not add a floor shadow unless requested.
P043. Transparent-background preparation
Isolate the main subject cleanly from the background, preserving fine hair, fur, translucent edges, and product contours. Keep subject colors, geometry, texture, and identity unchanged. Prepare a transparent-background result where supported.
P044. Remove an unwanted person
Remove only the PERSON_TO_REMOVE from the scene. Reconstruct the occluded background using nearby geometry, texture, lighting, and perspective. Preserve every other person, face, object, sign, shadow, and composition unchanged.
P045. Remove a small object
Remove only OBJECT_TO_REMOVE and reconstruct the area behind it from surrounding texture, edges, lighting, reflections, and perspective. Do not change nearby objects or the overall composition.
P046. Add one object
Add OBJECT_TO_ADD at PLACEMENT with realistic scale, perspective, occlusion, texture, lighting, and shadow. Preserve all existing subjects, faces, objects, text, colors, and framing unchanged.
P047. Move one object
Move OBJECT_TO_MOVE from ORIGINAL_POSITION to NEW_POSITION. Preserve its size, design, texture, and orientation unless required by perspective. Reconstruct the vacated area naturally and keep all other scene elements unchanged.
P048. Season change
Change only the environment from CURRENT_SEASON to TARGET_SEASON while preserving buildings, people, faces, products, geometry, camera angle, and composition. Make vegetation, sky, ground detail, and light physically consistent with the target season.
P049. Time-of-day change
Change the scene from CURRENT_TIME to TARGET_TIME while preserving subject identity, architecture, object placement, camera angle, and composition. Update sky, ambient light, shadows, window light, and reflections consistently.
P050. Weather change
Change only the weather to TARGET_WEATHER while preserving all people, faces, buildings, vehicles, object placement, camera perspective, and composition. Update sky, surface reflections, atmosphere, and lighting coherently.
Lighting, white balance, and color grading (P051 to P065)
Relighting is the edit most likely to succeed visually and fail physically. Every template names one light direction and asks for shadows that agree with it, because a portrait lit from the left with shadows falling left is the tell that gives an edit away.
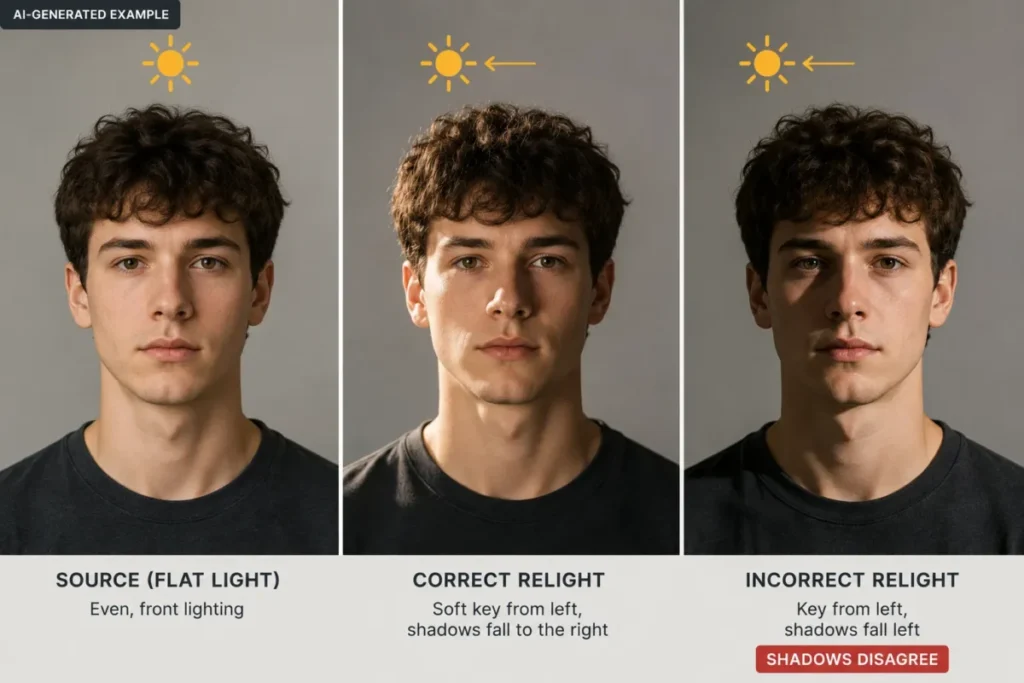
P051. Golden hour relight
Relight the scene to warm golden hour while preserving subject identity, textures, object geometry, composition, and camera perspective. Use a single coherent low-angle light direction, warm highlights, cooler open shadows, and realistic contact shadows.
P052. Soft window light
Relight the portrait with soft directional window light from SIDE while preserving facial identity, skin texture, expression, hairstyle, clothing, and background geometry. Keep shadows soft but dimensional.
P053. Overcast soft light
Convert harsh direct light into soft overcast daylight while preserving the subject, face, colors, textures, object placement, and composition. Reduce hard shadows without flattening the scene completely.
P054. Studio key and fill
Create a realistic studio portrait lighting setup with a soft key from SIDE and gentle fill from the opposite side. Preserve face, skin texture, body proportions, clothing, background, and camera angle.
P055. Dramatic rim light
Add a restrained rim light around the subject from SIDE while preserving the existing face, skin tone, clothing, pose, background, and primary light direction. The rim light should follow real edges and not create a glowing outline.
P056. Cinematic teal and warm grade
Apply a restrained teal-and-warm cinematic grade while preserving natural skin tone, neutral objects, product colors, exposure detail, facial identity, and scene lighting. Avoid extreme saturation.
P057. Muted film grade
Apply a soft muted film-inspired color grade with gentle contrast and subtle grain. Preserve skin tone, facial identity, product colors, fine texture, composition, and lighting direction.
P058. Black-and-white conversion
Convert the photo to a rich natural black-and-white image with readable skin tones, controlled highlights, deep but detailed shadows, and preserved texture. Do not alter subject identity or composition.
P059. Warm white-balance shift
Shift the overall white balance slightly warmer by DEGREE_OF_WARMTH while preserving neutral reference objects, natural skin tones, product colors, exposure, texture, and composition.
P060. Cool white-balance shift
Shift the image slightly cooler while preserving natural skin tone and neutral objects. Keep subject identity, original exposure, scene content, texture, and composition unchanged.
P061. Selective color correction
Correct only TARGET_COLOR so it appears DESIRED_COLOR while preserving material texture, reflections, shading, neighboring colors, object geometry, text, and all unrelated areas.
P062. Sky tone correction
Improve the sky's color and tonal detail without replacing its cloud structure or changing the landform below. Preserve horizon edges, reflected sky color, overall light direction, people, and foreground exposure.
P063. Indoor mixed-light correction
Neutralize conflicting tungsten and daylight casts in this indoor photo while keeping the scene believable. Preserve skin tone, product colors, lamp warmth where appropriate, subject identity, textures, and composition.
P064. Food color refinement
Refine white balance, contrast, and saturation so the food looks appetizing but realistic. Preserve the exact dish, ingredients, plating, texture, shadows, background props, and camera angle.
P065. Product color fidelity
Correct lighting and color so PRODUCT_COLOR matches the intended real-world color as closely as the source supports. Preserve product geometry, label text, material finish, edges, highlights, shadows, and background.
Restoration and repair (P066 to P075)
Restoration has one failure mode worth naming: the model modernizes the people. Faces get smoothed into a current beauty standard, period clothing loses its texture, and the photograph stops being a document.
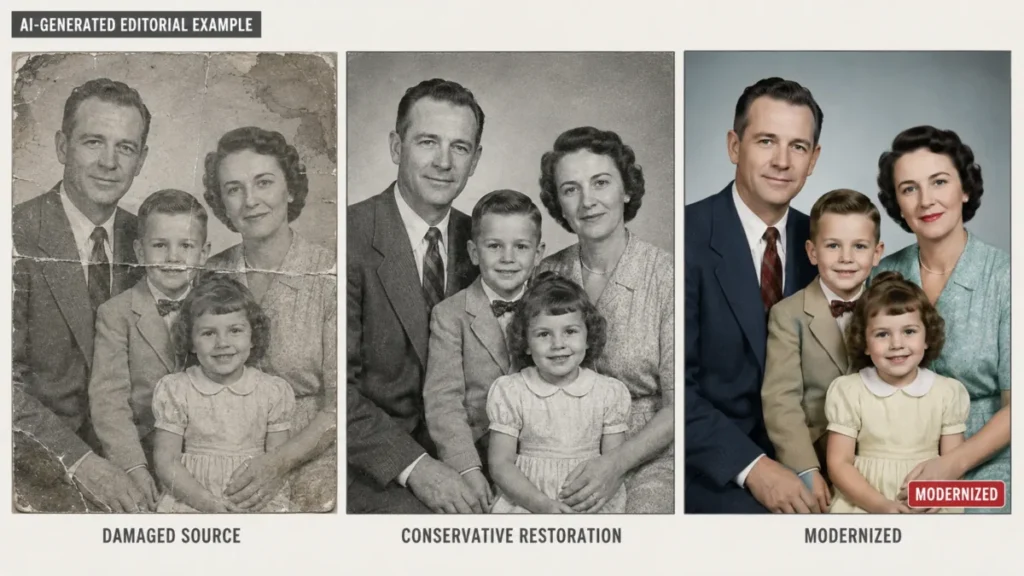
P066. Old photo restoration
Restore the scanned old photograph by reducing dust, scratches, stains, fading, and minor tears while preserving every person's facial identity, age cues, hairstyle, clothing, pose, background, and original photographic character. Do not modernize faces.
P067. Scratch removal
Remove only visible SCRATCHES and reconstruct the damaged pixels using surrounding tone and texture. Preserve facial features, hair, clothing, text, edges, grain, and composition.
P068. Crease repair
Repair the physical crease across the photo by reconstructing only the missing or distorted detail. Preserve faces, body shapes, clothing, objects, background geometry, grain, and original tonal style.
P069. Faded photo recovery
Recover contrast and color from this faded photograph conservatively. Preserve original skin tones, clothing hues, film character, grain, faces, composition, and historical details; do not invent saturated modern colors.
P070. Colorize an old photo
Colorize this monochrome photo with historically plausible, restrained colors while preserving facial identity, texture, clothing details, architecture, lighting, and grain. Keep uncertain colors conservative rather than inventing vivid details.
P071. Torn edge reconstruction
Reconstruct only the missing TORN_EDGE_AREA by extending visible background patterns, architecture, or environment logically. Do not change the intact central subject, face, text, or composition.
P072. Motion blur reduction
Reduce mild motion blur where recoverable while preserving facial identity, object geometry, fine texture, and original lighting. Do not invent sharp details that are unsupported by the source.
P073. Low-detail source cleanup
Improve clarity of this low-detail photo conservatively. Reduce artifacts and enhance readable edges while preserving facial identity, text shapes, object geometry, skin texture, and original composition. Avoid hallucinated micro-detail.
P074. Red-eye correction
Correct only the red-eye effect while preserving iris color, pupil size, catchlights, eyelid shape, expression, facial identity, skin texture, and lighting.
P075. Water stain cleanup
Remove visible water stains and discoloration from the scanned photo while preserving the underlying faces, clothing, textures, edges, grain, and tonal character. Reconstruct only where the source pattern supports it.
Product and ecommerce photo editing (P076 to P087)
Commercial edits carry a consequence the rest of this library does not: a rewritten label or a reshaped bottle is a listing that misrepresents the item. These prompts lock geometry, typography, material finish, and real color before they ask for anything pretty.
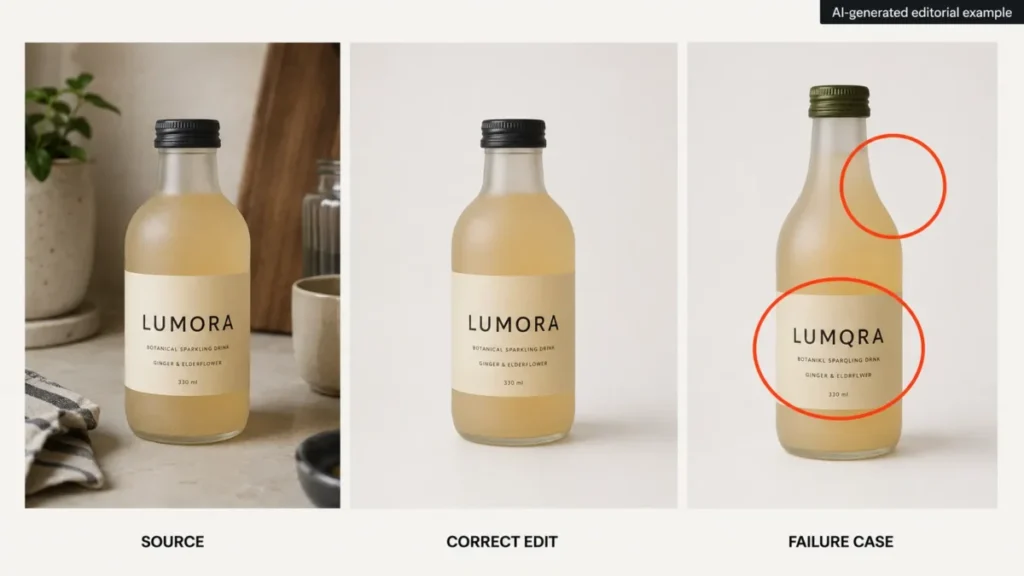
P076. Marketplace white background
Place PRODUCT on a clean white background while preserving exact geometry, proportions, material texture, brand marks, label text, color, and surface finish. Use a subtle realistic grounding shadow only if it does not obscure the product.
P077. Soft gray ecommerce background
Replace the background with a soft neutral gray studio surface. Preserve PRODUCT geometry, label text, color, texture, reflections, edges, and camera angle exactly; add a realistic contact shadow and no new props.
P078. Remove product dust
Remove only dust, fingerprints, and temporary surface smudges from PRODUCT. Preserve material texture, scratches that are part of the product, label text, geometry, color, reflections, and edges.
P079. Product shadow refinement
Refine the product's contact shadow so it is soft, physically plausible, and consistent with the existing key light. Preserve product geometry, label text, color, reflections, background, and camera angle.
P080. Transparent product cutout
Isolate PRODUCT cleanly for a transparent-background asset. Preserve fine edges, holes, transparent parts, reflective surfaces, label text, shape, and color. Do not redesign or simplify the product.
P081. Lifestyle kitchen scene
Place the unchanged PRODUCT in a realistic modern kitchen lifestyle scene. Preserve geometry, packaging, logo, label text, color, and scale. Match camera perspective, lighting, reflections, depth of field, and contact shadow.
P082. Lifestyle desk scene
Place the unchanged PRODUCT on a realistic desk in CONTEXT while preserving all packaging details, text, geometry, material finish, and color. Match scale, perspective, ambient reflections, and contact shadow.
P083. Bottle reflection cleanup
Clean distracting reflections on the bottle while preserving its shape, transparency, liquid color, cap, label typography, logo, highlights that define the material, and background.
P084. Jewelry cleanup
Improve this jewelry product photo by removing dust and controlling harsh reflections while preserving exact gemstone count, setting geometry, metal color, engraving, proportions, and surface texture.
P085. Apparel wrinkle reduction
Reduce only distracting temporary wrinkles in the garment while preserving fabric texture, seams, stitching, print placement, logos, fit, body shape, lighting, and color.
P086. Food packaging fidelity
Clean and balance this packaged-food product photo while preserving every word, logo, nutrition mark, package shape, color, seal, reflection, and shadow. Do not rewrite or stylize label text.
P087. Multi-angle product consistency
Make exposure, white balance, background tone, and scale consistent across the supplied product images while preserving the exact product design, label text, geometry, color, and unique camera angle of each image.
Creative and editorial treatments (P088 to P105)
This is the only group where transformation is the point, so the preserve lists get shorter and the risk moves elsewhere: a style pass that reshapes a jaw or softens a logo has stopped being a treatment and started being a redraw. The retro 1980s photo prompts are the narrowest version of that trade, with the preserve list written out in full for every variant.
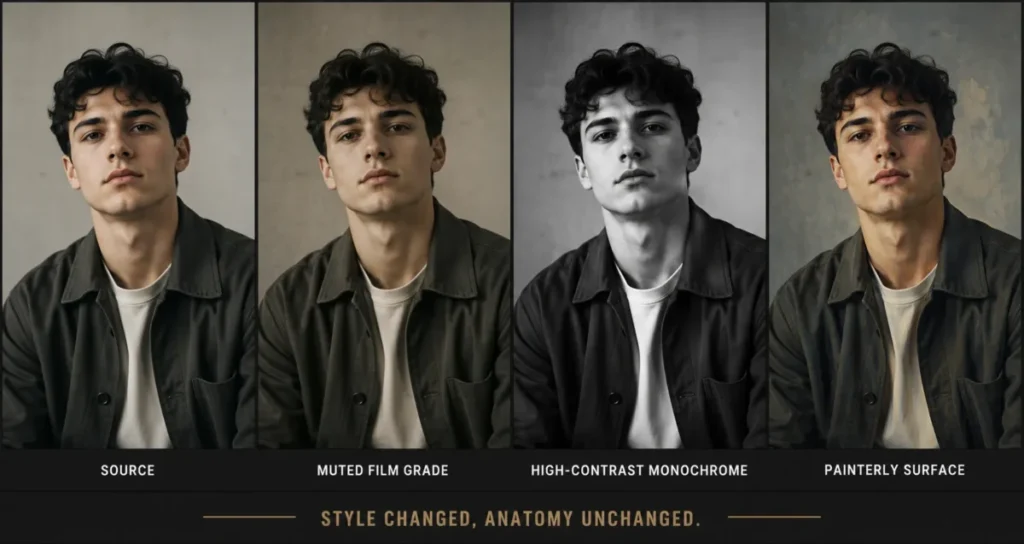
P088. Magazine editorial grade
Give the photo a polished magazine-editorial finish with controlled contrast, refined color, and natural texture. Preserve subject identity, skin detail, wardrobe, composition, and lighting logic.
P089. Minimalist fashion editorial
Restyle the environment into a minimalist fashion-editorial setting with BACKDROP_STYLE while preserving the model's face, body proportions, pose, clothing design, garment color, and camera angle.
P090. Film noir look
Transform the lighting and grade into classic film noir: high-contrast black and white, directional hard light, and deep shadows. Preserve subject identity, pose, clothing, composition, and scene geometry.
P091. Retro 1970s print
Apply a restrained 1970s print-photo aesthetic with warm color, gentle grain, slightly softened contrast, and period-inspired tonal character. Preserve all subjects, faces, clothing, composition, and object details.
P092. 1990s point-and-shoot
Give the photo a 1990s point-and-shoot feel with direct flash character, modest grain, natural color, and casual contrast. Preserve subject identity, pose, wardrobe, and composition.
P093. Y2K flash aesthetic
Apply a clean Y2K-style direct-flash aesthetic with crisp subject exposure, darker ambient background, and restrained cool highlights. Preserve face, skin texture, outfit, pose, and camera framing.
P094. Soft pastel editorial
Apply a soft pastel editorial palette with low-to-medium contrast and airy highlights while preserving skin tone, facial identity, clothing design, product colors that must remain accurate, and composition.
P095. High-fashion monochrome
Create a high-fashion monochrome treatment with sculpted light and rich tonal separation. Preserve the model's exact face, body proportions, pose, garment design, fabric texture, and framing.
P096. Painterly texture without identity drift
Apply a subtle painterly surface treatment to the image while preserving the subject's recognizable facial structure, pose, clothing silhouette, composition, and lighting. Keep the transformation stylistic rather than anatomical.
P097. Graphic poster treatment
Turn the photo into a bold graphic-poster treatment with simplified color blocks and strong contrast while preserving the subject silhouette, recognizable face, pose, composition, and any text that must remain exact.
P098. Dreamy haze
Add a subtle dreamy haze and soft highlight bloom while preserving subject sharpness at the eyes, facial identity, skin texture, clothing, scene geometry, and overall exposure.
P099. Rainy cinematic mood
Transform the atmosphere into a cinematic rainy mood while preserving subject identity, architecture, object placement, and camera angle. Add physically plausible wet-surface reflections, rain density, and cooler ambient light.
P100. Neon night mood
Create a believable neon-night mood using COLOR_PALETTE lighting while preserving face, skin tone, outfit, environment geometry, and camera framing. Add reflections only where surfaces would physically reflect light.
P101. Editorial grain
Add restrained film-like grain that is consistent in size and density across the image. Preserve facial features, text readability, product edges, original detail, colors, and composition.
P102. Selective desaturation
Desaturate the scene while keeping TARGET_COLOR naturally saturated. Preserve subject identity, material texture, lighting, reflections, gradients, and all geometry; avoid artificial edge halos.
P103. Duotone art treatment
Apply a controlled duotone palette using COLOR_ONE and COLOR_TWO while preserving subject silhouette, facial structure, texture hierarchy, composition, and readable text where present.
P104. Soft-focus beauty look
Create a subtle soft-focus beauty effect in highlights and background while keeping eyes, eyelashes, lips, hairline, facial identity, and key garment details crisp. Avoid plastic skin.
P105. Luxury campaign polish
Give the image a refined luxury-campaign finish with clean light, rich but restrained color, precise highlights, and premium tonal separation. Preserve exact product or subject identity, geometry, labels, texture, and composition.
Social formats, outpainting, and text (P106 to P115)
Reframing splits into two different jobs that prompt libraries routinely merge. Cropping removes content you have decided you can lose; extending keeps the original intact and invents new edges, and choosing the wrong one is how a product gets cut in half for a vertical feed.
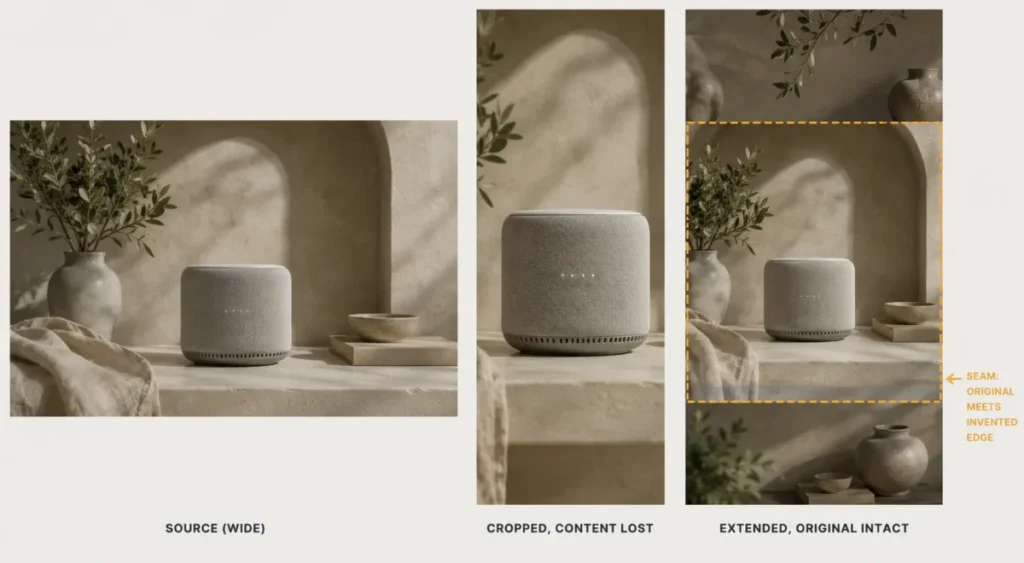
P106. Instagram 4:5 reframe
Reframe the photo to 4:5 for a vertical social post. Preserve the subject scale and key composition; extend only the necessary background or edge content using consistent perspective, texture, and lighting. Do not crop important hands, products, or text.
P107. Story 9:16 outpaint
Extend the image to 9:16 for a vertical story while keeping the original photo intact in the central composition. Continue the background naturally with matching perspective, lighting, texture, and depth; do not alter the main subject.
P108. Square ecommerce crop
Reframe the image to 1:1 while preserving the full PRODUCT and comfortable margins. Extend or crop only background areas as needed; keep product geometry, label text, color, reflections, and shadow unchanged.
P109. Wide banner outpaint
Extend the image horizontally to TARGET_RATIO for a banner. Keep the main subject unchanged and positioned at SUBJECT_POSITION. Continue the environment with matching horizon, perspective, lighting, texture, and depth.
P110. Add a short headline
Add the exact text "HEADLINE_TEXT" at PLACEMENT. Use TYPOGRAPHY_STYLE, SIZE_RELATIONSHIP, and TEXT_COLOR. Keep the wording exactly as supplied, maintain legibility and spacing, and do not cover the main subject.
P111. Replace existing short text
Replace only the visible text "OLD_TEXT" with "NEW_TEXT" while preserving the sign, package, surface perspective, material texture, lighting, font character where possible, and every other part of the image.
P112. Remove a text overlay
Remove only the TEXT_OVERLAY and reconstruct the pixels beneath it from surrounding texture, gradient, and scene detail. Preserve all subjects, faces, objects, logos that are not part of the overlay, and composition.
P113. Thumbnail contrast polish
Optimize the photo for small-thumbnail clarity by improving local contrast around the main subject and simplifying only distracting background tone. Preserve facial identity, object geometry, text accuracy, and original composition.
P114. Safe text space
Extend the background toward SIDE to create clean negative space for future text while preserving the subject, face, product, existing composition, lighting, and perspective. Do not insert any text.
P115. Multi-format crop set
Create composition guidance for 1:1, 4:5, and 16:9 versions of this same image. Preserve the subject and important objects in every version; use background extension rather than altering identity, product geometry, or text.
Advanced local and multi-reference editing (P116 to P123)
The last eight are the ones worth writing carefully. A local edit and a multi-reference composite both ask the model to hold most of the frame still while rebuilding a piece of it, and both fail quietly rather than visibly.
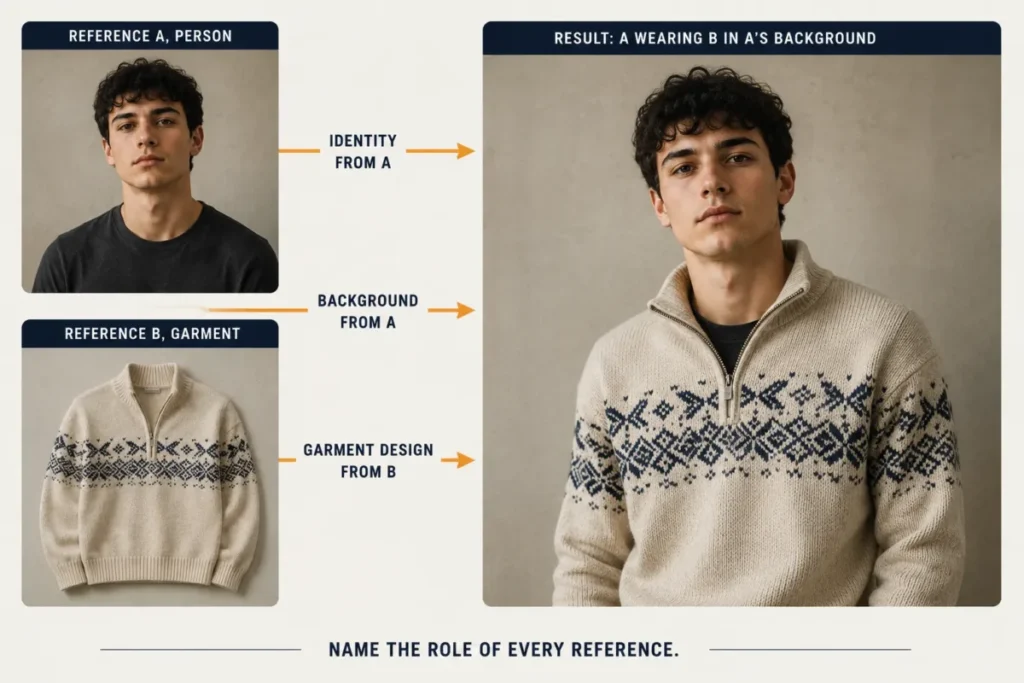
P116. Local clothing color edit
Change only the COLOR_TARGET_AREA of the clothing from ORIGINAL_COLOR to NEW_COLOR. Preserve fabric weave, folds, seams, logos, shadows, skin, body shape, face, background, and all other colors.
P117. Local eye direction fix
Adjust only the subject's gaze slightly toward TARGET_DIRECTION while preserving eye size, iris color, eyelids, facial expression, facial identity, head pose, skin texture, and lighting. Make no other facial changes.
P118. Local hand distraction cleanup
Correct only the small distracting artifact in HAND_AREA while preserving finger count, pose, jewelry, sleeve, skin tone, body posture, face, background, and overall composition. Keep the correction minimal.
P119. Combine two reference products
Create one scene using PRODUCT_A from reference A and PRODUCT_B from reference B. Preserve each product's exact geometry, color, logos, label text, and material finish. Match scale, perspective, lighting, reflections, and shadows in the shared scene.
P120. Wardrobe swap from a reference
Use the garment in REFERENCE_B on the person in REFERENCE_A while preserving the person's exact face, hairstyle, body proportions, pose, skin tone, and background. Preserve the garment's design, fabric, pattern, and color; adapt only its fit to the pose.
P121. Background from a reference
Use the environment from REFERENCE_B as the background for the subject in REFERENCE_A. Preserve the subject's face, pose, clothing, scale, and edges. Match camera perspective, horizon, lighting direction, color temperature, depth of field, and contact shadows.
P122. Style transfer from a reference
Apply the visual color and texture language of REFERENCE_B to REFERENCE_A while preserving the subject's identity, scene structure, composition, object geometry, and important text. Transfer style, not content or anatomy.
P123. Iterative repair prompt
Revise the previous edit by changing only ERROR_AREA. Restore ORIGINAL_DETAIL_DESCRIPTION and keep every correctly edited area exactly as it is. Do not recompose the image, change the face, alter colors outside ERROR_AREA, or introduce new objects.
Common AI Photo Editing Prompt Mistakes
These eight account for most of the results people quietly delete. Each one has a fix you can apply inside the prompt rather than in another round of retries.
- Asking for two changes in one run. “Replace the background and warm up the skin tones” gives the model permission to renegotiate both, and when one lands you cannot tell which instruction caused the other to drift. Split it: background first, accept it, then grade.
- Describing a mood instead of a finished state. “Make it cinematic” is a request the model has to interpret, and its interpretation includes contrast, color, grain, and sometimes composition. “Warm low-angle sunlight from the left, cooler open shadows, no change to framing” is a request it can execute.
- Leaving out the preserve sentence. This is the single most common defect in copy-paste prompt libraries. Without it, everything in the frame is fair game, and faces are the first thing to move.
- Trusting a selection to act as a boundary. OpenAI documents that highlights are not always precise and that edits can extend past the selected area, so a selection narrows intent rather than fencing it. Keep the preserve clause even when you have selected a region, and inspect the pixels just outside it.
- Writing an edit instruction into a Midjourney Image Prompt. The documentation is explicit that the text should describe everything you want in the final image rather than instructions for changing the reference. “Keep the person identical and swap the background” is not an instruction that mode can honor.
- Replacing a background without matching the light. A subject lit from the right dropped into a scene lit from the left reads as fake before a viewer can explain why. Name light direction, color temperature, horizon height, depth of field, and contact shadow in the same sentence as the new background.
- Retouching without naming what stays. “Smooth the skin” removes pores, fine lines, and freckles, and the result is a person who is recognizably nobody. Restrict the edit to temporary blemishes and uneven color, then list the texture that must survive.
- Accepting an output because the change worked. The change working is one of six things you are checking. The other five are identity, text, geometry, edges, and everything that moved without being asked.
The Four-Step Repair Ladder
Most partial failures get rewritten from scratch, which discards the parts that worked and rolls the dice again. Repair the failed region instead.
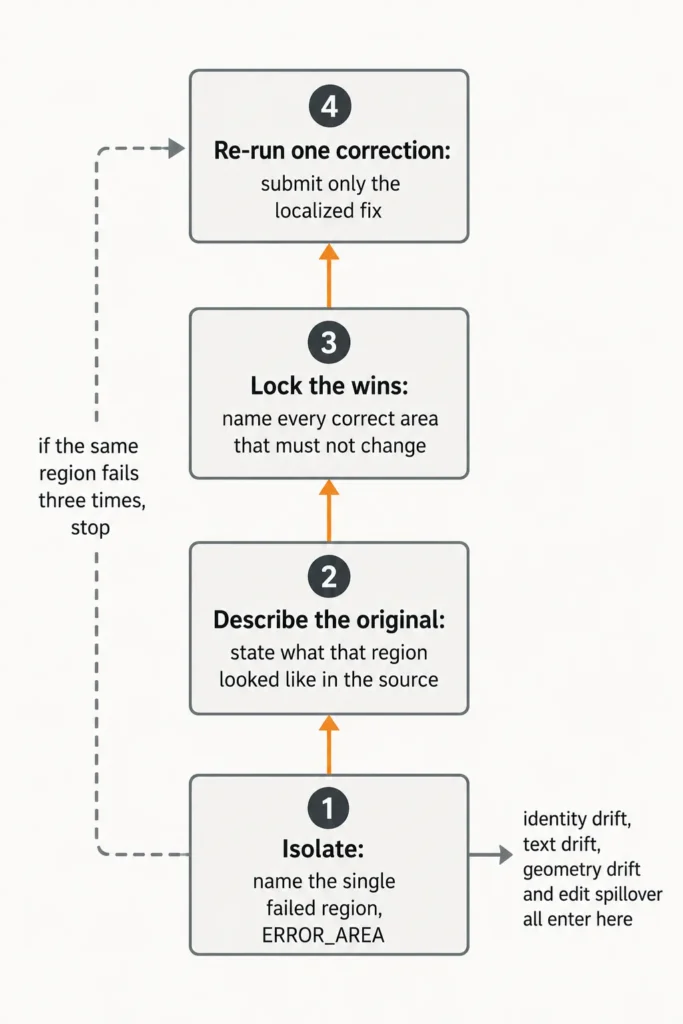
Step one names the failure precisely: not “the face looks off,” but “the left eyebrow is thicker and the jawline is wider than in the source.” A vague fault description produces a vague correction.
Step two describes what should be there, in the language you would use to a retoucher. The model cannot see your source and your output side by side the way you can.
Step three protects the run you just paid for. List the parts that came back right, by name, so the correction pass does not undo them.
Step four submits the smallest possible change, routed to a local mode where one exists: a region selection in ChatGPT, a directly described region in Gemini, Vary Region or the Erase brush in the Midjourney Editor. P123 in the library above is the template for exactly this pass.
If three repair rounds have not fixed the same region, the prompt is not the problem. Either the source image does not support the edit, or the job needs a deterministic editor rather than a generative one.
Prompt Validation Checklist
Run the first block before you submit and the second after the result comes back. Both are copyable.
BEFORE YOU RUN

1.  One primary editing action is obvious from the first sentence.
2.  The exact target area is named, not implied.
3.  PRESERVE_ELEMENTS lists identity, geometry, text, and protected scene elements.
4.  Spatial relationships use explicit locations: left, right, foreground, background.
5.  Lighting direction, color temperature, perspective, and shadows agree with each other.
6.  Exact text sits inside quotation marks with placement, size relationship, and color.
7.  An aspect-ratio change states whether it is a crop or a background extension.
8.  No two instructions contradict each other.
9.  The syntax matches the workflow; Image Prompt text describes the final image.
10. No unreplaced capitalized variables remain in the prompt.
AFTER THE RESULT COMES BACK

1.  Identity: face, age, markings, proportions, and expression match the source.
2.  Text: every character on every label, sign, and overlay is unchanged or exactly as specified.
3.  Geometry: product shape, architecture, and body proportions are unaltered.
4.  Edges: hair, fur, transparency, and cutout boundaries are clean, not smeared.
5.  Light: shadow direction and color temperature agree across subject and scene.
6.  Perspective: horizon, camera angle, and subject scale are consistent.
7.  Spillover: nothing outside the target area moved.
8.  Additions: no object, reflection, or detail appeared that you did not request.
9.  Omissions: nothing present in the source has quietly disappeared.
10. Detail honesty: recovered detail is plausible for the source, not invented sharpness.
One failure means repair that area. Two or more failures on the same run means the prompt is underspecified, so rewrite it before running again rather than rolling for a better outcome.
Not every job carries the same risk, and the checks worth spending time on shift with the edit type.
| Edit type | What breaks first | Check hardest |
|---|---|---|
| Tonal and color correction | Skin tone and neutral objects | Color accuracy on faces and products |
| Retouching | Skin texture and facial structure | Identity against the source at full size |
| Background replacement | Light direction and contact shadow | Edge quality and shadow agreement |
| Object removal | Reconstructed texture behind the object | Repeating patterns and perspective lines |
| Text edits | Character accuracy and letter spacing | Every character, read out loud |
| Restoration | Faces modernized, grain erased | Age cues, period detail, film character |
| Product edits | Label typography and geometry | Logo, wording, shape, material finish |
| Aspect-ratio extension | Invented edges and duplicated objects | The seam where original meets extension |
| Multi-reference composites | Which reference supplied what | Identity from A, attributes from B, nothing swapped |
Product and restoration edits sit at the top of that risk order for opposite reasons. One carries a commercial consequence if a label changes; the other carries a personal one if a face does.
Worked Example: One Background Swap, Three Tool Variants
The job: replace a portrait background with a professional office and keep the person identical. Same intent, three different phrasings, because the workflows are not the same.
ChatGPT Images
Edit the uploaded portrait. Replace only the background with a modern professional office
with subtle depth of field. Preserve the person's exact facial identity, age, skin tone,
hairstyle, expression, clothing, pose, body proportions, and edge detail. Match the office
lighting direction, color temperature, camera perspective, depth of field, and contact
shadows to the subject. Keep the person unchanged.
Gemini Apps
Edit the uploaded portrait and change only the background to a modern professional office
with subtle depth of field. Keep the same person, face, age, skin tone, hairstyle,
expression, clothing, pose, proportions, and sharp edge detail. Match the new background's
perspective, light direction, color temperature, depth of field, and contact shadows to the
source portrait. Do not change the subject.
Midjourney Editor
Select or erase only the background region, leaving the person unselected. Prompt:
a realistic modern professional office, subtle depth of field, camera perspective and
horizon matching the source portrait, light direction and color temperature consistent
with the subject, natural contact shadows.
The Midjourney variant is shorter for a structural reason: the region is defined by the brush rather than by the sentence, so the prompt only has to describe what belongs inside it. The Editor returns four options, which makes it the one workflow of the three where you choose the best edge quality rather than accept the only one.
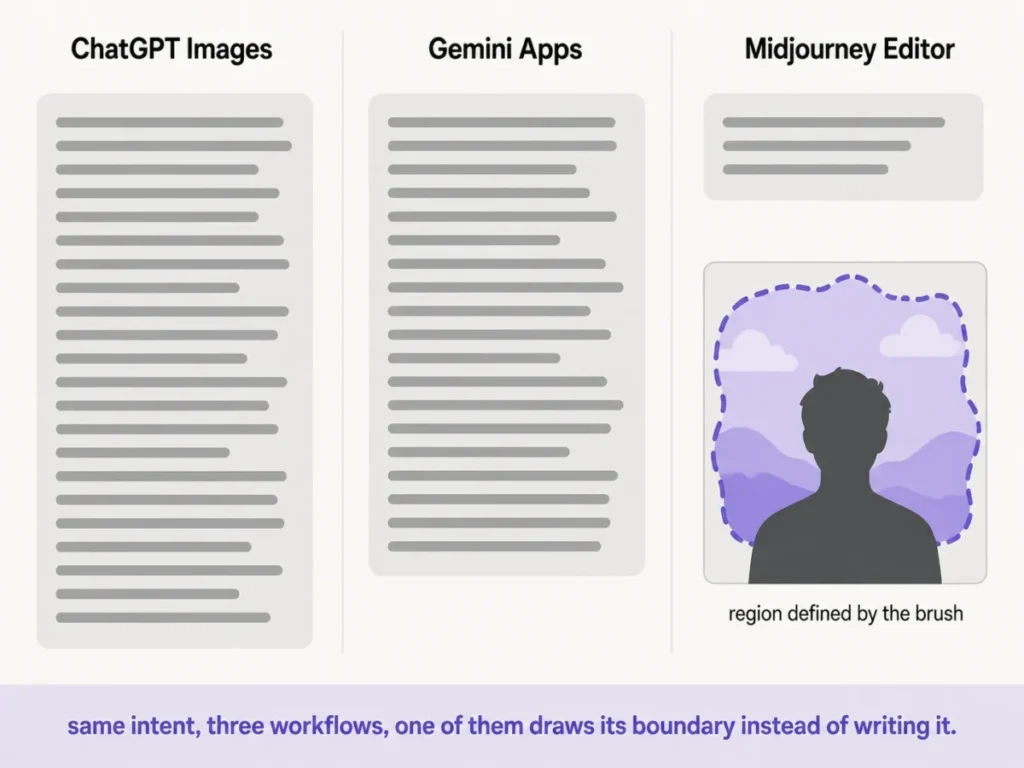
If you are using a Midjourney Image Prompt instead of the Editor, none of these three phrasings applies. Describe the complete finished image, including the person, and treat the result as image-guided generation rather than a preservation edit.
The Midjourney review covers where that distinction sits in the wider product.
When Not to Use an AI Photo Edit
A prompt library is only honest if it names the jobs it should not be pointed at. Nine cases where a generative edit is the wrong tool:
- Evidentiary or forensic images. Any edit alters pixels that were the point of the photograph.
- Identity, government, or insurance documents. An altered image can invalidate the submission and create real consequence for the person who filed it.
- Medical, safety-critical, or engineering imagery. Reconstructed detail looks like observed detail and is not.
- Regulated packaging copy. Nutrition marks, warnings, and required wording need a deterministic editor and a human reading every character.
- Measurements and technical geometry. Generative reconstruction does not preserve dimensional accuracy.
- Someone else’s likeness without permission. The technical ability to swap a face into a scene is not a right to do it.
- Copyrighted visual material as a reference. Use images you own or have permission to edit.
- Small local fixes in a whole-image restyle mode. Route the job to a local mode when the product exposes one.
- Anything you cannot verify. If you cannot compare the output against the source in detail, do not ship it.
There is also a quieter case: edits a conventional editor does better and faster. Cropping, straightening, exposure, and white balance are deterministic operations, and running them through a generative model trades precision for convenience.
The AI photo editor comparison covers where dedicated tools earn their place.
What to Do After You Get a Keepable Result
Accepting an output is not the last step, and three of these are easy to skip.
Keep the source. Every repair pass and every future re-edit starts from the original, not from the accepted output, because each generative pass compounds the drift from the last one.
Record the prompt that worked. A prompt that produced a good edit on one image is a starting template for the next twenty, and reconstructing it from memory a week later never quite works.
Check disclosure before publication. Images created or edited in the Gemini app carry a visible watermark and an invisible SynthID watermark, and platform, client, and marketplace rules on labeling edited imagery are their own decision worth making deliberately.
Name the file for what changed. “portrait-office-bg-v2” survives a handoff; “final_final” does not.
When the next brief is a moving shot instead of a still, the same field discipline carries over into 123 AI video prompts, where the added fields are motion, camera and timing.
If the answer turns out to be that you needed a new image rather than an edited one, that is a different tool decision, and the best AI image generators comparison is the right starting point. For more operational assets in this format, the templates and checklists hub collects the rest.
How These Prompts Were Built
Every workflow statement in this article traces to current official documentation from OpenAI, Google, and Midjourney, including the help centers, product blogs, and prompting guidance published by each company. Those pages were checked on 2026-08-19.
The 123 templates were built against one shared standard: name a single editing job, name the region allowed to change, name what must survive, and give the reader a check that decides acceptance. Prompts that could not carry all four were rewritten until they could.
Greater weight was given to the constraints that protect something a reader cares about: facial identity, product geometry, exact label text, light direction, and the region outside a local edit. Style vocabulary was treated as the least important part of any template.
Capability statements are attributed to the company that published them and describe design goals rather than assured outcomes. Generative output varies with the source image, the model, and the run, so the templates are starting points to validate against your own image.
Frequently Asked Questions
These are the questions the body above does not fully resolve on its own, mostly because they cut across two or three products at once.
Can ChatGPT edit an existing photo?
Yes. OpenAI documents that you can upload an existing image and describe the changes you want, and that you can select part of the image with the selection tool and then describe the change in chat.
How do I tell an AI to edit only one part of a photo?
Name the region explicitly, describe the finished state of that region, and add a sentence listing everything outside it that must stay unchanged. Where the product offers a local mode, use it: a selection in ChatGPT, or Vary Region and the Erase brush in the Midjourney Editor.
How do I keep the same face when editing a photo with AI?
Name the identity attributes you want preserved rather than writing “keep the face the same”: facial identity, age, skin tone, hairstyle, expression, and body proportions. Then compare the output against the source at full size, because consistency is a design goal of these editors and not a guarantee any of them makes.
Why did the AI change pixels outside the area I selected?
Because a selection narrows intent rather than building a boundary. OpenAI states directly that highlights are not always precise and that edits may extend beyond the area you selected, which is why the preserve clause and the post-run inspection both stay in the workflow.
Can Midjourney edit an existing image?
Yes, through the Editor, which accepts an image uploaded from your device or pasted as a URL and offers Remix, Vary Region, Pan, Zoom Out, Smart Select, Erase and Restore brushes, Layers, and Retexture. Image Prompts are a different mode: that text describes the final image you want rather than changes to the reference.
Should I use Vary Region or Retexture in Midjourney?
Use Vary Region when one part of the image changes and the rest stays, since it edits a specific portion without changing the remainder. Use Retexture when the whole image gets a new visual treatment, since it overlays new styles and details while keeping the structure of the original.
Which Gemini model should I use for a photo edit?
Google positions Nano Banana 2 Lite for speed on quick edits, Nano Banana 2 for a balance of speed with higher quality and reliable text rendering, and Nano Banana Pro for the highest consistency and most precise creative control. Route a simple single-image fix to the fast option and a multi-reference composite with readable text to the higher-control one.
How do I make the AI use exactly the text I supplied?
Put the wording in quotation marks, state placement, typography character, size relationship, and color, and keep the string short. OpenAI’s guidance adds one more move worth using: spell an uncommon word out letter by letter, then read every character in the output before accepting it.
How do I change a photo background without changing the person?
Write the background replacement and the preservation clause as one instruction. Then add the four physical constraints that make a composite believable: matched camera perspective, matched light direction and color temperature, matched depth of field, and a contact shadow that agrees with the light.
P036 through P041 in the library above are built this way.
Should I crop or extend an image for a new aspect ratio?
Crop when the content at the edges can be lost without cost. Extend when the subject, a product, or text has to stay intact, and expect the seam between original and invented edge to be the part that needs checking.
Start Your Next Edit
Choose the editing goal first, then copy the closest prompt from the library and replace the defined variables with your own subject, region and constraints.
Upload or select the source image in the appropriate tool workflow, run one focused edit, and validate the result against the source before keeping it.
If it comes back wrong in one place, repair that place. If it comes back wrong in three, the prompt was underspecified, not unlucky.