
Most ChatGPT photo editing prompts fail for one reason: they tell the model what to add and forget to tell it what to leave alone. You ask for a new background, and the face shifts.
You ask to fix one word of text, and the layout moves. This library gives you 100 copy-paste prompts, including prompts for the Sketch, Templates, and image comment tools that arrived with ChatGPT Images 2.5 on 2026-09-08, plus a repeatable way to state what must change and protect what must stay fixed.
That system targets the four failures that ruin most edits: identity drift, wrong text, altered product details, and changed composition.
Use it if you edit existing photos in ChatGPT Images and need publishable results, whether you are a creator, marketer, ecommerce seller, or job seeker. For non-image tasks, the broader ChatGPT prompts hub helps instead.
One boundary up front. This analysis draws on OpenAI’s official ChatGPT Images documentation, the OpenAI Academy guide, developer docs, and one independent 2025 study, all rechecked 2026-09-20 against ChatGPT Images 2.5.
The prompts below are original templates built from that documented behavior. They are starting points you adapt and verify, not guaranteed one-click results, because identity, text, and composition remain documented weak spots.
In This Article (27 sections)
Quick Copy: 10 Most Popular ChatGPT Photo Editing Prompts
These ten cover the edits people ask for most. Each one is reprinted from the library below, so you can paste one now and read the method later. Every block has a Copy button and copies unstyled plain text.
1. Professional headshot (full entry: P6)
Turn this portrait into a professional LinkedIn-style headshot with a simple warm-gray background, soft window light from the front-left, and a chest-up crop. Keep the person's exact identity, facial proportions, skin tone, hairstyle, expression, and clothing details unchanged. Retain natural skin texture.2. Keep my face unchanged (full entry: Preservation Clause Bank)
Apply this edit: [your change]. Keep the exact face, facial proportions, skin tone, hairline, and expression unchanged.3. Remove the background (full entry: C1)
Remove the background and place the subject on a transparent layer, keeping edge detail, hair strands, and the subject unchanged.4. Replace the background (full entry: P1)
Remove the entire background and replace it with a clean neutral light-gray studio backdrop. Keep the subject's face, hair, body shape, clothing, pose, camera angle, and edge detail unchanged. Match the existing light direction and preserve natural shadows.5. Remove an unwanted object (full entry: P42)
Remove the extra object that appeared near the subject's right hand. Reconstruct the hidden background naturally. Keep the subject, hands, fingers, clothing, face, pose, lighting, crop, and every other object unchanged.6. Enhance an old photo (full entry: P26)
Restore this old black-and-white family photo by reducing scratches, dust, stains, and fold marks while preserving every identifiable face, pose, clothing detail, background object, framing, and original grayscale character. Do not invent missing people or objects.7. Product photo on a white background (full entry: P16)
Place the product on a pure white ecommerce background with a soft realistic contact shadow. Keep the product's exact shape, color, dimensions, quantity, logo position, label spelling, packaging text, surface texture, and camera angle unchanged.8. Change the clothing (full entry: P7)
Change only the clothing to a tailored navy business jacket over a plain white shirt. Keep the face, hair, body proportions, pose, hands, background, lighting direction, camera angle, and expression exactly the same. Make the fabric and shadows realistic.9. Golden-hour lighting (full entry: P11)
Relight the scene as soft golden hour with warm light coming from the back-left, gentle rim light around the subject, and natural long shadows. Keep the subject, face, pose, objects, camera angle, geometry, and background layout unchanged.10. 4:5 Instagram crop (full entry: C10)
Recrop this photo to a 4:5 vertical frame with the subject centered. Extend the background naturally and change nothing else.Browse all 100 prompts ↓ , or pick your job in the table below.
Pick Your Edit: Jump to the Right Prompt
Find your job in the left column and jump straight to it. Every prompt block on this page has a Copy button that copies unstyled plain text.
| What you want to do | Prompts | Go to |
|---|---|---|
| Remove an object or a person | P2, P42, C3, IN11 | Precision Fixes and Recovery |
| Replace or clean up a background | P1, C1 | Basic Cleanup |
| Fix a dark, flat, or mixed-light photo | P3, P13, P15, C6 | Lighting and Color |
| Turn a snapshot into a LinkedIn or resume headshot | P6, HS1 to HS8 | Headshot prompts |
| Prepare a product photo for a listing | P16 to P20 | Product and Ecommerce |
| Restyle a room or a property shot | P39, P40 | Composite and Environment |
| Add or fix text inside an image | P23, P43, V8 | Social and Marketing |
| Restore an old or damaged photo | P26 to P30, F6 to F10 | Restoration and Repair |
| Fix a family or group photo | F1 to F10 | Family Photo Prompts |
| Change into a saree or a traditional outfit | IN1 to IN6 | Saree and Traditional Outfit |
| Edit a festival, wedding, or couple photo | IN7 to IN12 | Festival and Wedding |
| Get a trending look or a new profile picture | P25, IN13 to IN18 | Trending Portrait |
| Draw the layout first, then photograph it | V1 to V3 | Sketch Prompts |
| Change one region by commenting on it | V7 to V9 | Image Comment Prompts |
| Undo an edit that went wrong | P41 to P45 | Recovery Prompt Bank |
| Understand why a prompt failed | The five-part formula | The Five-Part Prompt Formula |
Two jobs sit outside this page. If you want to generate a headshot from scratch rather than edit a photo you already have, the dedicated headshot prompt library covers that, including the LinkedIn and US resume rules. If you run the same edit across ChatGPT, Gemini, and Midjourney, the cross-tool prompt library is built for that comparison.
Starter Prompts: Everyday Quick Edits
Start here if you mostly clean up personal photos, portraits, and social snaps. These edits are lower risk because the change is usually one clear property, but identity still drifts if you do not protect it.
Basic Cleanup
Protect the subject, the composition, and the natural texture. Inspect the reconstructed background and the skin texture after each edit.
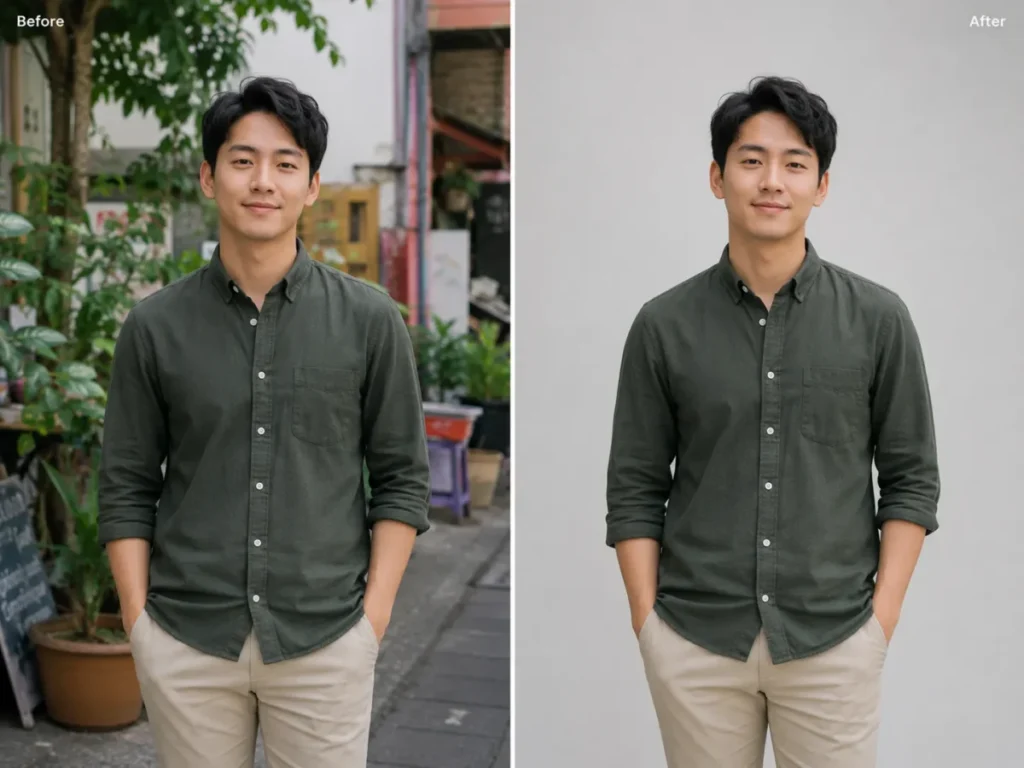
P1.
Remove the entire background and replace it with a clean neutral light-gray studio backdrop. Keep the subject's face, hair, body shape, clothing, pose, camera angle, and edge detail unchanged. Match the existing light direction and preserve natural shadows.
P2.
Remove the distracting person standing in the far-left background only. Reconstruct the wall and floor behind that person so texture, perspective, lighting, and shadows match the original. Keep the main subject and every other object unchanged.
P3.
Correct the exposure and white balance so the photo looks naturally lit by soft daylight. Recover detail in bright and dark areas without changing the subject, facial features, clothing colors, background objects, or composition. Avoid an HDR or over-processed look.
P4.
Reduce visible digital noise and mild compression artifacts while preserving natural skin texture, hair strands, fabric texture, small printed details, and original color. Do not smooth the image into a plastic appearance.
P5.
Clean dust spots, tiny sensor marks, and small temporary blemishes from the image only. Keep permanent facial features, freckles, moles, scars, texture, lighting, and all non-distracting details unchanged.
Portrait and Headshot
This is the highest-drift category in the starter band. One independent 2025 study of 83,000 image-editing requests reported that identity preservation was a recurring failure across the leading editors it evaluated, so treat every portrait output as unverified until you compare it with the source.
Get consent before you edit anyone else’s face.
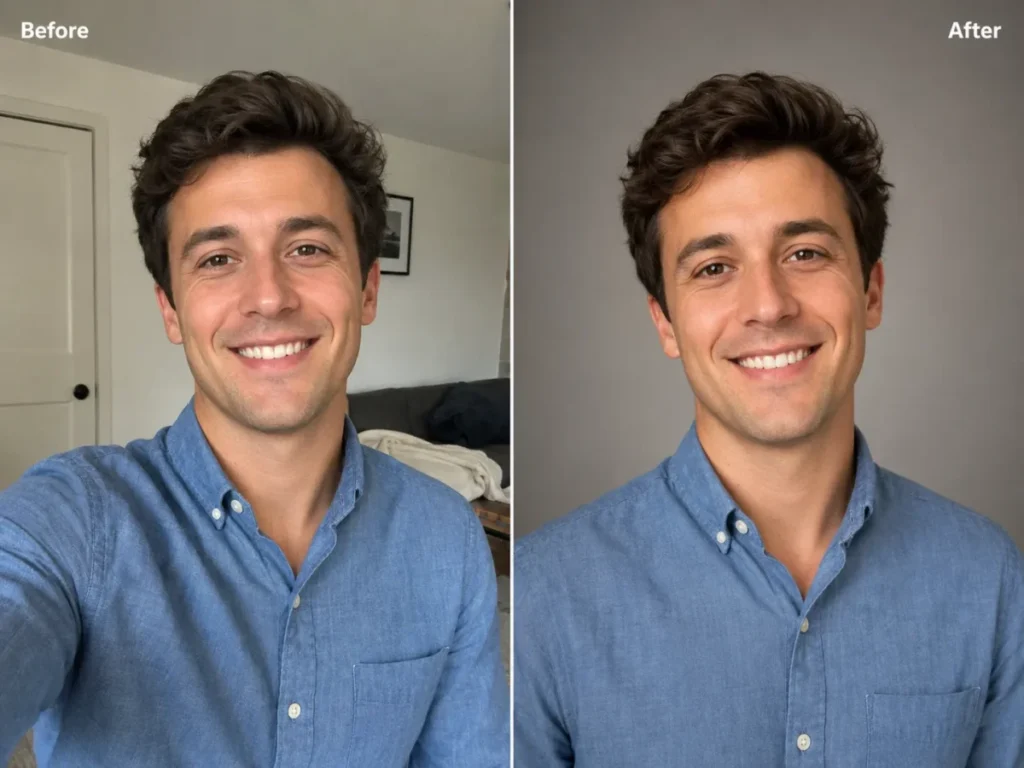
P6.
Turn this portrait into a professional LinkedIn-style headshot with a simple warm-gray background, soft window light from the front-left, and a chest-up crop. Keep the person's exact identity, facial proportions, skin tone, hairstyle, expression, and clothing details unchanged. Retain natural skin texture.
P7.
Change only the clothing to a tailored navy business jacket over a plain white shirt. Keep the face, hair, body proportions, pose, hands, background, lighting direction, camera angle, and expression exactly the same. Make the fabric and shadows realistic.
P8.
Change only the hair color to a natural medium chestnut brown. Preserve the exact hairstyle, hairline, strand direction, face, eyebrows, skin tone, expression, lighting, and background. Do not alter age or facial structure.
P9.
Make the expression slightly warmer by adding a subtle closed-mouth smile. Keep the person's identity, eye shape, nose, jawline, teeth visibility, hairstyle, pose, clothing, background, and lighting unchanged. Avoid exaggerated emotion.
P10.
Create a founder-profile portrait suitable for a company About page. Use a clean modern office background with shallow depth of field and soft natural daylight. Keep the person's exact identity, age, body proportions, clothing, expression, and camera perspective unchanged.
Lighting and Color
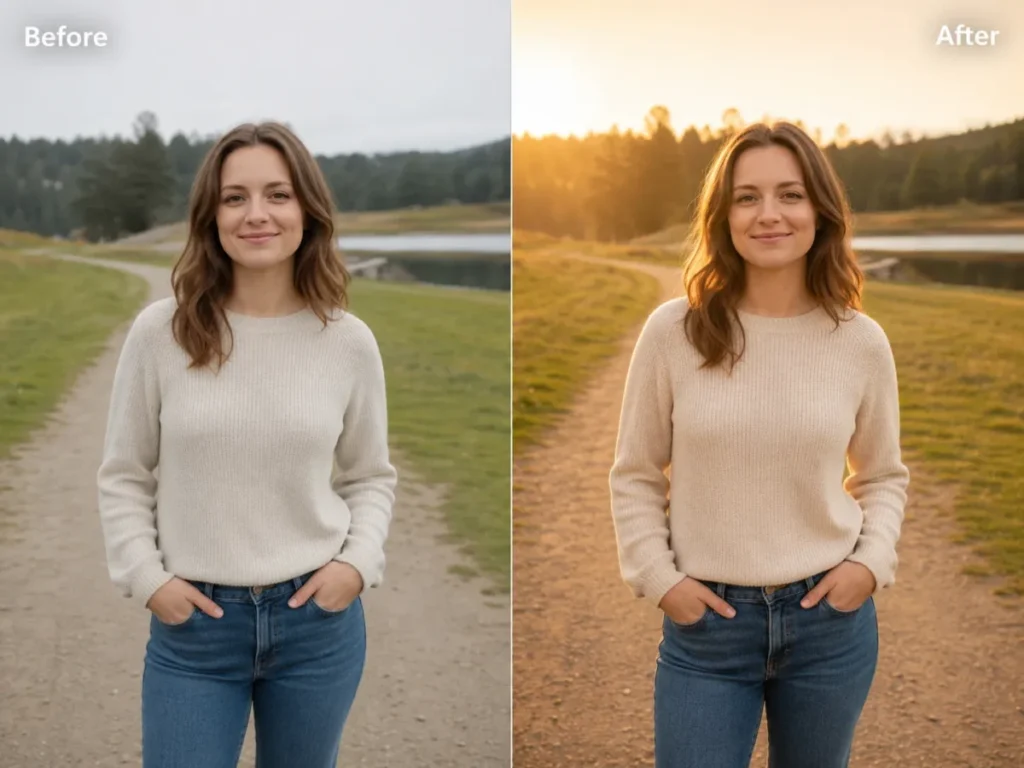
Relighting is forgiving because it rarely needs to touch identity, but it can shift skin tone and background layout if you do not lock them.
P11.
Relight the scene as soft golden hour with warm light coming from the back-left, gentle rim light around the subject, and natural long shadows. Keep the subject, face, pose, objects, camera angle, geometry, and background layout unchanged.
P12.
Apply a subtle cinematic color grade with slightly cooler shadows, gently warmer highlights, natural skin tones, restrained contrast, and fine film grain. Keep all subjects, objects, text, composition, and lighting direction unchanged.
P13.
Convert the harsh overhead lighting into soft diffused window light from the right. Reduce hard facial shadows while preserving the exact identity, skin texture, expression, hair, clothing, background, and camera angle.
P14.
Transform the daytime exterior into a realistic blue-hour scene just after sunset. Preserve the buildings, road layout, vehicles, people, signs, perspective, and weather. Adjust only sky color, ambient light, window glow, and corresponding shadows.
P15.
Create a clean bright editorial look with neutral whites, accurate skin tones, moderate contrast, and soft highlights. Keep the image content, product colors, clothing colors, facial features, background, and composition unchanged. Avoid oversaturation.
Intermediate Prompts: Business and Marketing Assets
Move here when the output has to earn its place in a store listing, an ad, or a customer-facing page. The stakes rise because a wrong label, a changed price, or a distorted product is unusable, not just imperfect.
Product and Ecommerce
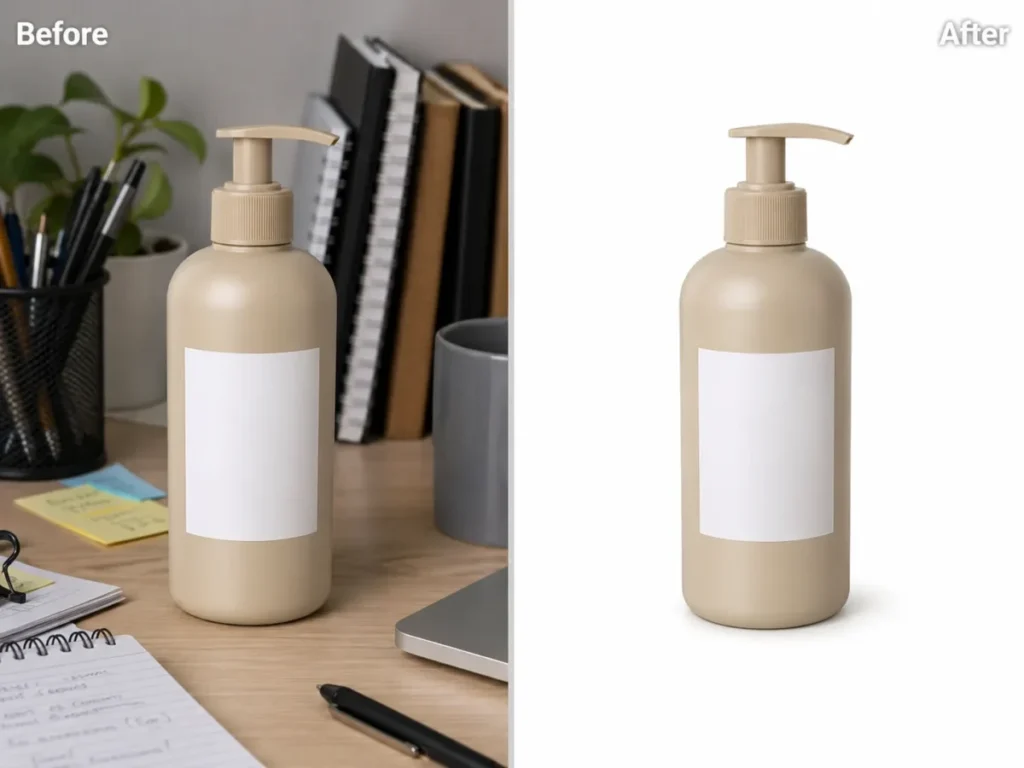
Protect the product’s shape, color, quantity, logo position, and label spelling. After every edit, zoom to 100% and read the packaging text character by character.
P16.
Place the product on a pure white ecommerce background with a soft realistic contact shadow. Keep the product's exact shape, color, dimensions, quantity, logo position, label spelling, packaging text, surface texture, and camera angle unchanged.
P17.
Replace only the background with a warm minimalist kitchen counter scene using soft morning light. Keep the product, packaging, label text, cap, proportions, color, reflections, and placement unchanged. Match the original perspective and create realistic shadows.
P18.
Create a premium hero image by placing the product centered on a dark matte stone surface with controlled rim lighting and subtle negative space on the right. Preserve the product's exact geometry, color, branding, text, quantity, and orientation. Add no extra accessories.
P19.
Remove fingerprints, dust, and minor surface smudges from the product and tabletop only. Preserve the material texture, reflections, edges, label text, logo, color, shape, and all intentional design details. Do not redesign the product.
P20.
Make the background transparent while keeping the complete product, fine edges, transparent parts, shadows inside the product, label text, logo, color, and proportions intact. Do not crop or add a new background.
OpenAI documents that ChatGPT Images can add text, add image details, and make a background transparent, so P20 is a supported request. The risk is not whether it can produce a cutout; it is whether the fine edges and label survive, which is why the verification step is not optional.
Social and Marketing
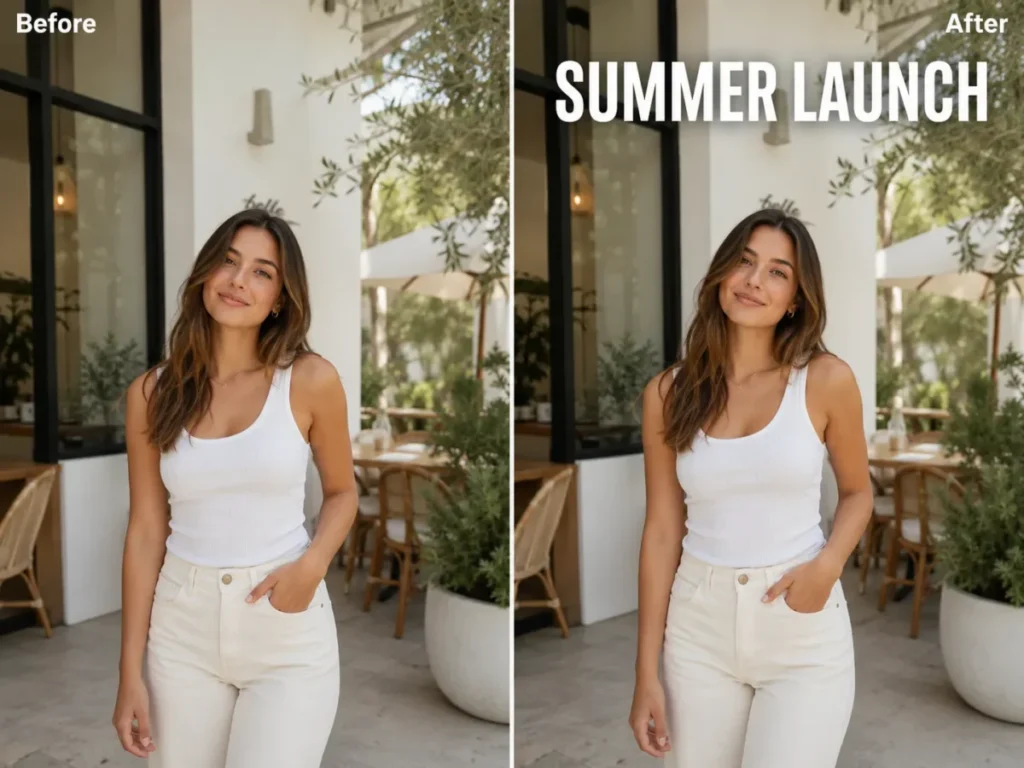
Text is the failure point here. OpenAI documents remaining limitations in text placement and clarity, so keep in-image copy short, quote it exactly, and read every character before you publish.
P21.
Reformat this photo for a square social post while keeping the main subject centered and fully visible. Extend the background naturally where needed. Preserve the subject's identity, pose, clothing, product details, lighting, and perspective. Add no text or logo.
P22.
Create a clean vertical story image using the uploaded photo as the main visual. Keep the subject in the lower two-thirds and extend the background upward with matching texture and light. Preserve the subject exactly and leave clear empty space at the top for later text.
P23.
Add the headline "SUMMER LAUNCH" in bold white sans-serif text, centered at the top, with high contrast and generous spacing. Keep the headline exactly as written and add no other text. Do not change the subject, product, background, colors, or layout.
P24.
Turn this photo into a polished YouTube thumbnail with stronger subject-background separation, brighter face lighting, and clean negative space on the left. Keep the person's identity, expression, clothing, hand position, and background objects unchanged. Add no text.
P25.
Create a professional profile picture with a circular-safe composition, a softly blurred neutral background, balanced natural light, and a head-and-shoulders crop. Keep the exact identity, skin texture, hair, expression, clothing, and camera angle unchanged.
Restoration and Repair
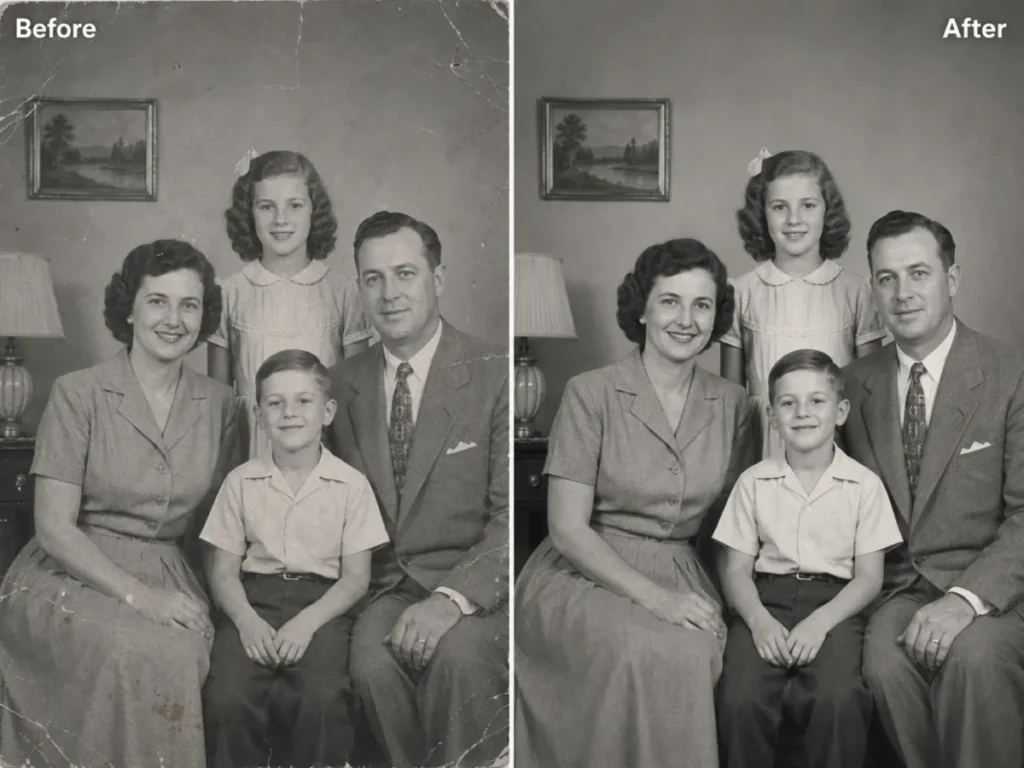
Here you need a different trust standard. Generative editing can invent plausible detail that was never in the original, so separate faithful cleanup from creative reconstruction and never present a restored family photo as historically exact.
P26.
Restore this old black-and-white family photo by reducing scratches, dust, stains, and fold marks while preserving every identifiable face, pose, clothing detail, background object, framing, and original grayscale character. Do not invent missing people or objects.
P27.
Colorize this black-and-white portrait using restrained, historically plausible skin, hair, clothing, and background colors. Preserve the exact faces, expressions, pose, composition, lighting, and visible details. Treat uncertain colors conservatively and avoid modern styling.
P28.
Repair the torn corner by extending only the surrounding background texture and border pattern. Keep all people, objects, text, dates, framing, and undamaged areas unchanged. Do not create new facial or historical details.
P29.
Improve legibility and tonal balance in this faded photograph. Restore moderate contrast, reduce the yellow color cast, and clarify existing edges without changing faces, clothing, objects, composition, or period character. Avoid aggressive sharpening.
P30.
Reduce blur and compression artifacts enough to make the existing subject clearer, but preserve the original facial proportions, expression, hair, background, and texture. Do not invent fine details that are not supported by the source image.
Advanced Prompts: Composites, Transformations, and Recovery
These edits combine inputs, restyle whole scenes, or repair a near-miss result. They carry the most drift risk, so the multi-image and recovery prompts lean hardest on repeated invariants.
Creative Transformations
Style transfers are lower stakes for identity, but they still drift on pose and object count. Keep real-person likeness and brand imitation in check: OpenAI Academy recommends generic or ownable design directions rather than copying a specific brand or artwork. If the style you want is a specific decade rather than a medium, the 80s flashback prompts for ChatGPT apply the same preserve-then-change shape to a single era.
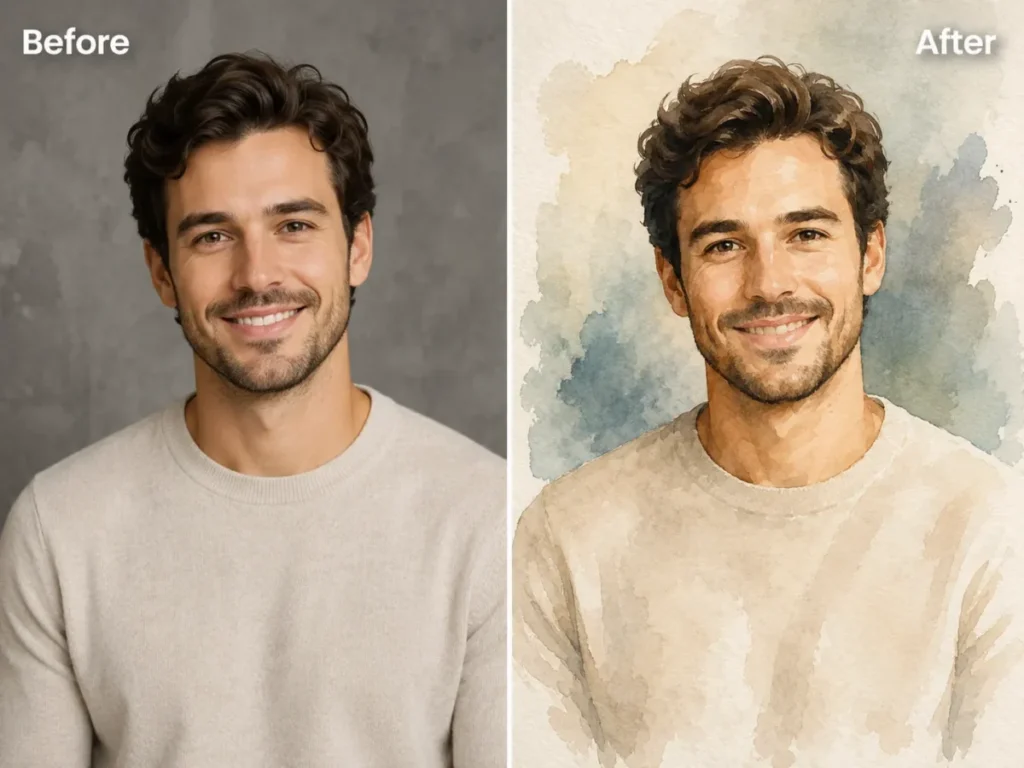
P31.
Transform the photo into a refined watercolor illustration with soft paper texture, controlled brush edges, and muted natural colors. Preserve the subject's recognizable identity, pose, clothing silhouette, background composition, and major objects. Add no text or watermark.
P32.
Convert the image into a clean graphic-novel illustration with precise ink lines, restrained halftone shading, and a limited warm-and-cool palette. Preserve the original composition, identity, pose, clothing, object count, and perspective.
P33.
Turn the portrait into a tasteful three-dimensional collectible figurine displayed in plain transparent packaging. Preserve the person's recognizable hairstyle, facial structure, clothing colors, and accessories. Use generic packaging with no brand names or logos.
P34.
Reimagine the scene as a vintage 1970s editorial photograph with warm film tones, subtle grain, slightly faded contrast, and period-neutral styling. Preserve the people, identities, pose, composition, and key objects. Do not add branded props.
P35.
Create a layered editorial collage using the uploaded portrait as the central element, with abstract paper shapes, subtle handwritten-style marks that contain no readable words, and a restrained neutral palette. Preserve the face, hair, clothing, and pose exactly.
Composite and Environment
When you combine images, name each one by order and give it a single role. OpenAI guidance supports multiple uploaded images and recommends a small, manageable set with each image referred to by order and its relationship explained.
P36.
Use Image 1 as the main portrait and Image 2 only as a lighting reference. Apply Image 2's soft side lighting and color temperature to Image 1 while keeping Image 1's person, identity, pose, clothing, background layout, and camera angle unchanged.
P37.
Use Image 1 as the product source and Image 2 as the background reference. Place the unchanged product from Image 1 on the center of the surface shown in Image 2. Match perspective, light direction, reflections, and shadows. Preserve all product text, shape, color, and quantity.
P38.
Combine the two uploaded portraits into one natural group photo with Person 1 on the left and Person 2 on the right. Preserve each person's exact identity, clothing, body proportions, and expression. Match scale, eye level, light direction, and shadows. Add no other people.
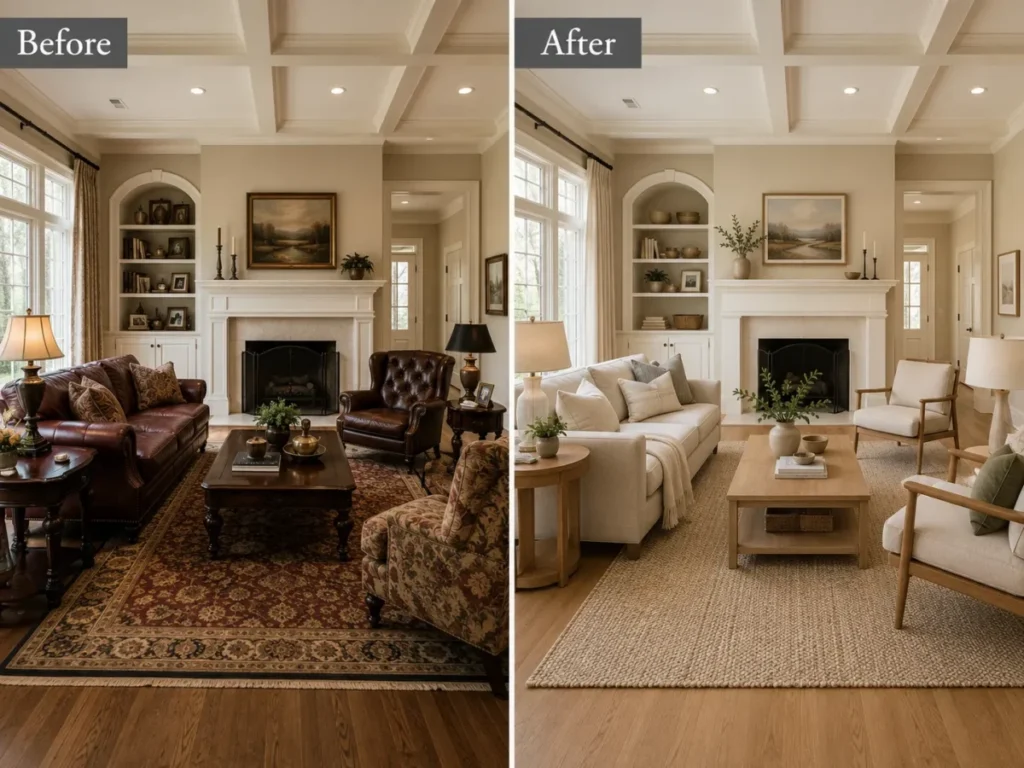
P39.
Redesign only the furniture and decor in this living room using light oak, neutral fabrics, a textured rug, and warm ambient lamps. Keep the walls, windows, doors, floor plan, ceiling, camera position, room dimensions, and exterior view unchanged.
P40.
Change the season from summer to winter by adding realistic snow to roofs, ground, and branches, overcast cold light, and light snowfall. Preserve the buildings, roads, people, vehicles, signs, perspective, and object placement unchanged.
For real estate work, treat P39 as a staging concept, not property documentation. Precise composition control is a documented limitation, so a redesigned room that quietly moves a window or wall could misrepresent the space.
Precision Fixes and Recovery
These are the prompts you paste when the first edit is almost right and one thing is wrong. Each changes a single issue while restating what already worked.
This is the section most prompt libraries skip, and it is often more useful than another inspiration prompt.
P41.
Restore the person's face to match the original uploaded photo. Change only the facial identity and proportions back to the source. Keep the current background, clothing, pose, crop, lighting, and all other successful edits unchanged.
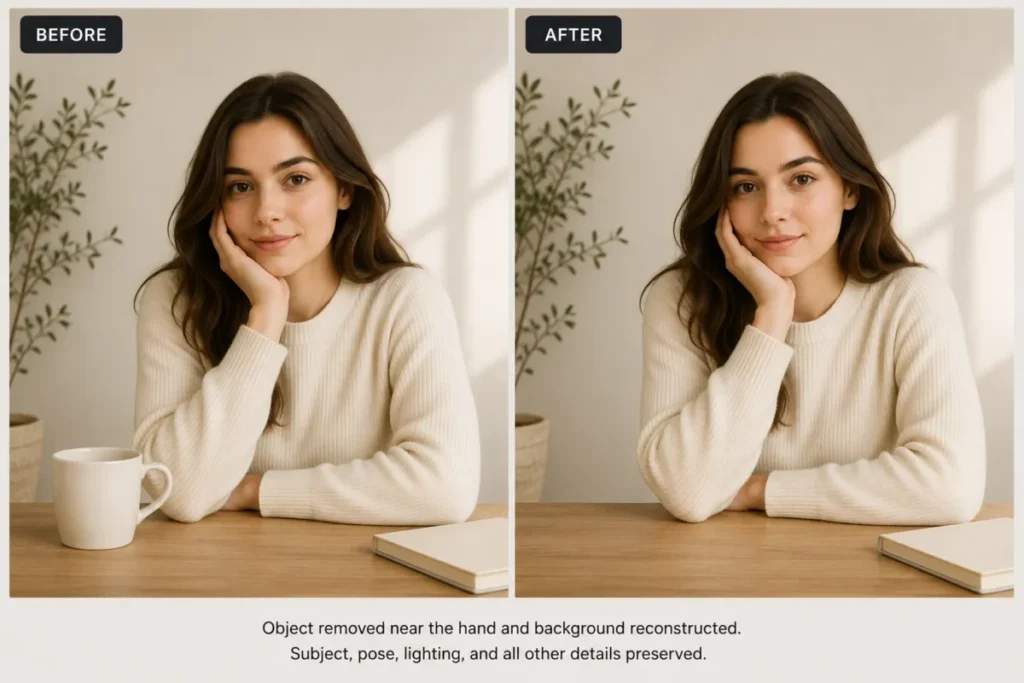
P42.
Remove the extra object that appeared near the subject's right hand. Reconstruct the hidden background naturally. Keep the subject, hands, fingers, clothing, face, pose, lighting, crop, and every other object unchanged.
P43.
Correct only the headline so it reads "SUMMER LAUNCH" exactly, with the same font style, size, color, and position. Change no other text, image element, layout, subject, product, color, or background.
P44.
Reduce the skin smoothing and restore natural pores, fine lines, and realistic texture while keeping the person's identity, expression, hairstyle, makeup, lighting, clothing, background, and crop unchanged.
P45.
Return the image to the original composition and camera framing while preserving the successful lighting and color adjustments. Restore the original subject position, object placement, crop, perspective, and negative space. Add or remove nothing else.
ChatGPT Photo Editing Codes: One-Line Prompts to Copy
Plenty of people search for a photo editing code rather than a prompt. There is no code to enter and no hidden mode: a code here is the shortest working form of the prompts above, one line for one change with nothing to fill in.
Paste one when a single fix is all you need. Use the watermark code only on images you own. The same one-liner habit works in Google’s model, and the Nano Banana photo editing prompts library carries that phrasing.
One-Line Image Editing Codes for Cleanup
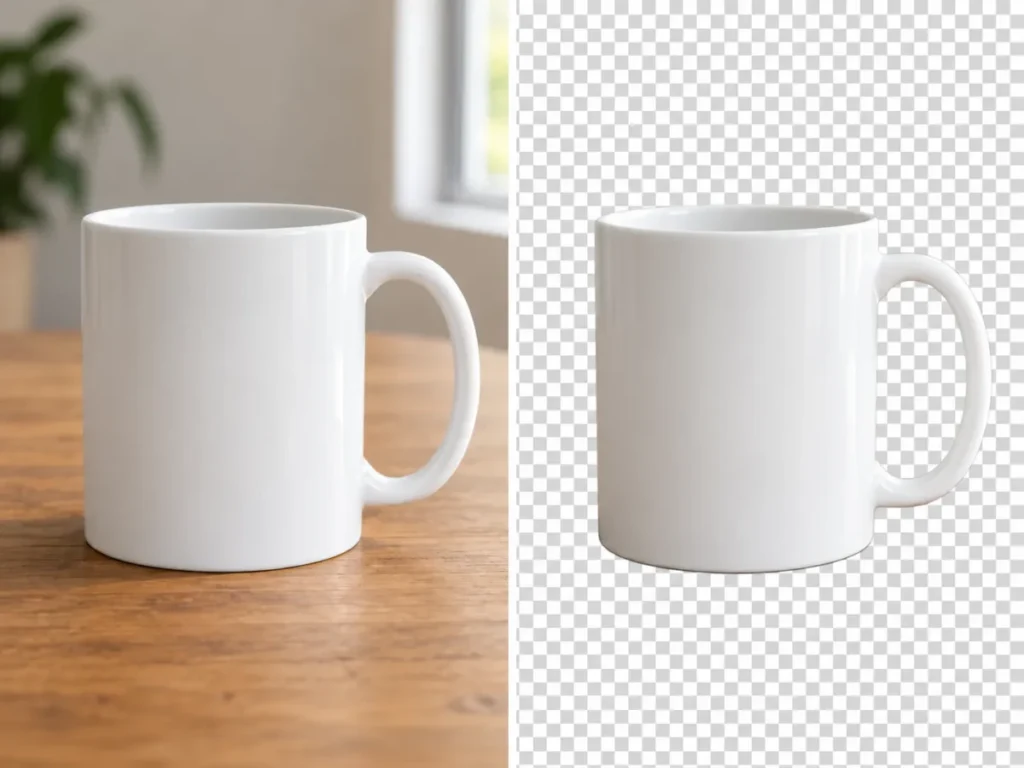
C1.
Remove the background and place the subject on a transparent layer, keeping edge detail, hair strands, and the subject unchanged.
C2.
Sharpen this image slightly while keeping natural skin texture, hair strands, and fabric detail. Do not smooth or repaint anything.
C3.
Remove the object nearest the left edge and rebuild the background behind it. Change nothing else in the frame.
C4.
Remove the hard shadow falling across the face. Keep facial features, skin tone, hair, and the existing light direction unchanged.
C5.
Remove the watermark from this image, which I own, and rebuild the covered area. Keep every other detail unchanged.
One-Line Photo Editing Codes for Light, Color, and Framing
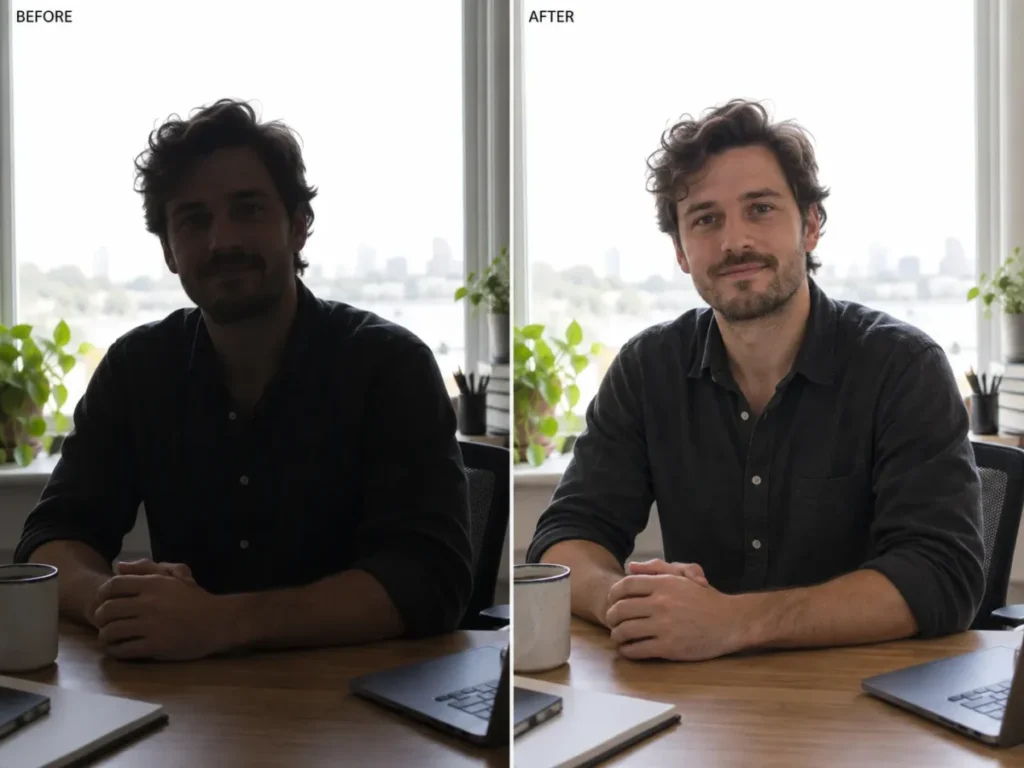
C6.
Fix the backlighting so the face is evenly exposed. Keep the background, colors, light direction, and composition unchanged.
C7.
Change the shirt color to charcoal gray. Keep the fabric folds, fit, face, hair, pose, and background unchanged.
C8.
Straighten this photo so the horizon is level. Crop minimally, extend the edges where needed, and change nothing else.
C9.
Even out the skin tones and add gentle contrast without erasing pores, lines, or beard texture. Keep identity unchanged.
C10.
Recrop this photo to a 4:5 vertical frame with the subject centered. Extend the background naturally and change nothing else.
A code is blunt by design. If one drifts, move up to the matching full prompt rather than repeating it.
Family Photo Prompts for ChatGPT
Family photos are the hardest edits to judge, because you know the faces well enough to notice one that is almost right. Pair each prompt below with a line from the Preservation Clause Bank.
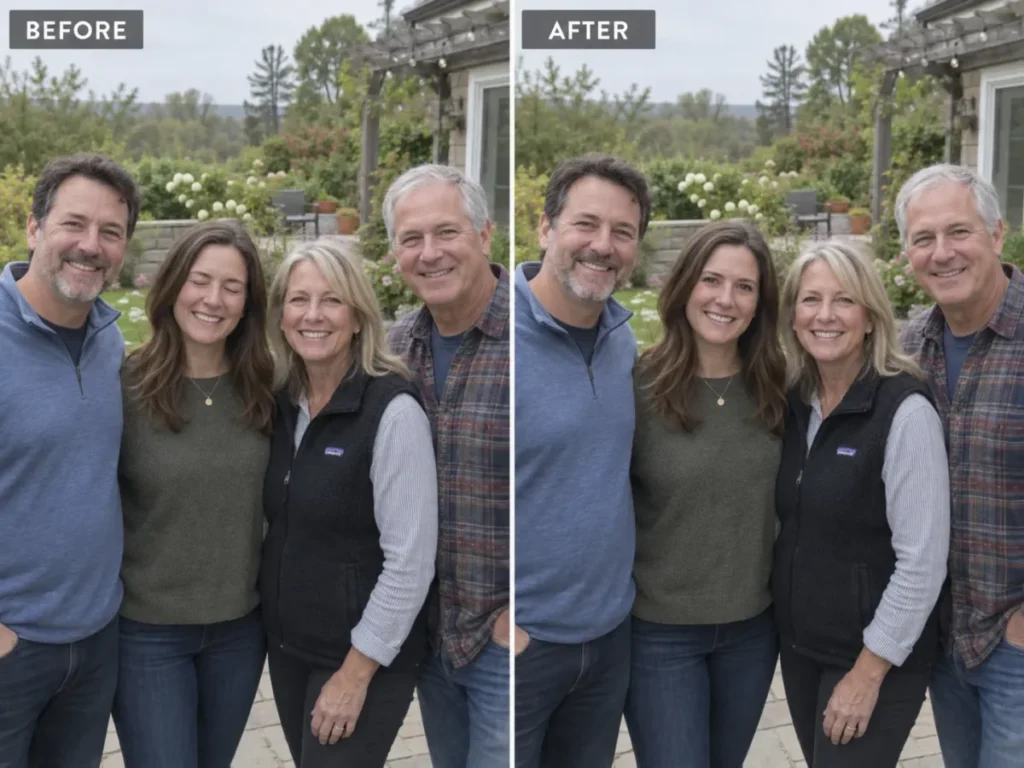
Family Photo Editing Prompts for Group Shots
F1.
Use Image 2 as a reference for the same person's open eyes and replace the closed eyes in Image 1. Keep every other face, pose, and background detail unchanged, and invent no eye detail Image 2 does not show.
F2.
Place the person from Image 2 at the right end of the group in Image 1 as a composite. Match scale, eye level, light direction, and shadows. Keep every existing face, pose, and background element unchanged, and add no one else.
F3.
Remove the stranger walking through the background on the right and rebuild the wall and railing behind them so texture and perspective match. Keep every family member, their faces, poses, clothing, and the framing unchanged.
F4.
Match Image 2's color temperature, contrast, and grain to Image 1 so the pair reads as one exposure. Keep every face, skin tone, clothing color, object, and composition in both unchanged. Adjust tone only, never content.
F5.
Replace only the cluttered background with a plain warm-white wall. Keep both children's faces, apparent ages, head sizes, hair, expressions, and clothing exactly as they are, keep the adults unchanged, and match the existing soft daylight.
Family Image Editing Prompts for Old and Damaged Photos
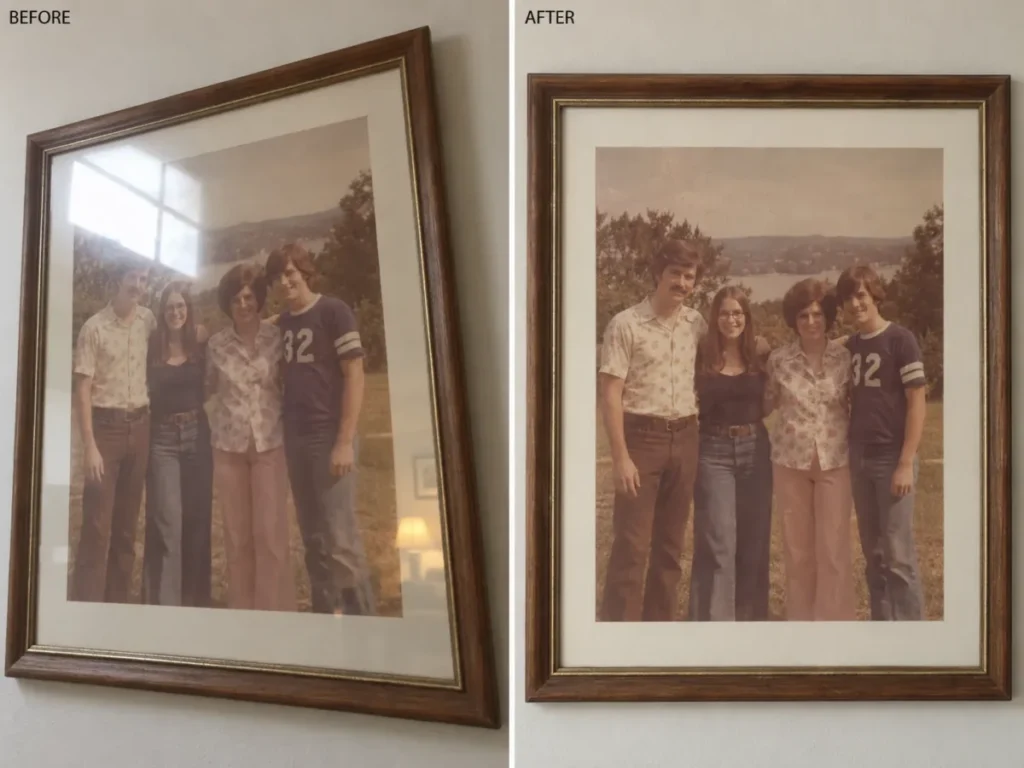
F6.
This is a phone photo of a framed print. Remove the glass glare and the room reflection, and correct the keystone distortion. Keep every face, object, border, and tonal character unchanged, and invent nothing hidden under the glare.
F7.
Remove the orange date stamp in the lower-right corner and rebuild the grass beneath it. Keep every person, face, pose, clothing detail, and the original film grain unchanged. Add no new objects.
F8.
Repair the crease running across this print, rebuilding background and clothing along it. Where the crease crosses a face, reduce the line without reconstructing features, and leave unsupported detail visibly soft rather than invented.
F9.
Image 2 is a second copy of the same photograph. Replace only the water-damaged upper-left area of Image 1 with the matching area from Image 2, aligned exactly. Keep every face, object, and tone in Image 1 unchanged.
F10.
The person at the right edge is cut off by the frame. Extend the frame to the right using only the surrounding wall and floor. Do not reconstruct the missing part of that person, and keep the original frame unchanged.
Say so when you pass one of these on. A photo that adds, removes, or moves a person is a new picture, not a record of the day, and that matters most for photos of children and of someone who has died.
Headshot Prompts for a Photo You Already Have
A headshot fails on identity long before it fails on lighting, so each prompt locks the face first. Get consent before you edit anyone else’s. The full set lives in the dedicated headshot prompt library, with the LinkedIn and US resume rules that decide where the finished file may go.
Headshot Photo Editing Prompts: Background, Light, and Crop
HS1.
Replace the background with a solid mid-blue studio backdrop lit evenly from both sides, with no gradient. Keep the exact face, skin tone, hairline, expression, clothing, and camera angle unchanged.
HS2.
Remove the shelving, cables, and doorway behind the subject and rebuild a plain office wall. Keep the subject's identity, pose, clothing, hands, and the existing light direction unchanged.
HS3.
Recrop to a 1:1 profile frame with the eyes on the upper third line and even margin around the head, so a circular mask cuts nothing. Change no facial detail.
HS4.
Match Image 1's background tone, light direction, and crop to the reference headshot in Image 2 so both sit on one team page. Keep Image 1's face, hair, expression, and clothing unchanged.
Headshot Image Editing Prompts: Clothing, Skin, and Gaze
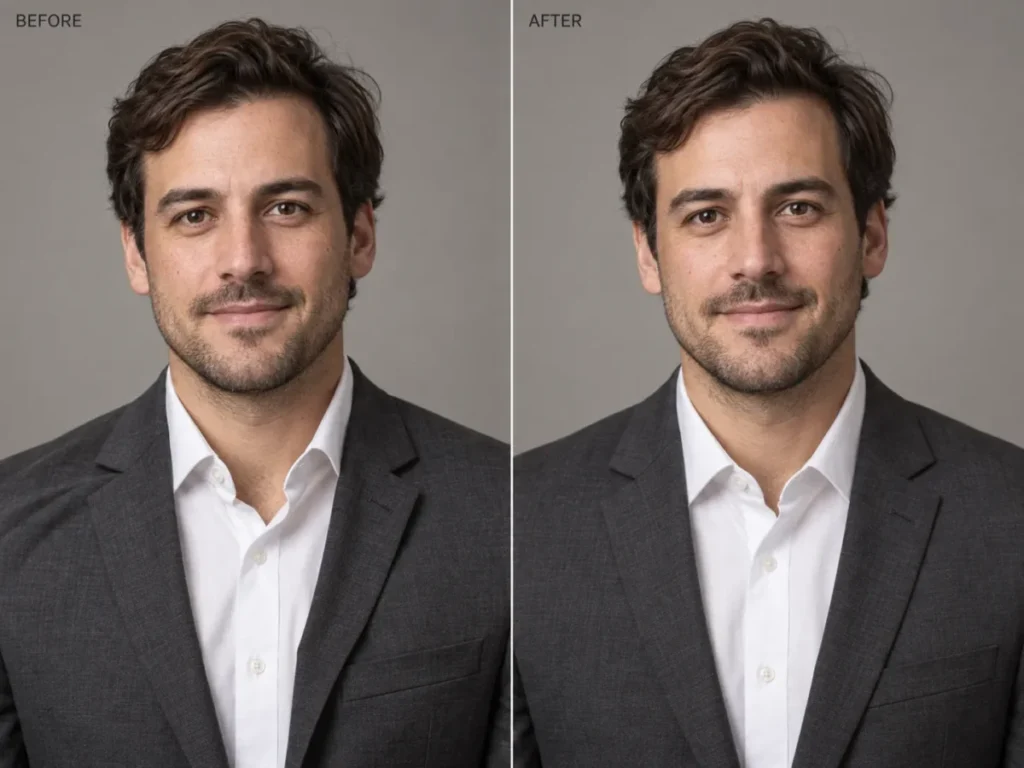
HS5.
Straighten the collar and lapels and flatten the wrinkle across the left shoulder. Do not change the garment, its color or cut, the face, the hair, or the pose.
HS6.
Even out the color patches on the forehead and cheeks caused by mixed lighting. Keep pores, fine lines, beard texture, moles, skin tone, and facial structure unchanged. No smoothing.
HS7.
Redirect the gaze to the camera without turning the head. Keep the eye shape, iris color, eyelid position, eyebrows, expression, and every other feature unchanged.
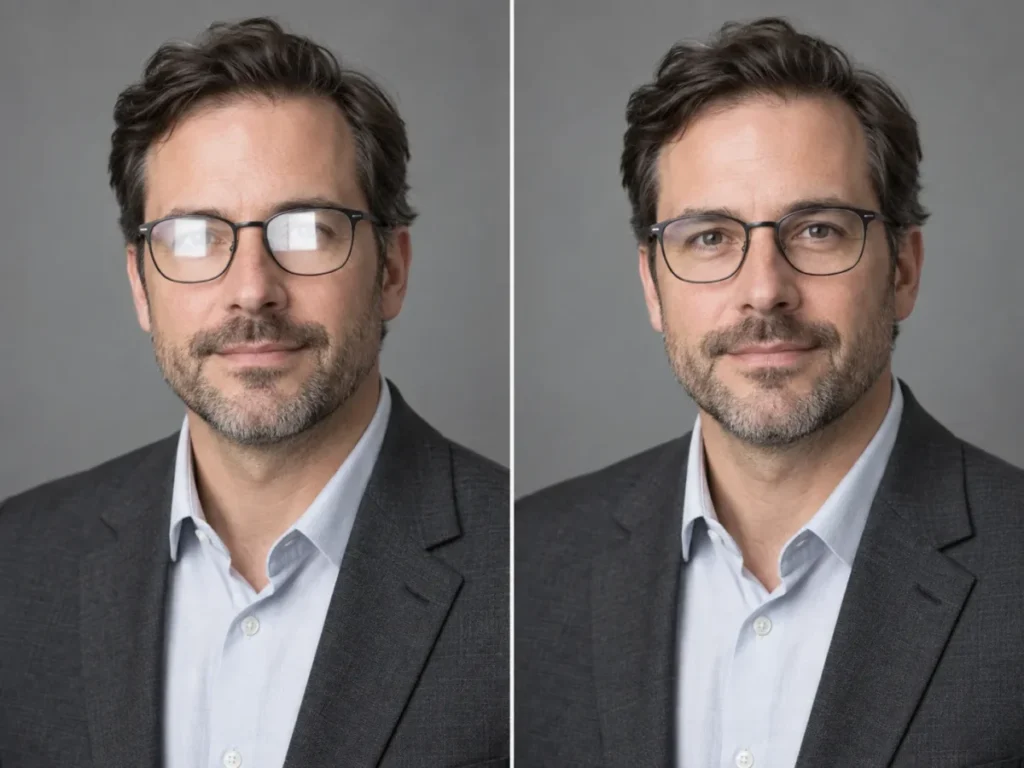
HS8.
Reduce the reflection on the glasses so the eyes show through the lenses. Keep the frames, their position, the eyes, skin tone, and surrounding lighting unchanged.
Prompting suits one or two headshots you inspect yourself. It suits twenty people who must look photographed on the same afternoon much less, because you would re-ask for the same background and light twenty times and grade every answer by eye. The roundup of the best AI headshot generators covers tools built for a consistent set.
ChatGPT Images 2.5: Sketch, Templates, and Image Comments
OpenAI shipped ChatGPT Images 2.5 on 2026-09-08, and it changed the editor before it changed the prompting. Three entry points now sit beside the two edit routes ChatGPT already had. Every prompt in this library still works in all of them, because the part that does the work is the preservation clause, not the button you press.
Read the release wording carefully before you trust it. OpenAI says 2.5 is “better at editing only what you’ve asked for, while keeping the rest of the details the same”, that “image subjects look more recognizable”, and that “distinctive features are more likely to carry through”. The operative phrase is more likely. It is not a guarantee, and it is not the same claim OpenAI made about facial likeness for the earlier GPT-Image-1.5 release. Nothing in the 2.5 announcement retires the habit of naming what must not change.
| Tool | Where it works | What you do | Review burden |
|---|---|---|---|
| Sketch | ChatGPT mobile app | Type @ and select Sketch, draw, confirm with the checkmark, then write the instruction | Medium: the drawing is guidance, not a mask |
| Templates | Images sidebar; not yet available in Work mode | Open Images, select Templates, pick a category and a template, then add your details | Low: this starts a new image, it is not a route for editing your own photo |
| Image comments | ChatGPT mobile app | Open a generated image full-screen, then add a comment on the part you want changed | Medium: a comment points at a region, the model still re-renders |
Source: ChatGPT Images documentation and the Images 2.5 announcement, rechecked 2026-09-20. Image comments are the thinnest documented of the three: OpenAI gives step-by-step instructions for Sketch and Templates, and one sentence for comments.
Sketch Prompts
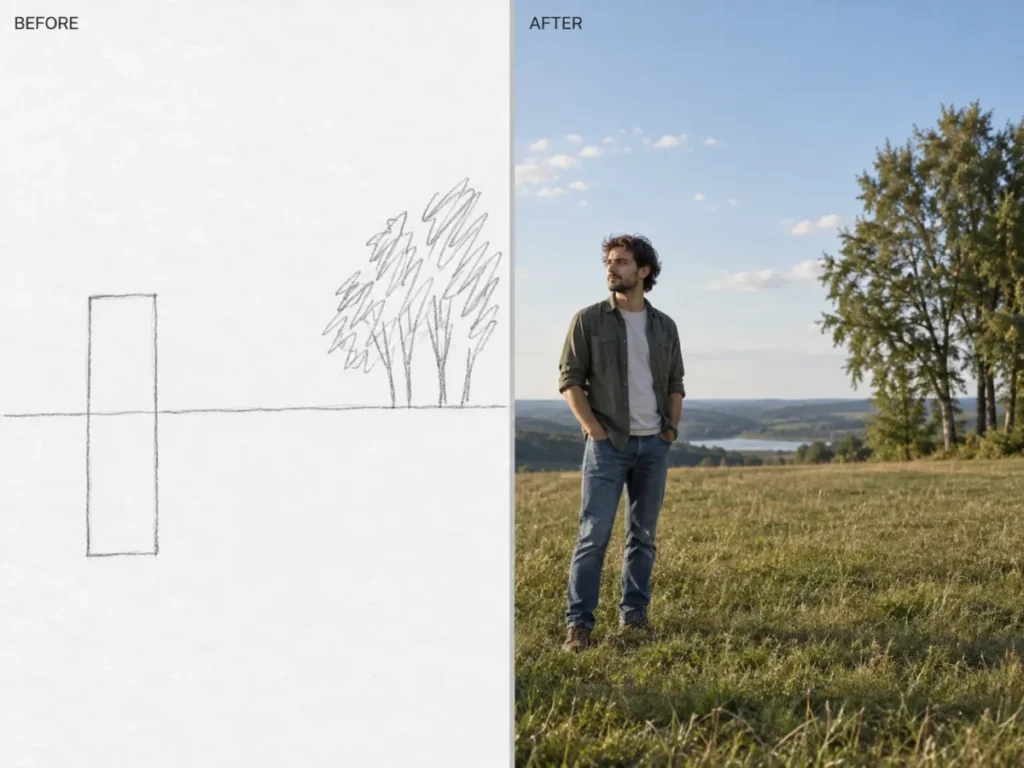
OpenAI documents Sketch as a way to create an image from a drawing plus written instructions, not as a mask over a photo you upload. Use it to fix composition first, then bring your own photo into the same conversation, because OpenAI states you can keep asking for changes after the image is generated.
V1.
Use my sketch as the layout guide only. Place the subject where the box sits, keep the horizon at the line I drew, and render the result as a photograph with natural daylight. Do not copy any sketch lines, strokes, or paper texture into the final image.V2.
Treat my sketch as a floor plan of the scene. Build a photographic background with the furniture in the positions I drew, shot at eye level with a 35mm look and soft window light from the left. Leave the marked center area empty so I can place a person there in the next step.V3.
My sketch marks where one new object should sit. Generate the scene with that object at the position and scale I drew, matching the perspective lines. Keep everything outside the marked area plain and uncluttered so it is easy to composite later.Template Prompts
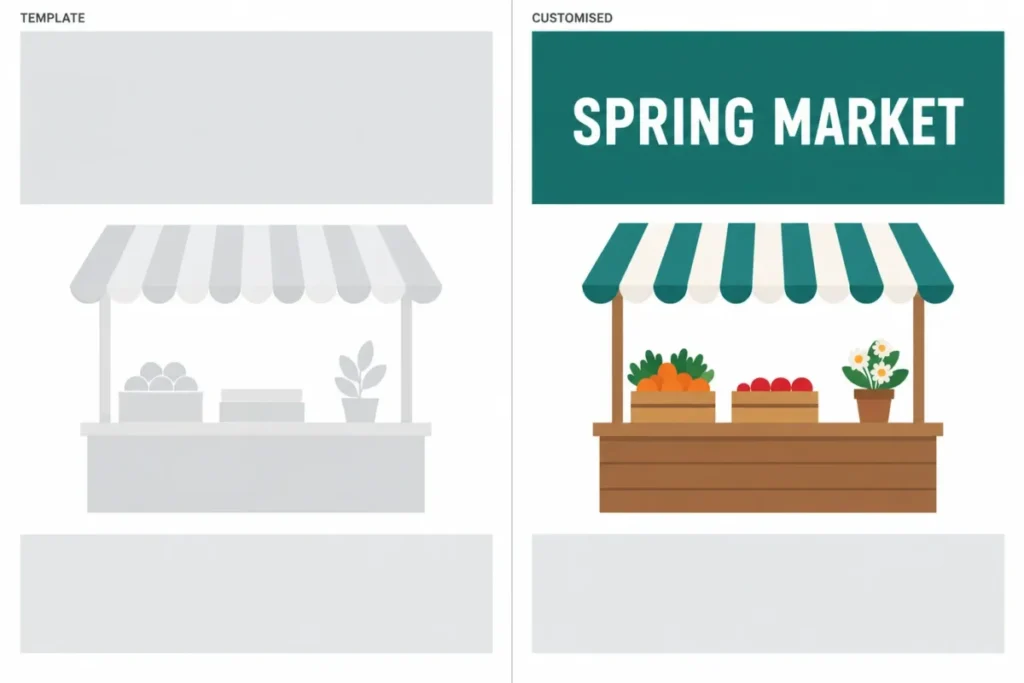
Templates start from a preset such as a poster or a logo. The customization text is where you keep control, and OpenAI notes that ChatGPT may ask follow-up questions about style before it renders.
V4.
Use this poster template. The headline must read exactly: [HEADLINE]. Keep the template's layout, margins, and type hierarchy unchanged. Use [HEX COLOR] as the single accent color and leave the lower third empty for a date line I will add myself.V5.
Use this merch template for a [PRODUCT]. Place the mark centered at chest height at roughly [SIZE] wide. Keep the fabric texture, folds, and shadow realistic, and do not stretch, warp, or run the artwork across a seam.V6.
Use this template together with the reference image I uploaded. Match the reference's color palette and lighting only. Do not copy its subject, its layout, its typeface, or any text from it. If anything is ambiguous, ask me before rendering.Image Comment Prompts
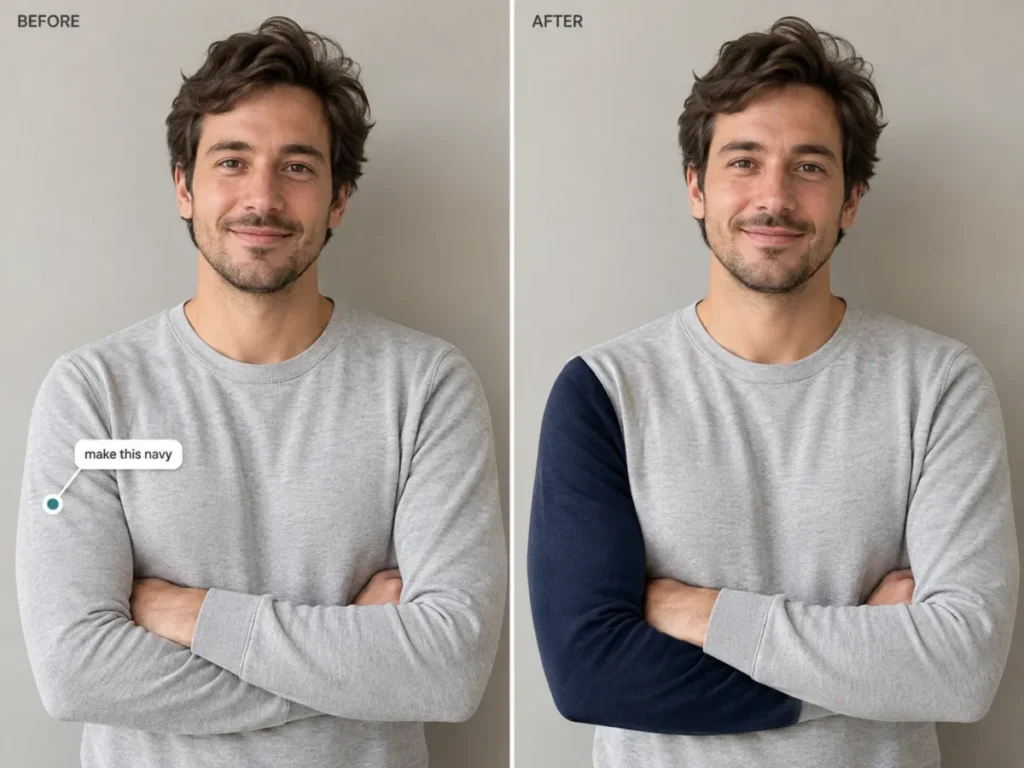
A comment points at a region, which makes it the closest thing to a local edit in the app. It is still not a mask: OpenAI’s own documentation warns that highlights are not always precise and that edits may extend beyond the area you selected. Write the preserve clause anyway.
V7.
On this sleeve only: change the color to navy. Keep the cut, the seams, the folds, the shadow under the arm, the rest of the garment, and the whole background exactly as they are.V8.
On this sign only: correct the spelling so it reads exactly [EXACT TEXT]. Keep the typeface, letter size, color, spacing, alignment, and the sign's position identical. Change no other text anywhere in the image.V9.
On this area above the shoulder only: remove the pole. Rebuild the wall texture to match the surrounding surface, grain, and light falloff. Leave the subject, the edge of the shoulder, and the hair outline untouched.One boundary worth stating, because readers join it wrongly. Images 2.5 rolled out across all tiers according to OpenAI, and the API exposes two variants, gpt-image-2.5-flare for fast everyday work and gpt-image-2.5-sunburst for precision editing. Access to the product is not the same as choosing a variant. OpenAI’s documentation does not state which variant the ChatGPT app runs, so treat any guide that names one as unsourced.
Images with thinking is a separate feature from the model version, and it is still not universal. OpenAI lists it for Plus, Pro, and Business, and says it is coming to Enterprise and Edu. Rechecked 2026-09-20.
Festive, Traditional, and Trending Portrait Prompts
These are the edits people ask for around weddings, festivals, and a profile refresh. They carry more identity risk than a background swap, because clothing, jewellery, and lighting all move at once and the model has more room to redraw the face while it works. Every prompt below names the face as protected for that reason.
People search these as prompts for boys and prompts for girls. The prompts work either way: the only part that changes is the styling clause, so swap the garment and keep the preserve clause exactly as written.
Saree and Traditional Outfit Prompts
An outfit swap is a full-garment redraw. Protect the hands and the neckline explicitly, because those are the two places the model most often invents detail.
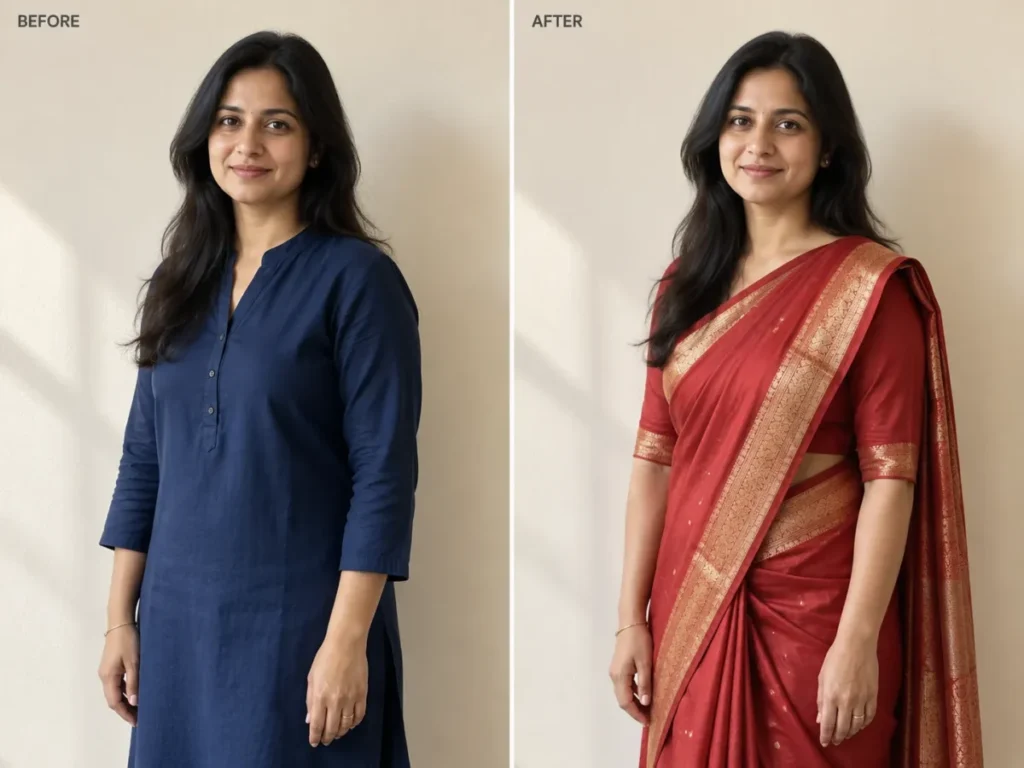
IN1.
Replace the outfit with a red silk saree with a gold zari border. Keep the face, hairline, skin tone, body proportions, pose, hands, fingers, and background exactly as they are. Match the fabric's fall to the existing body position and keep the light direction unchanged.IN2.
Change the outfit to a Banarasi silk saree in deep maroon with fine gold brocade. Keep the pallu draped over the left shoulder. Preserve the face, expression, hairline, ears, neck, and both arms, and change nothing in the background.IN3.
Replace the outfit with a pastel lehenga with light embroidery on the blouse and a plain dupatta. Keep the dupatta clear of the face. Preserve the face, hair, existing jewellery, hands, and background exactly as they are.IN4.
Change the outfit to an ivory sherwani with a mandarin collar and a subtle self-print. Keep the face, beard shape, hairline, posture, hands, and background unchanged. Add no accessories, buttons, or brooches I did not ask for.IN5.
Keep the same saree and fix only the drape. Straighten the pallu pleats and smooth the wrinkle at the waist. Do not change the color, the border pattern, the fabric sheen, the face, the pose, or the background.IN6.
Add one pair of simple gold jhumka earrings and a thin chain. Keep the face, ears, earlobe shape, neck, skin tone, and hair exactly as they are. Add no other jewellery, no nose ring, and no forehead ornament.Festival and Wedding Photo Prompts
These are relighting and cleanup jobs rather than garment swaps, so the risk shifts from identity to colour cast. Say which colour is the light and which colour is the object, or the model will paint one onto the other.
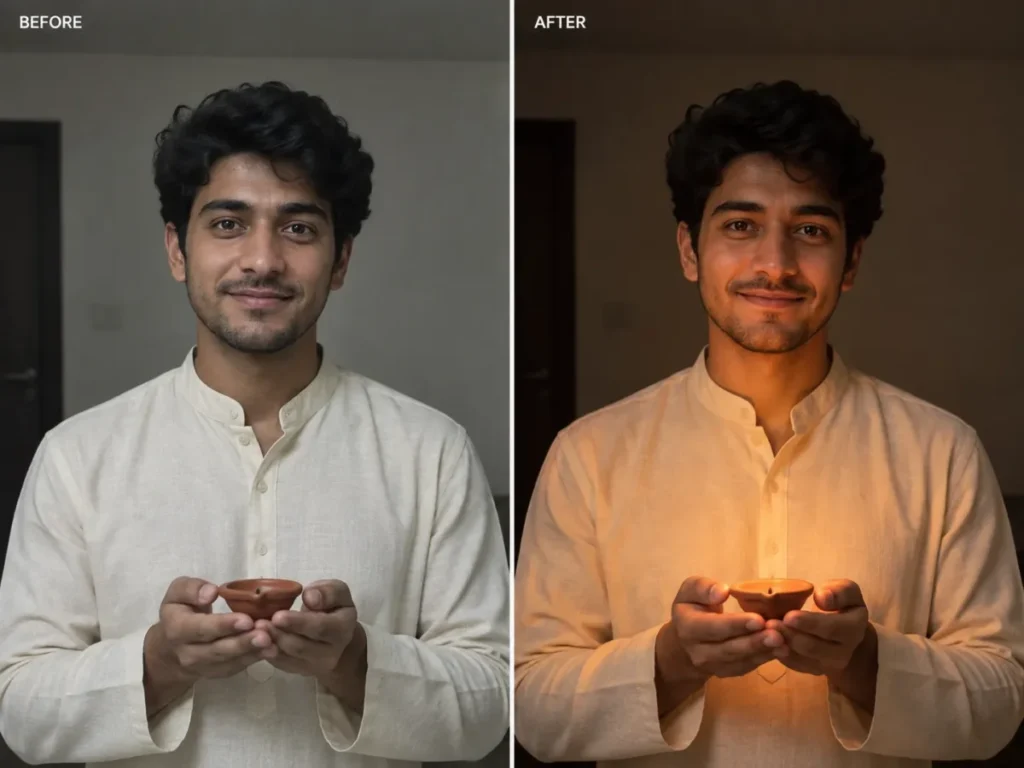
IN7.
Relight this photo as a Diwali evening: warm diya light from below and slightly to the right, with a soft falloff into the background. Keep the face, skin tone, clothing colors, and every background object unchanged. Do not add flames, lamps, or sparks that are not already in the frame.IN8.
Brighten this haldi photo so the yellow reads as a warm scene color and not as a cast on the skin. Keep the turmeric visible on the skin and clothing exactly where it is, and keep the face, expression, and background unchanged.IN9.
Sharpen the mehendi pattern on the hands so the fine lines read clearly. Keep the exact existing design, the hand position, the finger shapes, the skin tone, and the jewellery unchanged. Do not redraw, extend, or complete any part of the pattern.IN10.
Relight this couple photo for golden hour: low sun behind the subjects, a soft rim on the hair, and warm bounce on the faces. Keep both faces, their expressions, the outfits, the pose, and the setting unchanged.IN11.
Remove the people standing behind the group and rebuild the wall and floor behind them to match the surrounding surface. Keep every person in the front row, their faces, their outfits, their spacing, and their edges exactly as they are.IN12.
Replace the background with a plain mandap backdrop in cream and marigold, kept soft and out of focus. Keep both subjects, their outfits, their hair edges, and the direction of the light on their faces unchanged.Trending Portrait Prompts
Trends move faster than this page does. What survives a trend cycle is the structure: name the light, name the film or finish, then protect the face. The six below are written that way so you can swap the style word and keep the rest.
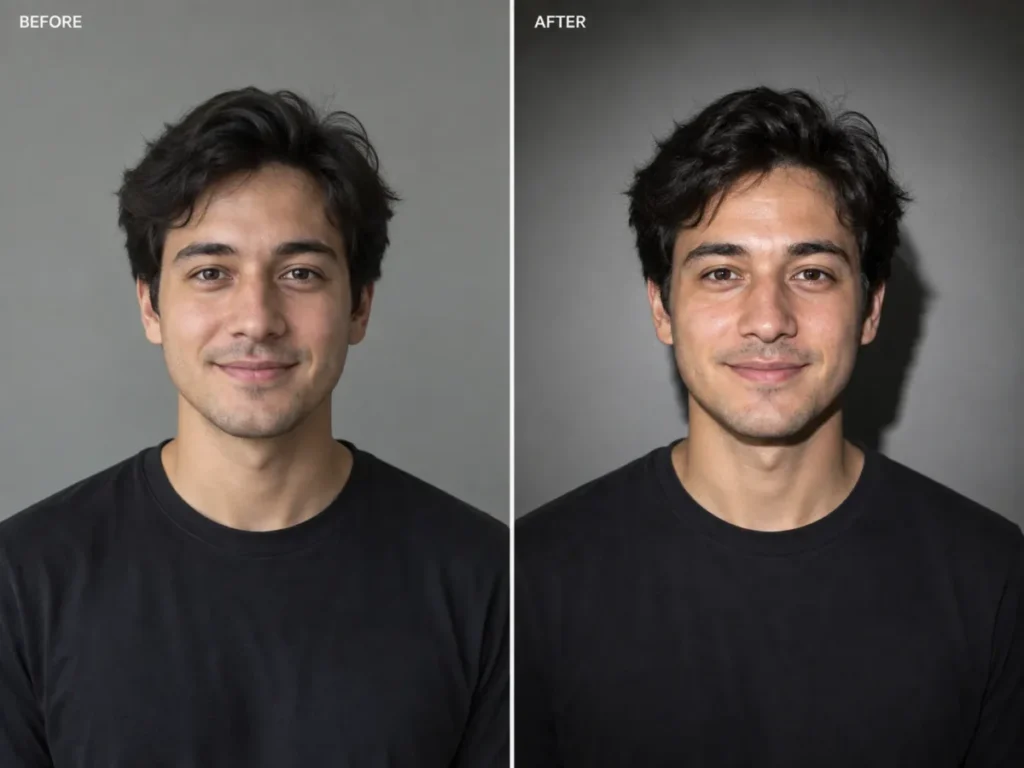
IN13.
Give this portrait a direct on-camera flash look: bright even light on the face, a hard shadow just behind the shoulder, and a deeper falloff into the background. Keep the face, skin texture and pores, hair, and clothing unchanged.IN14.
Restyle this as a 1990s film photograph: fine grain, slightly warm color, gentle highlight roll-off, and a small orange date stamp in the lower right corner. Keep the face, features, expression, and composition exactly as they are.IN15.
Restyle this as a school yearbook portrait: plain blue-grey studio backdrop, even frontal light, and a chest-up crop. Keep the face, hairstyle, glasses, and clothing unchanged, and do not smooth the skin.IN16.
Convert this to a plain ID-style portrait: flat white background, even frontal light, straight head position, and the current neutral expression kept as it is. Keep the face, features, skin tone, and hair exactly as they are, and do not retouch or smooth the skin.IN17.
Restyle this as a clean studio profile photo: charcoal backdrop, soft key light from the left, a subtle rim on the right shoulder, and the collared shirt kept in its current color. Keep the face, hair, and expression unchanged.IN18.
Apply a soft natural finish: even skin tone with the pores kept, gentle definition around the eyes, and a neutral lip. Keep the face shape, features, hairline, and expression exactly as they are. Do not slim, widen, lengthen, or reshape any part of the face or body.One caution on IN16, because it is the prompt most likely to be misused. An edited ID-style portrait is not automatically an acceptable passport or visa photo. Each issuing authority sets its own rules on dimensions, background shade, head size, and whether a digitally altered image is accepted at all, and those rules are set by the authority rather than by the editor. Check the requirements published by the office that will receive the photo before you submit anything generated here, and shoot a real photo for official use.
The consent rule from the privacy section applies with more force here. A garment swap on someone else’s photo changes how that person is presented, so get their agreement before you publish it, and keep the original file so the edit stays reversible.
Copy the Prompts as Text, or Share Them as a Link
Plain-Text Prompts You Can Paste Anywhere
Every prompt block on this page carries a Copy button, and it copies unstyled plain text, so it drops cleanly into Notes, WhatsApp, Slack, or a document. Keep the block below on your phone if you would rather carry one frame than a library.
PHOTO EDIT PROMPT - PLAIN TEXT STARTER
1. Scene:   In this [photo type] of [subject],
2. Change:  [the one thing to change].
3. Protect: keep [face / text / product / layout] unchanged.
4. Look:    match [light direction and style].
5. Output:  produce [ratio, crop, or transparency].

PROTECT LINES
- Identity: keep the facial proportions and expression as they are.
- Wording:  keep every existing character exactly as printed.
- Geometry: keep the walls, windows, and camera position fixed.
How to Share a ChatGPT Photo Editing Link
No link edits a photo for you. ChatGPT’s share feature links to a conversation that already happened, which is what people usually want when they ask for one.
Open the conversation, select Share, review the conversation and the sharing options, then select Create link or Copy link and send it. OpenAI describes a shared conversation as covering chat history, a single response, supported images, or uploaded files, and a personal-account link as a snapshot of what existed when it was created or updated. Later messages do not appear in it.
A shared link has no per-recipient access control and no expiry, so anyone holding the URL can open it until you delete it. Links are anonymous by default, though OpenAI notes some older sharing experiences may show the creator’s name. To revoke one, open Settings, then Data controls, then Manage under Shared links, and choose Delete shared link, as documented in the ChatGPT shared links FAQ, checked 2026-09-05.
The chat carries the images you uploaded into it, so a link to a family photo edit publishes that photo to whoever opens the URL. OpenAI advises against including sensitive personal information in a shared conversation, and a face qualifies.
Choose the Edit Mode
ChatGPT Images documents two edit routes for a photo you upload, and the choice changes how much you must review afterward. Images 2.5 added three more entry points on 2026-09-08, set out in the Images 2.5 section.
| Your goal | Use this mode | Review burden |
|---|---|---|
| Scene-wide change (background, lighting, style) | Describe it in chat, no selection | Review the whole image |
| One region (object, clothing area, a word of text) | Selection tool, highlight the region | Review the region AND the full image |
| Identity-critical or label-critical edit | Select narrowly, state protected surroundings | High: compare against the original at full size |
Source: ChatGPT Images documentation, rechecked 2026-09-20.
Here is the catch with the selection tool. OpenAI states that selection highlights are not always precise and that edits may extend beyond the selected area.
So a highlighted region is guidance, not a pixel-exact mask. Treat every localized edit as if it could touch the surrounding pixels, and inspect the full frame before you accept it.
The Five-Part Prompt Formula
Every precision edit in this library follows the same shape. OpenAI’s Academy guidance says a good image prompt usually needs only one to three clear sentences and should state what changes and what stays the same.
This formula turns that into a fill-in template.
| Part | What it does | Example clause |
|---|---|---|
| 1. Source context | Names the subject and scene | “In this portrait of one person seated indoors” |
| 2. Exact change | The single thing to change | “replace the background with a plain warm-gray studio wall” |
| 3. Protected invariants | What must stay identical | “keep the face, hairstyle, expression, clothing, and pose unchanged” |
| 4. Visual treatment | Light, style, framing | “match the existing front-left light and keep natural shadows” |
| 5. Output constraint | Format or crop | “produce a vertical 4:5 crop” |
Source: OpenAI Academy image guide, rechecked 2026-09-20.
Weak prompt: “make this a professional headshot.” Strong prompt: “turn this into a professional headshot with a plain warm-gray background and soft front-left light. Keep the exact face, skin tone, hairstyle, expression, and clothing unchanged. Use a chest-up crop.”
The strong version protects identity. That gives the model less room to invent a new face.
Prompt Quality Scorecard (score your prompt before you send it)
Before you submit, rate your draft prompt against these eight criteria. This is a self-check rubric for your prompt, not a rating of any product.
| Criterion | Weight | Score 1-5: does the prompt state it plainly? |
|---|---|---|
| Purpose and use case | 15% | |
| Exact single change | 20% | |
| Protected invariants | 20% | |
| Subject and scene named | 10% | |
| Visual treatment (light, style) | 10% | |
| Framing or crop | 10% | |
| Output format need | 10% | |
| One-change discipline | 5% |
Weighted total = sum of (score / 5 x weight). Decision thresholds: 0.85 and above means send it, 0.70 to 0.84 means add the missing invariants first, and below 0.70 means rewrite before you waste an edit.
The two criteria that carry the most weight, exact change and protected invariants, are the two most competitors leave out.
Fill-In Prompt Templates
The formula explains the shape. These templates hand you that shape already typed, with brackets where your own detail goes.
| Situation | Prompt frame to fill in | Example fill |
|---|---|---|
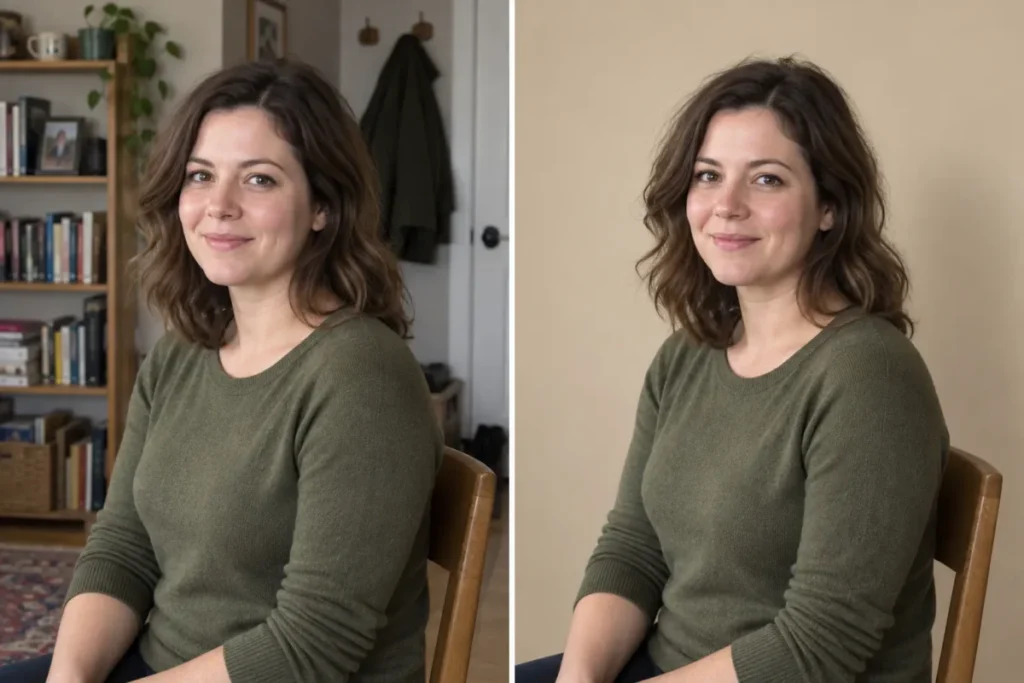
| Background swap | In this photo of [subject], replace the background with [new background]. Keep [protected details] unchanged and match the light direction. | one seated person; sand-colored wall; face, hair, clothing |
| Object removal | Remove [object] from [position] only. Rebuild what was behind it so texture and perspective match. Keep [protected details] unchanged. | a parked scooter; far right; the building line and every person |
| Text correction | Correct only [text element] so it reads “[exact wording]”. Keep the same font, size, color, and position, and change nothing else. | the banner headline; SPRING INTAKE |
| Relight | Relight this scene as [light description] from [direction]. Keep [protected details], the camera angle, and the background layout unchanged. | soft overcast daylight; the left; faces and clothing colors |
| Reframe | Recrop this image to [ratio] for [channel], keeping [subject] fully visible. Extend the background naturally and leave [empty area] clear. | 9:16; a story post; both people; the top fifth |
| Product cleanup | Clean [defect] from [surface] only. Preserve the label spelling, logo position, color, quantity, and texture exactly. | fingerprints and dust; the bottle and tray |
| Drift recovery | Restore [element] to match the original upload. Keep [the successful edits] exactly as they are and change nothing else. | the face and jawline; the new background and lighting |
Each frame is one sentence of instruction and one of protection. If a frame runs long, cut the visual treatment first and the protection clause last.
Preservation Clause Bank
Append the right clause to any prompt above. This is the language that reduces unintended change.
It does not guarantee perfect preservation, but it removes the ambiguity that lets the model wander.
| Risk | Copy-paste clause |
|---|---|
| Identity | “Keep the exact face, facial proportions, skin tone, hairline, and expression unchanged.” |
| Product | “Preserve the product’s shape, color, quantity, logo position, and label spelling exactly.” |
| Room and geometry | “Keep the walls, windows, doors, floor plan, camera position, and room dimensions unchanged.” |
| Text | “Keep all existing text exactly as written; change no wording, font, size, or placement.” |
| Restoration | “Preserve every identifiable feature; do not invent missing faces, objects, or details.” |
| Background | “Reconstruct only the hidden area so texture, perspective, light, and shadows match the original.” |
The clause bank is the reusable core of this whole library. A prompt without at least one of these clauses is the prompt most likely to drift.
Refine One Detail at a Time
OpenAI recommends small, targeted revisions and adjusting one element at a time, and it recommends repeating important details on each turn to reduce drift. That turns refinement into a fixed ladder.
- Turn 1, core edit. Make the single main change with full invariants stated.
- Turn 2, lighting. Adjust light only. Restate identity, product, and layout invariants.
- Turn 3, cleanup. Remove one leftover artifact. Restate the invariants again.
- Turn 4, output. Set aspect ratio or transparency. Restate the subject-preservation clause.
Stop the moment a new turn makes the image worse. A broad second-round prompt is the fastest way to undo a good first result, so never fix three things in one message.
Fix a Bad Edit: Recovery Prompt Bank
When an edit is close but wrong, do not restart from scratch. Paste the matching recovery prompt, change one issue, and restate what already worked.
| Problem | Recovery prompt to paste |
|---|---|
| Face changed | Prompt P41: restore the face to the original, keep everything else. |
| Extra object appeared | Prompt P42: remove the object, reconstruct the background, keep the rest. |
| Text misspelled | Prompt P43: correct only the text to the exact wording, change nothing else. |
| Over-retouched skin | Prompt P44: reduce smoothing, restore natural texture, keep identity. |
| Wrong crop or composition | Prompt P45: return to the original framing, keep the good color and light. |
| Background changed by accident | “Restore the original background exactly, keep the subject and the intended edit.” |
Recovery works because it re-anchors the model to a known-good state. Without it, each new broad attempt is a fresh roll of the dice.
Example: A Filled-In Prompt Workflow
Here is one complete pass, scored with the rubric above, so you can see the system in action.
Scenario. A job seeker has one casual phone photo and needs a clean LinkedIn headshot. Budget: a free ChatGPT account. Goal: a usable, credible headshot without a studio.
| Step | Action | Result to verify |
|---|---|---|
| Prompt | Paste P6 (LinkedIn-style headshot) | Background, light, crop as asked |
| Score | Purpose, change, invariants all stated: weighted total 0.90 | Above the 0.85 send threshold |
| Review | Compare face against the original at full size | Identity intact, no new features |
| Drift found | Jaw looks slightly narrowed | Fails the identity check |
| Recovery | Paste P41 to restore the original face | Face matches source, background kept |
| Output | Ask for a 4:5 crop, verify edges | Ready to download |
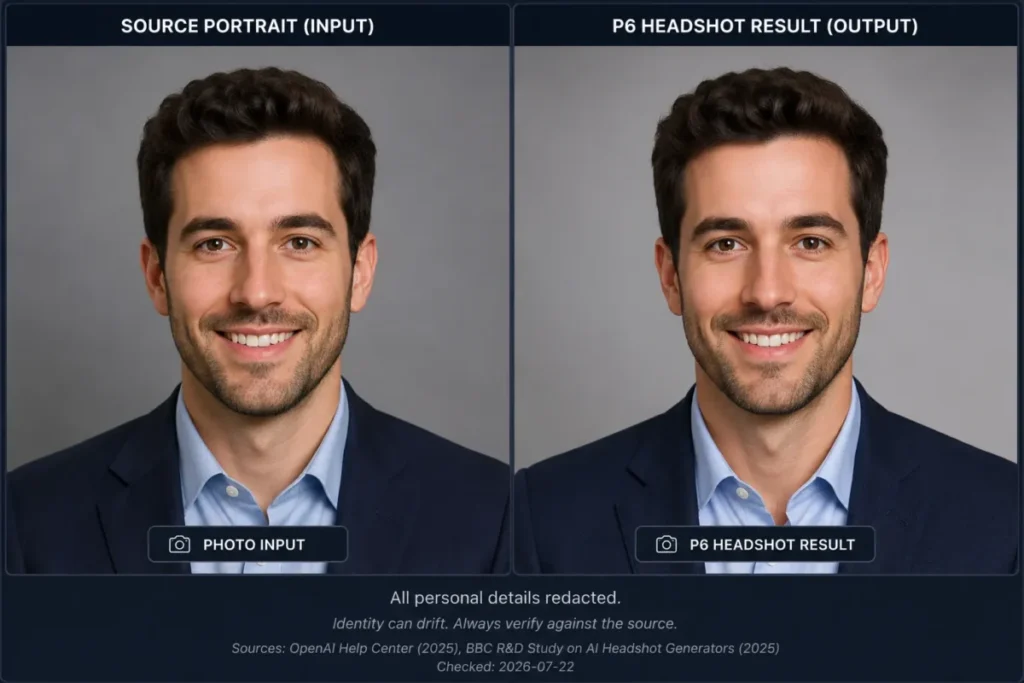
The lesson is in the middle rows. The first output looked professional, but it failed the identity check, and only a side-by-side comparison caught it.
That comparison is the difference between a headshot that represents the person and one that quietly does not.
Quick Copy: The 12-Point Photo Edit Checklist
Copy this before you paste any prompt. It is the fastest way to avoid a wasted edit.
CHATGPT PHOTO EDIT CHECKLIST
[ ] 1. Source image is a clear static file (PNG, JPEG, or non-animated GIF)
[ ] 2. You have permission to use any real person's likeness in the photo
[ ] 3. Sensitive or confidential details are removed or the risk is acceptable
[ ] 4. You named the ONE exact change you want
[ ] 5. You listed what must stay unchanged (face, text, product, layout)
[ ] 6. You chose whole-image chat OR a narrow selection for a local edit
[ ] 7. You stated the visual treatment (light direction, style, framing)
[ ] 8. You set the output need (aspect ratio, transparent background)
[ ] 9. You reviewed the WHOLE image, not just the edited area
[ ] 10. You checked identity, text spelling, object count, and edges at full size
[ ] 11. You made only one change per follow-up turn
[ ] 12. You kept the original file before saving the edit
Every item maps to a documented ChatGPT behavior or a known limitation covered in this guide. Items 5, 9, and 11 are the ones competitors skip, and they are the reason most edits drift.
How to Use This Checklist and Library
Work through these seven steps once, and the prompts do the rest.
- Prepare the source. Upload one clear static image, or a small numbered set of reference images. According to OpenAI’s image-input documentation, supported types are PNG, JPEG, and non-animated GIF, and image inputs are static, not video.
- Confirm consent and privacy. OpenAI Academy advises using a reference photo for real-person accuracy and confirming you have permission to use that person’s likeness. Handle sensitive photos before upload, not after.
- Pick the edit mode. Use whole-image chat for scene-wide changes. Use the selection tool for a specific region, knowing the edit can still extend beyond the highlighted area.
- Build the prompt from the five-part formula. State source context, the exact change, the protected details, the visual treatment, and the output constraint.
- Review the entire result. Do not trust the edited region alone. Check the face, hands, text, object count, edges, and reflections.
- Refine one detail per turn. Repeat the protected details every time. Stop when a new turn degrades the image.
- Verify, then save. Set the aspect ratio or transparency, check every character and label at full size, and keep the original.
The person responsible for scoring the result is you, not the model. If a must-protect element failed, the edit is rejected regardless of how good the rest looks.
Verify Before You Download
Run this pass on every edit before you use it. It converts the documented weak spots into a short review.
| Check | Look for |
|---|---|
| Identity | Face and proportions match the original |
| Anatomy | Hands, fingers, and ears are correct |
| Object count | Nothing added or removed by accident |
| Product integrity | Shape, color, and quantity unchanged |
| Text spelling | Every character correct, no invented words |
| Edges | Clean hair and product edges, no halos |
| Reflections and shadows | Consistent with the light direction |
| Perspective | Geometry and camera angle unchanged |
| Background | No new artifacts or altered details |
| Unintended changes | Anything edited that you did not request |
A generative edit can change details outside the area you asked about, so this pass is not busywork. For a headshot, a product shot, or a restored family photo, it is the step that decides whether the file is publishable.
Red Flags in an Edited Image
Treat any of these as a reason to reject or redo, not to publish.
- The face looks slightly different from the original, even if it looks good on its own.
- Text is misspelled, warped, or has invented extra words.
- A product label, logo, or color has shifted from the real item.
- The object count changed: an item appeared or vanished.
- Hands, fingers, or teeth look distorted.
- The background gained an artifact, a seam, or a repeated pattern.
- Reflections or shadows point the wrong way for the stated light.
- A room edit moved a window, wall, or door.
- Skin looks plastic, with pores and texture erased.
- The crop or composition changed when you only asked for a color or light edit.
- A selection edit changed pixels well outside the highlighted area.
- A restored photo added a person, object, or detail that was never in the original.
The first red flag is the most dangerous because it is the easiest to miss. An edit that is visually strong but subtly off-identity will pass a casual glance and fail the person it represents.
A photo of two people carries two of those identities to check at once, which is the job the Gemini prompts for two-person photos are written around.
Common Mistakes
Each mistake below has a one-line fix.
| Mistake | Fix |
|---|---|
| Vague instruction like “make it better” | Name the exact change, the protected details, and the output use. |
| Changing many things in one turn | Split the job into small, single-change revisions. |
| Not repeating protected details on follow-ups | Restate identity, geometry, labels, and layout on every turn. |
| Assuming a selection is a perfect boundary | Inspect the full image; edits can extend past the highlight. |
| Trusting a face or label without a zoomed check | Compare with the original and verify spelling, color, and count. |
| Requesting long in-image copy | Keep text short, quote it exactly, and verify every character. |
| Mixing ChatGPT UI steps with API-only settings | The consumer app has no input_ |
| Uploading many references with no roles | Number each image and assign one role per image. |
The API note matters because several guides borrow developer settings. In OpenAI’s API, the image prompting guide tells you to omit input_fidelity on GPT Image 2 because image inputs are always processed at high fidelity, and it does not list the parameter at all for gpt-image-2.5-flare or gpt-image-2.5-sunburst. Masking stays prompt-guided across GPT Image models: the model uses the mask as guidance and may not follow its exact shape.
Those are API behaviors, not switches in the ChatGPT app.
Cost, Limits, and Availability
Free access does not mean unlimited editing, and that shapes how you should batch your work.
| Factor | What the documentation says |
|---|---|
| ChatGPT Images 2.5 availability | Available on all tiers, rechecked 2026-09-20 |
| Images with thinking | Listed for Plus, Pro, and Business; coming to Enterprise and Edu |
| Image creation and upload limits | Can be separate from the main chat limit and can vary |
| Reset timing | Shown in-product when a limit is reached |
| Platforms | Web, iOS, and Android |
Sources: ChatGPT Images documentation and ChatGPT Free Tier FAQ, rechecked 2026-09-20.
Plan tiers and their limits are detailed in the ChatGPT pricing guide.
I would not plan a 40-image batch on a free account without expecting an interruption. The image allowance can be capped separately from chat, and OpenAI does not publish a single fixed number, so the practical move is to do your highest-priority edits first and let the in-product notice tell you when you have hit the wall.
There is no official RAW support in the cited input documentation, so convert a copy to JPEG or PNG before you upload rather than building a workflow around camera raw files.
Privacy, Consent, and Data Controls
Editing a personal photo is a data decision before it is a creative one. The controls below are documented, but none of them make an upload risk-free.
PRIVACY CHECKLIST BEFORE UPLOAD
[ ] I have permission to use every identifiable person's likeness
[ ] The image holds no confidential, financial, or intimate content I cannot risk
[ ] I have set Data Controls to match my preference on model improvement
[ ] I enabled Temporary Chat if the conversation should expire
[ ] I removed metadata or sensitive details the edit does not need
OpenAI’s Data Controls let you decide whether your conversations help improve its models, and OpenAI states that Temporary Chats are deleted from its systems after 30 days. Those are real levers, but a home interior, an ID, or a family photo can still be sensitive, so I would keep anything I could not risk exposing off the platform entirely.
Sources: Data Controls FAQ and chat and file retention policy, rechecked 2026-09-20.
When ChatGPT Is Not Enough
ChatGPT Images is fast and conversational, and for lower-risk creative and business edits that manual review can catch, that speed is the point. It is not the right final tool for every job.
| Use case | Better final step |
|---|---|
| Forensic or evidence images | A verifiable pixel editor and human review |
| Regulated or legal documentation | A controlled, auditable workflow |
| Exact product-label or packaging production | A design tool with precise typography |
| Pixel-perfect masks and cutouts | A conventional layer-based editor |
| High-stakes identity work at volume | Manual verification of every output |
Some of these jobs need a different generative editor rather than a different class of tool. A local region edit, a whole-image restyle and a multi-source composite each have a mode built for them, and the cross-tool AI photo editing prompts library routes the job before it hands you the wording.
The reason is evidence, not opinion. One 2025 study of 83,000 requests reported that only about 33% could be fulfilled by the leading editors it evaluated, and OpenAI’s own documentation lists text, consistency, and precise composition as remaining limitations.
If you need exact reproduction rather than a strong generative approximation, prompt in ChatGPT to concept fast, then finish in a tool built for precision. The roundup of the best AI photo editors covers dedicated options for that final step.
What to Do After You Finish an Edit
Pick the path that matches your outcome.
- The edit worked and you want more control next time. Build your own prompts with the prompt engineering guide, then reuse the five-part formula here.
- You want a second prompt library to compare styles. The Nano Banana photo editing prompts cover portraits and products with a different model’s phrasing.
- You need to generate images, not just edit them. Compare tools in the best AI image generators guide.
- The edit missed and you want a purpose-built editor. Move to a dedicated photo tool for exact masks and typography.
Frequently Asked Questions
These answers cover the questions people most often ask before editing a photo in ChatGPT.
Can ChatGPT edit an existing photo?
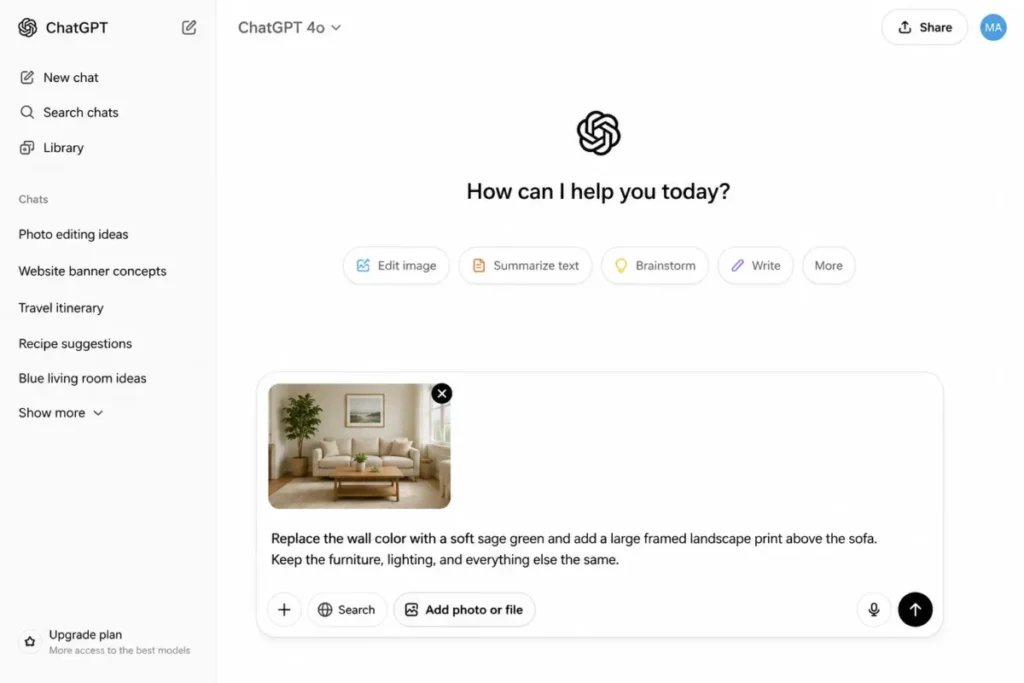
Yes. According to OpenAI’s ChatGPT Images documentation, you can upload an existing image and describe the changes you want, either by describing the edit in chat or by selecting part of the image first.
It creates a new edited image from your instructions rather than editing the original file pixel by pixel.
What is the best ChatGPT prompt for photo editing?
The best prompt is the one that names the exact change and protects everything else. Use the five-part formula: source context, exact change, protected invariants, visual treatment, and output constraint.
A prompt that says “change only the background and keep the face, pose, and clothing unchanged” beats “make this look professional” every time.
How do I stop ChatGPT from changing my face?
State the identity clause explicitly: “keep the exact face, facial proportions, skin tone, and expression unchanged.” Then compare the result against the original at full size, because identity drift is a documented weak spot. If the face still shifts, paste the recovery prompt (P41) to restore it to the source while keeping the rest of the edit.
How do I edit only one part of a photo in ChatGPT?
Use the selection tool to highlight the region, then describe the local change and name the surrounding details to protect. OpenAI notes that selection highlights are not always precise and edits may extend beyond the selected area, so review the whole image afterward, not just the region you highlighted.
Can ChatGPT remove or replace a background?
Yes, and it can also make the background transparent, according to OpenAI’s documentation. Ask it to replace or remove the background while keeping the subject, edges, and shadows intact.
Check the hair and product edges at full size, since fine edges are where background edits most often break.
Can ChatGPT combine two uploaded photos?
Yes. Upload a small set, refer to each image by order, and give each one a single role such as subject, background, or lighting reference.
State how they relate, for example “place the product from Image 1 on the surface in Image 2,” and verify scale, light direction, and shadows in the result.
Why does ChatGPT change details I did not ask it to change?
Because it regenerates an updated image from your instructions rather than editing pixels directly, so anything you do not lock down is open to change. OpenAI documents remaining limits in consistency and composition.
The fix is to repeat your protected invariants on every turn and change only one thing at a time.
How do I fix misspelled text in an edited image?
Ask for a text-only correction: quote the exact wording, keep the same font, size, color, and position, and forbid every other change. Keep in-image copy short, since text placement and clarity are documented limitations.
Then read every character at full size before you accept it.
Can ChatGPT restore an old photo accurately?
It can reduce scratches, dust, and fading, but it can also invent plausible detail that was never in the original. Ask it to preserve every identifiable feature and to avoid creating new faces or objects, and compare the result with the source at full size.
Treat colorization and reconstruction as an interpretation, not a historical record.
Is ChatGPT photo editing free?
ChatGPT Images is available on all tiers as of 2026-09-20, and OpenAI says Images 2.5 rolled out across all tiers, so basic editing is accessible on a free account. Image creation and uploads can carry limits that are separate from the main chat limit and can change, and ChatGPT shows the reset timing in-product when you hit one.
There is no stable published quota, so plan your most important edits first.
Is there a ChatGPT photo editing link I can open?
Not in the sense of a URL that edits a photo for you. ChatGPT’s share feature creates a link to a conversation that already happened, so a photo editing link is someone’s shared chat. To edit your own image, open ChatGPT, upload the file, and describe the change.
What is a ChatGPT photo editing code?
It is another name for a prompt. There is no code to enter and no hidden mode to unlock. People use the word for the shortest form of a prompt: one line, one change, nothing to fill in. The one-line codes in this guide are exactly that.
Can ChatGPT edit family photos without changing faces?
Often, but not reliably. Identity drift is a documented weak spot, so name every face that must stay unchanged, edit one thing per turn, and compare the result with the original at full size. If a face shifts, restore it before you make any further change.
What is ChatGPT Images 2.5?
It is the image model OpenAI shipped on 2026-09-08 and rolled out across all ChatGPT tiers. OpenAI describes it as better at editing only what you asked for while keeping the rest of the details the same, and says distinctive features are more likely to carry through an edit. It also added Sketch, Templates, and comments on images. In the API it appears as two variants, gpt-image-2.5-flare for fast everyday work and gpt-image-2.5-sunburst for precision editing, and OpenAI does not publish which variant the ChatGPT app uses. Rechecked 2026-09-20.
How do I use Sketch in ChatGPT?
On the ChatGPT mobile app, type @ in the message box and select Sketch. Draw your rough guide, choosing a color, erasing, or undoing a stroke as you go, then confirm with the checkmark. Add written instructions describing the subject, colors, and style you want, and send. OpenAI documents Sketch as a way to create an image from a drawing plus instructions, and says you can ask for further changes in the same conversation afterward. It is not documented as a mask over a photo you upload, so use V1 to V3 above to fix composition first, then continue editing in the same thread.
Can I comment on part of an image to edit it?
Yes, on the ChatGPT mobile app. Open an image ChatGPT generated to full screen, then edit it or add a comment on the part you want changed. This is the closest the app gets to a local edit, but it is still not a precise mask: OpenAI’s own documentation warns that highlights are not always precise and that edits may extend beyond the area you selected. Keep the preserve clause in the comment, and compare against the original at full size afterward. OpenAI publishes only a short description of this feature, with no step-by-step guide of the kind it gives for Sketch and Templates.