Tested on ChatGPT Plus (GPT Image 1.5)
How this content was created: Every prompt below was written and tested by our editorial team using real uploaded photos inside ChatGPT Plus. AI tools assisted with research aggregation and formatting, but all testing, evaluation, and editorial judgment are human-driven.
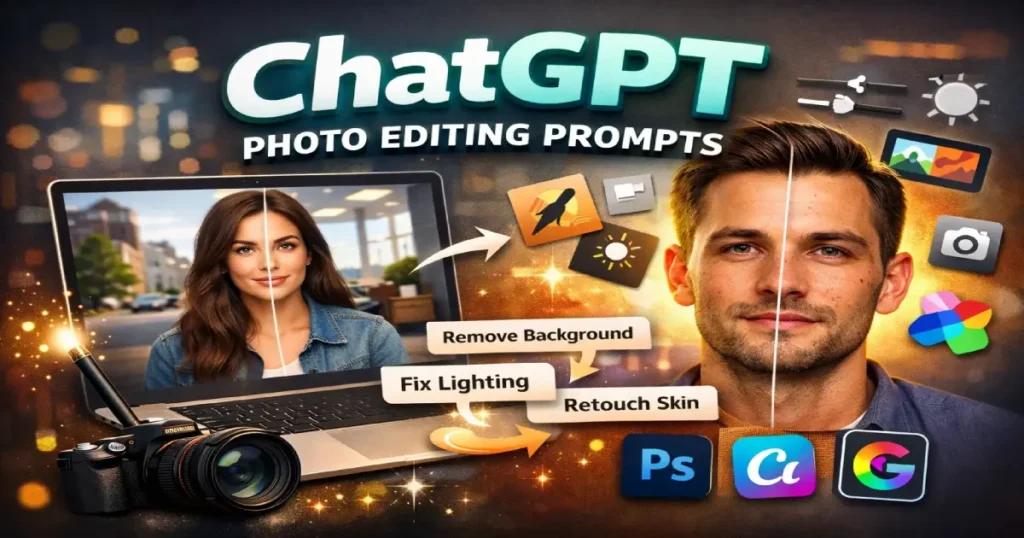
ChatGPT photo editing prompts are the natural-language instructions you write when you upload a real photo to ChatGPT and ask the model to change it — fix lighting, swap the background, retouch skin, or remove unwanted objects. The right prompt is the single biggest factor between getting a usable, professional-looking edit and getting a warped, over-processed image that looks obviously AI-generated. This guide gives you 50 copy-and-paste prompts we actually tested, a reusable prompt formula, honest notes on where ChatGPT fails, and direct comparisons with Photoshop, Canva, and Gemini so you can choose the right tool for each job.
3 Things You Need to Know
✅ What works: ChatGPT handles background swaps, lighting corrections, color grading, and basic retouching well — when you give it explicit constraints.
❌ What fails: Facial identity drift, over-smoothed skin, weird hands, and garbled text are still common without “preserve” instructions.
📋 What this guide solves: A copy-paste prompt library, a reusable formula, a failed-prompts section, troubleshooting fixes, and a comparison framework — not just a list.
Best Prompt Formula (Quick Reference)
[Subject] + [Edit Action] + [Preserve Constraints] + [Style/Lighting Details] + [Technical Specs] + [Negative Constraints]
Example: “Edit this headshot. Soften the background to neutral gray. Even out skin lighting. Preserve exact facial features and clothing. Output at 4K, 3:4 crop. Do not alter skin texture.”
Best For / Avoid If
Best for: Quick single-image edits, background replacement, lighting fixes, color grading, conversational iteration, non-designers who need fast results.
Avoid if: You need pixel-perfect retouching, batch processing, precise masking around fine hair, or professional print-ready output.
What Changed in ChatGPT Photo Editing in 2026
ChatGPT’s image editing capabilities in 2026 are significantly different from what was available even 6 months ago. Here’s what matters for prompt writing:
| Change | What it means for your prompts |
|---|---|
| GPT Image 1.5 model | Better at preserving facial identity and lighting direction than the previous DALL·E-based editing. You still need explicit “preserve” instructions, but results are more consistent. |
| Selection tool | You can now highlight a specific area of your photo and tell ChatGPT to edit only that region. This dramatically reduces unwanted changes. |
| Conversational editing | Multi-turn refinement is more stable — ChatGPT remembers context better across follow-up prompts within the same session. |
| Mobile editing support | Full image editing available on iOS and Android apps, not just web. Same prompt quality applies. |
| Better text rendering | Text on products and signs is less frequently corrupted, though still imperfect. |
| Pricing change | Image editing is included in ChatGPT Plus ($20/month) and Team plans. Free-tier access remains limited — check the OpenAI Help Center for current limits. |
Bottom line: The model has improved, but it still requires well-structured prompts. Vague instructions still produce bad results.
How We Tested These Prompts
Every prompt in this article was tested against a consistent set of source images — headshots, product flats, travel snapshots, vintage scans, and social media portraits — using ChatGPT Plus with GPT Image 1.5.
Our test image set included:
- 3 professional headshots (studio lighting, outdoor, casual indoor)
- 2 product flat-lays (small electronics, cosmetics)
- 2 travel snapshots (beach, city street)
- 1 vintage family photo (scanned 1970s print)
- 2 social media portraits (selfie, full-body)
We scored each result on five criteria:
- Instruction accuracy — Did ChatGPT do exactly what the prompt asked?
- Identity preservation — Did faces, logos, and key details stay intact?
- Naturalness — Does the output look like a real edited photo, or an obvious AI render?
- Repeatability — Does the same prompt give consistent results across different source photos?
- Edge-case behavior — How does it handle hands, accessories, text, and fine hair?
Where a prompt consistently failed, we either revised it until it worked or moved it to the “Prompts That Failed” section with an explanation.
What ChatGPT Photo Editing Prompts Actually Are
A ChatGPT photo editing prompt is an instruction paired with an uploaded image that tells ChatGPT exactly how to modify that specific photo. Many guides mix three very different things together. Here’s the distinction that matters:
| Type | What happens | Example |
|---|---|---|
| Photo editing | You upload a real photo and ask ChatGPT to change part of it | “Remove the trash can from the left side of this beach photo” |
| Image generation | You describe a scene from scratch — no uploaded photo | “A golden retriever sitting on a red couch, studio lighting” |
| Style transfer | You upload a photo and ask ChatGPT to redraw it in a different artistic style | “Turn this portrait into a Studio Ghibli character” |
This article focuses on true photo editing — working with your real, uploaded images. If you’re looking for broader prompt strategies beyond photo editing, our complete ChatGPT prompts guide covers use cases across writing, business, and creative work. For pure AI image generation from text, our best AI image generators roundup compares the top tools.
How it works at a high level: You upload a photo, then describe the edit you want in natural language. ChatGPT processes the image through its built-in image model (currently GPT Image 1.5, the successor to DALL·E) and returns a modified version. You can then continue the conversation to refine the result — adjusting specific areas, changing intensity, or undoing parts of the edit.
How to Edit Photos in ChatGPT (Step by Step)
Here is the actual workflow for editing uploaded photos in ChatGPT in 2026.
1. Upload Your Photo
Click the attachment icon in any ChatGPT conversation and select your image. For best results, use high-resolution source files (at least 2000 px on the long side). JPG, PNG, and WebP formats all work.
2. Write Your Edit Prompt
Be specific. “Make this look better” gives unpredictable results. “Brighten the subject’s face by about 1 stop, keep the warm sunset tones in the background, and preserve her exact facial features” gives the model real constraints.
3. Use Selection Editing for Targeted Changes
Use the built-in selection tool to highlight a specific area — a face, a background region, a product — and ask for changes only within that selection. This is critical for object removal, localized color correction, or swapping only the sky.
4. Refine with Conversational Follow-Ups
ChatGPT retains context within the same conversation. You can say:
- “The skin looks too smooth — add back more realistic texture.”
- “Good, but make the background slightly more blurred.”
- “Undo the color change on her jacket.”
5. Preserve What Matters
If identity, composition, or lighting are important, state your constraints explicitly in every prompt. ChatGPT will not automatically preserve these unless you tell it to.
The Prompt Formula That Gets Better AI Photos
Most bad results come from vague prompts — it’s a core principle of prompt engineering. This formula consistently produces better AI photo editing results:
| Component | Purpose | Example |
|---|---|---|
| Subject | What or who is in the photo | “the woman in the center of this headshot” |
| Edit action | What you want changed | “replace the background with a soft-focus modern office” |
| Preserve constraints | What must NOT change | “preserve her exact facial features, hair, jewelry, and clothing” |
| Scene/style details | Mood, lighting, environment | “warm directional lighting from the upper left, shallow depth of field” |
| Technical specs | Resolution, aspect ratio, format | “output at 4K resolution, 3:4 portrait aspect ratio” |
| Negative constraints | What to avoid | “do not alter skin texture, do not add makeup, do not change eye color” |
3 Reusable Prompt Templates
Quick Prompt (1 line):
Edit this photo: [edit action], keep [key element] unchanged, [one style note].
Detailed Prompt (full control):
Edit the uploaded photo. [Edit action in detail]. Preserve [list of constraints]. The lighting should be [lighting description]. Maintain [composition/aspect ratio/resolution notes]. Do not [negative constraint 1], do not [negative constraint 2].
Refinement/Revision Prompt (follow-up):
Good, but [specific adjustment]. Also [second tweak]. Keep everything else from the last version.
50 Tested ChatGPT Photo Editing Prompts
Portrait & Headshot Prompts (1–10)
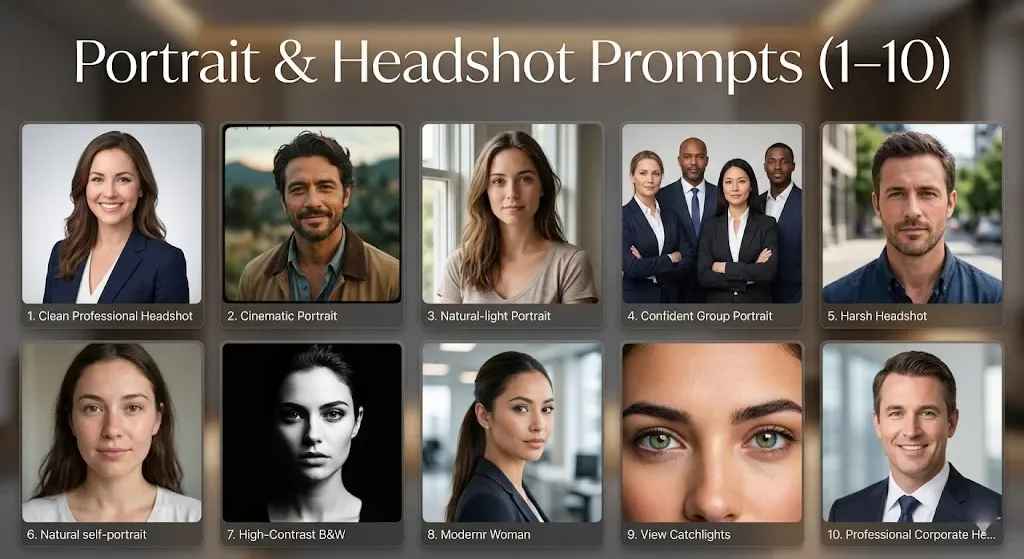
1. Clean Professional Headshot
Edit this headshot photo. Soften the background to a clean, neutral light-gray gradient. Subtly even out the subject's skin tone without removing natural texture or pores. Brighten the eyes slightly. Preserve the subject's exact facial features, hair, and clothing. Keep the lighting natural and directional. Output in 4K resolution, 3:4 portrait crop.Why it works: Constrains the model to specific edits while locking identity. The “without removing natural texture” clause prevents over-smoothing.
Best for: LinkedIn headshots, company bios, speaker pages.
Tip: Add “do not change teeth color or add whitening” if dental appearance matters.
2. Cinematic Portrait Edit
Edit this portrait. Apply subtle cinematic color grading — slightly desaturated midtones, warm highlights, cool shadows. Add a very gentle film grain. Preserve the subject's exact facial features and expression. Do not change clothing or accessories. Keep the original composition and aspect ratio.Why it works: The midtone/highlight/shadow split gives ChatGPT precise color grading directions.
Best for: Editorial portraits, personal branding, portfolio pieces.
Tip: Add “similar to Kodak Portra 400 tones” for a more specific film reference.
3. Natural-Light Window Portrait
Edit this indoor portrait. Adjust the lighting to simulate soft, diffused window light coming from camera-left. Keep all shadows subtle and open. Preserve the subject's face, hair, and outfit exactly. Do not change the background furniture or walls.Why it works: Specifying light direction and quality gives the model clear physical constraints.
Best for: Author photos, lifestyle branding, dating profiles.
4. Corporate Group Headshot Consistency
Edit this group photo. Even out the lighting across all faces so no individual appears significantly brighter or darker than the others. Subtly reduce under-eye shadows on all subjects. Keep all facial features, hair, and clothing exactly as they are. Do not crop or change the composition.Why it works: Group photos need uniform treatment — this prompt forces consistency.
Best for: Company team pages, About Us sections, press kits.
5. Outdoor Headshot — Harsh Sun Fix
Edit this outdoor headshot. Reduce harsh midday shadows on the subject's face, especially under the nose and chin. Open up the shadow areas without blowing out highlights. Keep the natural outdoor environment and all original details intact.Why it works: Targets a specific real-world problem (harsh overhead sun) with precise editing language.
Best for: On-location headshots, conference photos, quick LinkedIn shots taken outdoors.
6. Gentle Self-Portrait Retouch
Edit this selfie. Remove minor blemishes and smooth out uneven skin tone very subtly. Do not alter facial structure, remove freckles, change nose shape, or modify lip shape. Keep realistic skin texture with visible pores. Preserve hair and clothing exactly. Keep the warm natural lighting.Why it works: Explicit “do not” clauses prevent over-retouching.
Best for: Social media profiles, personal sites, casual branding.
Tip: Follow up with “add back more skin texture — the result looks too airbrushed” if needed.
7. Black-and-White Editorial Portrait
Convert this portrait to high-contrast black and white. Preserve rich midtone detail in the skin. Keep deep blacks in the background and clean whites in highlight areas. Do not alter the subject's facial features, expression, or pose. Maintain the original composition.Why it works: Specifying tonal ranges (midtone detail, deep blacks, clean whites) guides the conversion.
Best for: Portfolio work, editorial features, thought-leader branding.
8. Headshot Background Upgrade
Replace the background of this headshot with a softly blurred modern office environment — glass, warm wood, subtle ambient lighting. Keep the subject's face, hair, neck, shoulders, and clothing perfectly intact. Match the lighting on the subject to the new background. Do not change the subject's skin tone or expression.Why it works: “Match the lighting” prevents the classic compositing error of mismatched ambient light.
Best for: Upgrading a home-office headshot for professional use.
9. Add Catchlight to Eyes
Edit this portrait. Add a subtle, natural-looking catchlight reflection in each eye as if a softbox were placed at upper camera-left. Do not change eye color, pupil size, or any other facial feature. Keep everything else in the photo unchanged.Why it works: Extremely targeted micro-edit with tight constraints.
Best for: Polishing studio headshots, making flat-lit eyes pop.
10. Professional Headshot From Casual Photo
Edit this casual photo into a professional-looking headshot. Crop to a head-and-shoulders composition, 3:4 aspect ratio. Soften and simplify the background to a neutral tone. Even out the subject's skin lighting. Sharpen the eyes slightly. Preserve the subject's exact appearance — face, hair, clothing, expression. Do not stylize or add filters.Why it works: A full brief — crop, background, lighting, sharpening — with hard preserve constraints.
Best for: Quick professional headshot from a phone snapshot.
Product Photo Prompts (11–15)
11. Clean E-Commerce White Background
Edit this product photo. Remove the existing background and replace it with a pure white (#FFFFFF) seamless background. Preserve the product's exact colors, textures, labels, and proportions. Ensure the product shadow is a soft, natural drop shadow. Do not alter the product in any way.Why it works: The hex code plus shadow instruction give marketplace-ready results.
Best for: Amazon, Shopify, Etsy product listings.
12. Lifestyle Product Staging
Edit this product photo. Place the product on a light marble countertop with a softly blurred kitchen background. Add warm, natural window lighting from camera-right. Keep the product's exact shape, color, label, and size. Ensure the lighting on the product matches the new scene.Why it works: Scene-matching instructions prevent the floating-object look.
Best for: Shopify hero images, Instagram product posts, DTC brand pages.
13. Remove Background Clutter Around Product
Edit this photo. Remove all objects surrounding the product except the product itself. Keep the product on its current surface. Clean up any visual distractions (stray wires, paper, dust, fingerprints on product). Do not change the product's appearance.Why it works: Targets the “quick photo on a messy desk” scenario.
Best for: Speed-cleaning product shots for social or marketplace use.
14. Product Photo Color Accuracy Fix
Edit this product photo. Correct the white balance so that the product's colors appear accurate and true to life. The product should look as it does under neutral daylight (5500K). Do not add warmth, coolness, or any color cast. Preserve all details and textures on the product.Why it works: The Kelvin reference gives the model a precise white-balance target.
Best for: E-commerce where color accuracy affects returns (clothing, cosmetics, paint).
15. Product Lightbox Setup
Edit this product photo. Place the product inside a clean, modern product photography lightbox with soft, even lighting from all sides. Minimal shadow directly beneath the product. Pure white background visible behind and below. Keep the product's exact appearance and proportions.Why it works: Emulates studio lightbox conditions without a physical studio.
Best for: Jewelry, small electronics, cosmetics.
Background Replacement Prompts (16–20)
16. Urban Street to Studio Background
Replace the background of this photo with a clean, solid medium-gray studio backdrop. Keep the subject fully intact — face, hair, clothing, accessories, pose. Match the studio lighting to the existing light on the subject. Maintain original image resolution and composition.Why it works: Simple environment swap with explicit lighting-match instruction.
Best for: Converting an outdoor snapshot into a studio-style portrait.
17. Natural Outdoor Background Swap
Replace the background behind the subject with a lush, green park setting — soft-focus trees, dappled sunlight, and a walking path in the distance. Preserve the subject completely. Match the ambient light warmth and direction to the new background.Why it works: Detailed scene building plus light matching.
Best for: Family photos, graduation portraits, engagement photos.
18. Sky Replacement for Real Estate
Replace only the sky in this exterior real estate photo with a clear blue sky featuring a few soft white clouds. Keep the building, landscaping, driveway, and all foreground elements perfectly intact. Match the lighting angle on the building to the new sky's sun position.Why it works: Real estate agents need this daily; the sun-position note prevents mismatched shadows. For more real estate applications, see our ChatGPT prompts for real estate agents.
Best for: MLS listings, Zillow/Redfin uploads, real estate marketing.
19. Shallow Depth-of-Field Simulation
Simplify the background of this photo. Blur all background elements to simulate a shallow depth of field (approximately f/2.0). Keep the subject in sharp focus. Do not change the subject's appearance in any way. Maintain original aspect ratio.Why it works: The f-stop reference guides the model toward a photorealistic blur level.
Best for: Portraits taken in busy environments, conference photos.
20. Seasonal Background Change
Replace the background of this outdoor photo with an autumn scene — warm golden and red foliage, soft afternoon light, fallen leaves on the ground. Keep the subject and their clothing completely intact. Match the warm color temperature on the subject to the new fall lighting.Why it works: Seasonal swaps are high-demand for social media and personal branding.
Best for: Seasonal social posts, holiday cards, marketing campaigns.
Lighting & Color Grading Prompts (21–25)
21. Golden-Hour Warmth
Edit this photo. Apply warm golden-hour lighting — slightly warm white balance, soft amber highlights, gentle lens flare near the edge of frame. Preserve the subject's face and clothing exactly. Do not over-saturate.Why it works: “Do not over-saturate” is the key constraint.
Best for: Travel photos, engagement photos, lifestyle brand content.
22. Blue-Hour Moody Edit
Edit this photo. Shift the color grading to a blue-hour mood — cool shadows, slightly desaturated midtones, soft blue overtones. Keep subject detail and facial features perfectly preserved. Add subtle contrast lift to maintain readability.Why it works: The contrast-lift instruction prevents the image from becoming murky.
Best for: Moody portraits, urban photography, music artist branding.
23. Fix Underexposed Indoor Photo
Brighten this underexposed indoor photo by approximately 1.5 stops. Open up shadow areas on the subjects' faces while keeping highlights from blowing out. Reduce any visible noise or grain introduced by the brightness increase. Preserve all details, colors, and composition.Why it works: Stop-value guidance and noise-reduction produce a controlled correction.
Best for: Restaurant photos, event shots, dimly lit interior snapshots.
24. Remove Color Cast
Remove the strong green color cast from this photo. Neutralize the white balance so that whites appear truly white and skin tones look natural. Preserve all other details and do not add any new color grading.Why it works: Targets a specific technical problem without new creative choices.
Best for: Photos taken under fluorescent lighting, mixed lighting interiors.
25. Analog Film Simulation
Apply a subtle analog film look to this photo — slight Kodak Portra 400 color palette with lifted blacks, gentle highlight rolloff, and fine film grain. Preserve the subject's facial features and clothing exactly. Do not over-process. This should look like it was shot on film, not digitally filtered.Why it works: Naming a specific film stock anchors the color profile.
Best for: Personal branding, editorial work, wedding photography post-processing.
Social Media & Profile Photo Prompts (26–30)
26. Instagram-Ready Portrait Polish
Edit this portrait for Instagram. Subtly brighten the subject's face, add gentle warmth to the overall color palette, and slightly increase contrast. Soften any harsh shadows. Keep the subject's face, outfit, and pose exactly as they are. Output in 4:5 aspect ratio.Why it works: Platform-specific aspect ratio plus targeted brightness/contrast adjustments.
Best for: Instagram grid posts, carousel cover photos.
27. TikTok Thumbnail Enhancement
Edit this photo to work as a strong TikTok thumbnail. Increase contrast and vibrancy slightly. Make the subject's face the clear focal point — brighten the face and darken the background edges subtly (mild vignette). Preserve all facial features and details. Output in 9:16 aspect ratio.Why it works: Combines platform-specific formatting with attention-grabbing edits.
Best for: TikTok cover images, Reels thumbnails, YouTube Shorts covers.
28. LinkedIn Professional Profile Upgrade
Edit this photo for a LinkedIn profile. Crop to a centered head-and-shoulders composition. Soften the background to a professional neutral tone. Even out skin lighting. Add subtle warmth. Preserve the subject's exact face, expression, and attire. Output as square (1:1) crop.Why it works: LinkedIn-specific crop and tone guidance.
Best for: LinkedIn profile photos, executive bios, corporate directories.
29. Dating Profile Photo Enhancement
Edit this casual photo. Brighten the overall image slightly. Add subtle warmth. Reduce any harsh shadows on the face. Sharpen the eyes gently. Keep the subject's natural appearance — do not alter face shape, body proportions, or skin texture significantly. Maintain a natural, approachable look.Why it works: The “do not alter body proportions” clause is critical for authenticity.Best for: Dating app profile photos. Tip: If you want to generate couple photos from scratch rather than edit existing ones, Gemini handles multi-person scenes better than ChatGPT — see our 50 Gemini couple photo prompts for ready-to-use templates.
30. Personal Brand Hero Image
Edit this photo into a polished personal brand hero image. Apply professional-grade color grading with slightly lifted blacks and a cohesive warm-neutral palette. Subtly sharpen the subject. Soften the background. Ensure the overall look feels editorial and intentional. Preserve the subject's exact face, clothing, and body. Output at high resolution, 16:9 aspect ratio.Why it works: “Editorial and intentional” pushes past default processing.
Best for: Website hero banners, speaker pages, podcast cover art.
Fashion & Beauty Prompts (31–35)

31. Clean Beauty Editorial
Edit this beauty close-up. Even out skin tone subtly while preserving realistic pore texture and natural imperfections. Remove only obvious temporary blemishes (pimples, redness). Do not smooth wrinkles, reshape features, or change makeup. Sharpen the eyes and lips slightly. Keep lighting and color grading as is.Why it works: Granular blemish policy prevents over-editing.
Best for: Beauty brand content, cosmetics marketing.
32. Fashion Lookbook Color Grade
Apply a high-fashion editorial color grade to this photo. Slightly desaturate skin tones while keeping clothing colors vibrant. Add cool undertones to shadows and neutral-warm highlights. Increase contrast slightly. Preserve the model's face, body, and clothing details exactly. Do not alter the garments.Why it works: Separate treatment of skin tones vs. clothing colors mirrors real fashion post-production.
Best for: Fashion brand lookbooks, e-commerce campaigns.
33. Hair Color Preview
Edit this portrait to change only the subject's hair color to a warm honey blonde. Keep the hair's natural texture, volume, shine patterns, and style exactly the same. Do not touch the face, skin, clothing, or background. Make the color change look natural — no wig-like appearance.Why it works: Constraining everything except the target change produces realistic previews.
Best for: Salon consultation visuals, personal color experiments.
34. Outfit Color Change
Change the color of the subject's jacket from navy blue to a deep burgundy. Keep the fabric texture, wrinkles, folds, buttons, and fit exactly the same. Do not change anything else in the photo.Why it works: Fabric-detail preservation prevents flat, painted-on-looking colors.
Best for: Fashion planning, e-commerce color variant previews.
35. Jewelry Enhancement
Enhance the jewelry in this portrait. Add subtle catchlight reflections to metallic surfaces. Slightly increase the sparkle on gemstones. Keep the overall photo unchanged — face, clothing, background, and lighting — except for the jewelry enhancement. Do not resize or reposition any jewelry.Why it works: Micro-targeted enhancement with tight constraints.
Best for: Jewelry brand marketing, engagement ring photos.
Travel & Lifestyle Prompts (36–40)
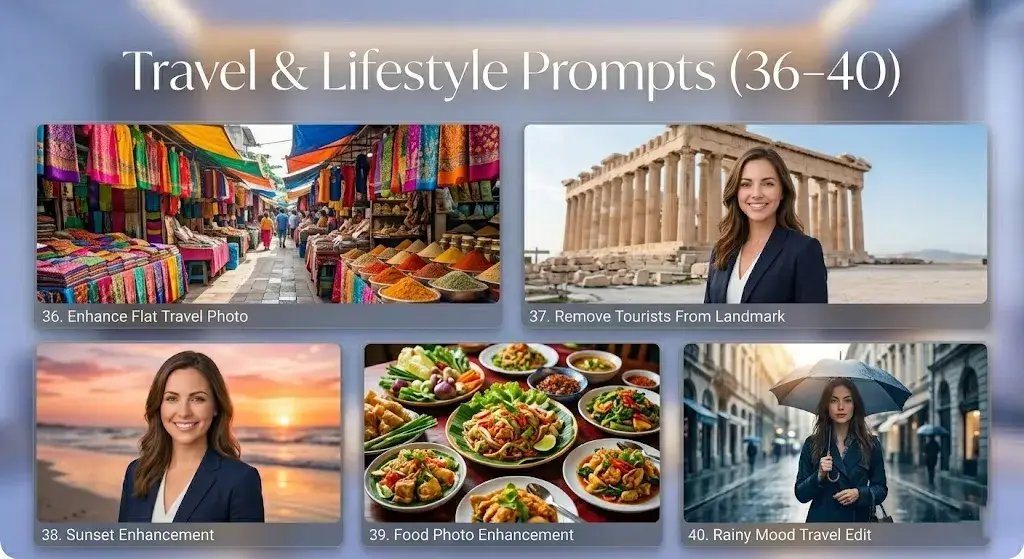
36. Enhance Flat Travel Photo
Edit this travel photo. Increase vibrance and clarity moderately. Open up shadow areas to reveal more detail in darker regions. Add a subtle warm tone to highlights. Keep the composition, subjects, and location details exactly as they are. Do not add or remove objects.Why it works: “Do not add or remove objects” prevents ChatGPT from “helpfully” adding elements.
Best for: Trip recap posts, travel blogs.
37. Remove Tourists From Landmark Photo
Remove all people from the background of this photo, keeping only the main subject(s) in the foreground. Fill the removed areas with a natural continuation of the landmark/architecture behind them. Preserve the main subject(s) and all foreground elements exactly.Why it works: Clear separation between “keep” and “remove” subjects.
Best for: Landmark photos, museum shots.
38. Sunset Enhancement
Enhance the sunset colors in this photo. Intensify the warm oranges and pinks in the sky by about 20%, and add a subtle golden reflection on any water or reflective surfaces. Do not oversaturate. Preserve the landscape, subjects, and foreground details exactly.Why it works: Percentage guidance prevents the nuclear-sunset look.
Best for: Beach shots, mountain sunsets, lake reflections.
39. Food Photography Enhancement
Edit this food photo. Enhance the color saturation of the food slightly to make it look more appetizing. Add a gentle warm tone. Increase contrast modestly. Sharpen the food details. Keep the plate, table setting, and background elements exactly as they are.Why it works: Food-specific edits focused on appetizing appeal.
Best for: Restaurant content, food blog photos.
40. Rainy Mood Travel Edit
Edit this travel photo to enhance the rainy, moody atmosphere. Deepen the blues and grays slightly. Add subtle reflections on wet surfaces. Increase contrast in the midtones. Keep all subjects, buildings, and scene elements exactly as they are. Do not add rain that isn't already there.Why it works: “Do not add rain that isn’t already there” stops hallucinated weather effects.
Best for: European travel content, atmospheric street photography.
Restoration & Cleanup Prompts (41–45)
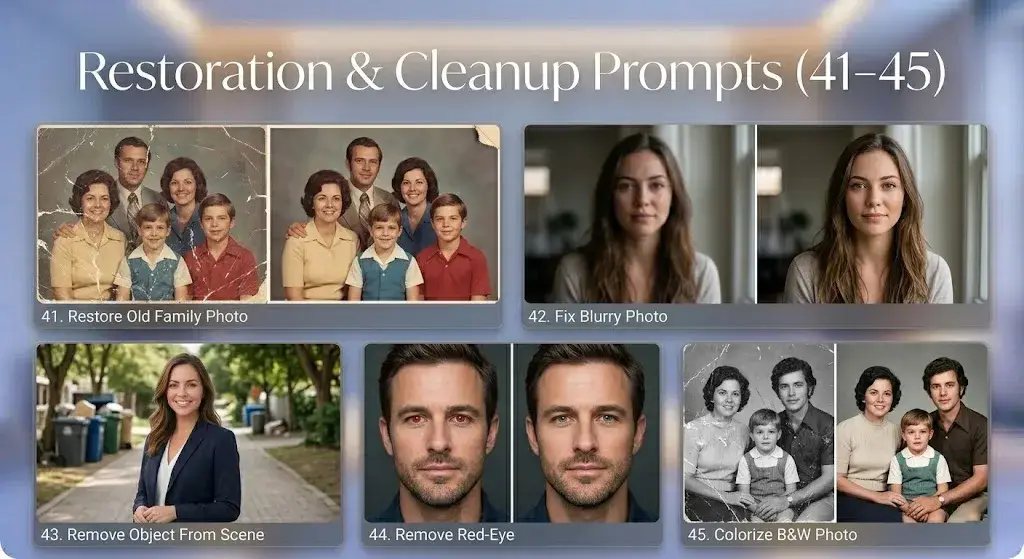
41. Restore Old Family Photo
Restore this old photograph. Remove visible scratches, dust spots, creases, and fading. Rebuild any missing or damaged areas to match the surrounding image content. Preserve the original subjects' faces and expressions as accurately as possible. Maintain the vintage look — do not modernize the style or convert to full color unless asked.Why it works: “Maintain vintage look” prevents over-correction into modern aesthetics.
Best for: Family heritage projects, memorial photo restoration.
42. Fix Blurry Photo
Sharpen this slightly blurry photo. Improve clarity and edge definition on the main subject without introducing obvious sharpening artifacts or halo effects. Keep the background soft if it was originally out of focus. Preserve all colors, composition, and content.Why it works: The artifacts/halos warning prevents over-sharpening.
Best for: Rescuing slightly soft shots, low-light phone photos.
43. Remove Object From Scene
Remove the [object, e.g., "trash can on the left side"] from this photo. Fill the area naturally with the surrounding environment — match the ground texture, lighting, and perspective. Do not alter anything else in the image.Why it works: Inpainting-style instruction with explicit fill guidance.
Best for: Real estate photos, landscape cleanup.
44. Remove Red-Eye
Remove the red-eye effect from the subject's eyes in this photo. Restore natural eye color. Do not change pupil size, eye shape, or any other facial feature. Keep everything else exactly the same.Why it works: Ultra-narrow scope prevents collateral changes.
Best for: Flash photography, event candids.
45. Colorize Black-and-White Photo
Colorize this black-and-white photograph with historically accurate, natural colors. Use era-appropriate tones for clothing, skin, hair, and environment. Keep the colorization subtle and realistic — it should look like a color photo from the period, not a modern filter. Preserve all details and composition.Why it works: “Era-appropriate” and “not a modern filter” guide historically informed choices.
Best for: Family history, historical document restoration.
Creative & Style Prompts (46–50)

46. Dramatic Rembrandt Lighting
Edit this portrait to simulate dramatic Rembrandt lighting — strong directional light from upper camera-left creating a triangle of light on the shadow-side cheek. Deepen shadows considerably. Keep the subject's face, expression, and clothing exactly the same. Apply only the lighting change.Why it works: Naming a specific lighting style plus describing its signature pattern gives clear creative direction.
Best for: Artistic portfolios, actor headshots, dramatic personal branding.
47. Vintage 1970s Color Edit
Edit this photo to have a 1970s vintage color palette — slightly faded, warm yellows and oranges, soft contrast, muted greens, and a subtle overall haze. Keep the subject and composition exactly as they are. This should look like a naturally aged film photograph, not a digital filter.Why it works: Specific decade reference with named color characteristics.
Best for: Themed social posts, retro branding.
48. Double Exposure Effect
Create a double exposure effect by blending this portrait with a forest/nature scene. The nature imagery should appear primarily in the highlight and midtone areas of the subject's head and shoulders. Keep the subject's face recognizable. Use a cool-toned color palette.Why it works: Specifying where the overlay appears prevents facial recognition loss.
Best for: Creative portfolios, album art concepts.
49. Tilt-Shift Miniature Effect
Apply a tilt-shift miniature effect to this cityscape or landscape photo. Keep a narrow horizontal band in sharp focus through the center and add a strong, gradual blur above and below. Slightly increase color saturation to enhance the toy-like look. Do not alter the actual content.Why it works: Describes the physical effect rather than just the name.
Best for: Urban photography, architectural shots.
50. Selective Color Pop
Edit this photo so that the subject's [specific item, e.g., "red dress"] remains in full color while the rest of the image is converted to black and white. Keep the color boundary clean and natural. Preserve all details and the original composition.Why it works: Selective color isolation with clear masking instructions.
Best for: Social media standout posts, portfolio accents.
Before & After: 3 Real Edit Examples
Here’s what our tested prompts actually produced — along with what went right and what needed refinement.
Example 1: LinkedIn Headshot Upgrade (Prompt #1)
Source photo: Casual indoor selfie with cluttered bookshelf background, uneven overhead lighting, slight redness on one cheek.
Result after one prompt: Background softened to clean neutral gray. Skin lighting evened out. Eyes subtly brightened. Face and clothing preserved accurately.
What worked: Identity preservation was near-perfect. The background separation was clean even around hair edges.
What required follow-up: Skin was slightly over-smoothed on first pass. The follow-up prompt “add back more realistic skin texture — the result looks slightly too smooth” fixed it in one round.
Verdict: Usable for LinkedIn as-is after one correction round. Total time: ~90 seconds. Would have taken 5–10 minutes in Adobe Photoshop with similar quality.
Example 2: E-Commerce White Background (Prompt #11)
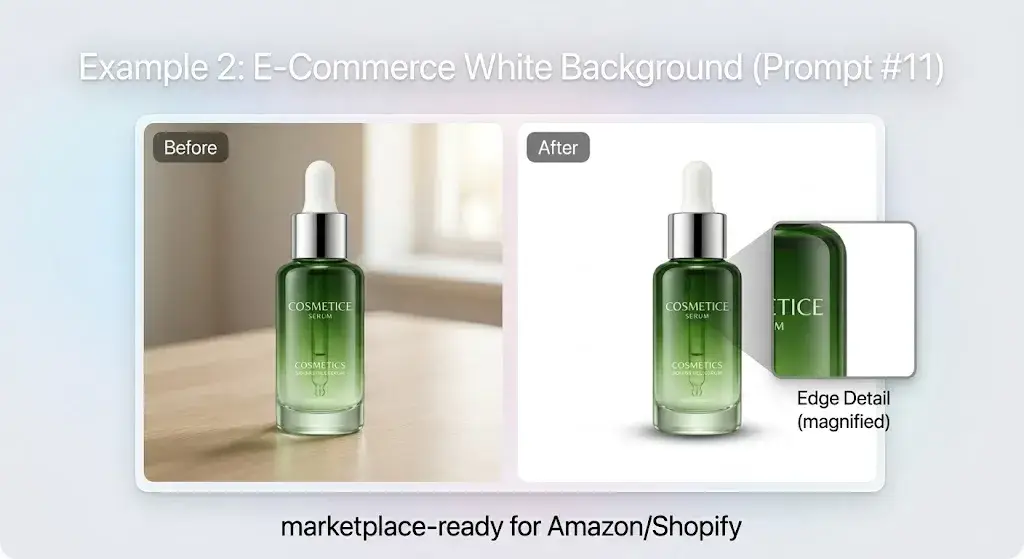
Source photo: Cosmetics bottle photographed on a beige wooden table with window light.
Result after one prompt: Background replaced with pure white. Product colors accurate. Drop shadow present and natural-looking.
What worked: Product proportions and label text both preserved correctly. Shadow quality was realistic.
What required follow-up: A faint halo/edge artifact appeared along the right side of the bottle, visible at 100% zoom. Follow-up: “Clean up any halo or edge artifacts around the product silhouette.”
Verdict: Marketplace-ready after one minor fix. Good enough for Amazon/Shopify listings. For high-volume product photography catalogs, dedicated tools or professional retouching are still more efficient.
Example 3: Restore Vintage Family Photo (Prompt #41)
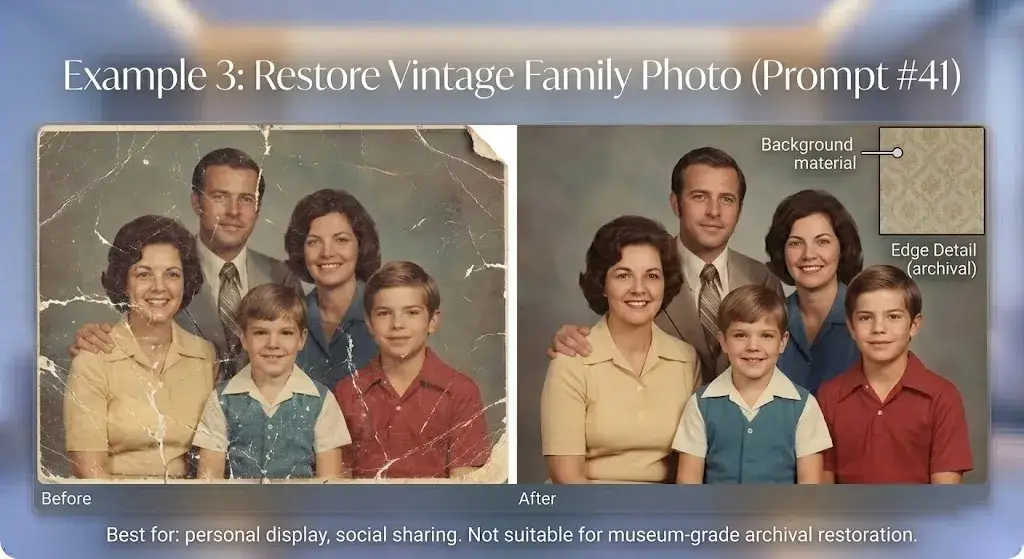
Source photo: Scanned 1970s family photo with multiple creases, heavy fading, and a torn corner.
Result after one prompt: Creases and dust removed effectively. Faded areas restored with appropriate tonal range. Torn corner rebuilt. Vintage color palette preserved — no unwanted modernization.
What worked: Facial features of all four family members stayed visually consistent with the original.
What failed: Some fine detail in the background wallpaper pattern was “hallucinated” — ChatGPT generated plausible-looking wallpaper that didn’t exactly match the original. Acceptable for display use; not suitable for archival restoration.
Verdict: Best for: personal display, social sharing, family projects. Not ideal for: museum-grade archival work.
Best Prompt by Use Case
Not sure which prompt to start with? This decision matrix includes honest assessments of where ChatGPT excels and where you may want to use something else.
| Use Case | Start With | Best For | Not Ideal For | Verdict |
|---|---|---|---|---|
| LinkedIn headshot | #1 Clean Professional Headshot | Quick turnaround, non-designers | High-end executive portraits | ✅ Solid first option |
| Instagram portrait | #26 Instagram-Ready Portrait | Platform-optimized crop + color | Heavy retouching needs | ✅ Good for casual creators |
| E-commerce product | #11 Clean White Background | Single-product listings | 100+ SKU batch processing | ⚠️ Good per-image, not scalable |
| Real estate exterior | #18 Sky Replacement | Quick sky swaps, MLS listings | Complex architectural compositing | ✅ Strong for agents |
| Travel photo | #36 Enhance Flat Travel Photo | Safe, non-destructive enhancement | RAW file processing | ✅ Great for social sharing |
| Personal brand | #30 Personal Brand Hero Image | Editorial-grade hero images | Print-resolution deliverables | ✅ Strong for digital use |
| Family photo cleanup | #41 Restore Old Family Photo | Casual restoration, social sharing | Museum-grade archival work | ⚠️ Good, not archival |
| Event/wedding | #23 Fix Underexposed Indoor Photo | Reception photos, venue lighting | Batch editing 500+ photos | ⚠️ Good per-image |
| Beginners | #10 Professional From Casual | People who have never edited before | Anyone with Lightroom skills | ✅ Best starting point |
| Marketers | #30 or #12 | Brand content, social assets | Large campaign production | ✅ Fast iteration |
| E-commerce sellers | #11 + #14 | Marketplace-compliant photos | Catalog-scale production | ⚠️ Use per-listing, not bulk |
Prompts That Failed Our Test
Not every prompt works. These are prompts we tested that consistently produced bad results — and what we learned from each failure.
❌ Failed: “Make this photo look professional”
What happened: ChatGPT applied random changes — over-sharpened, added unnecessary contrast, sometimes changed the background entirely without being asked. Results were inconsistent across different photos.
Why it fails: Too vague. “Professional” means different things for headshots, products, and landscapes. Without specific constraints, the model guesses — and guesses wrong often.
Lesson: Always specify what you want changed and what to preserve.
❌ Failed: “Edit this group photo — make everyone look their best”
What happened: ChatGPT altered facial features on multiple subjects. Some faces became thinner, others had different nose shapes. One person’s glasses disappeared entirely.
Why it fails: “Look their best” is subjective and unverifiable. The model interprets it as license to modify faces however it thinks looks “better.”
Lesson: For group photos, focus on lighting and color only. Never ask ChatGPT to “improve” faces in a group setting.
❌ Failed: “Remove the background and add a tropical beach scene with the text ‘Summer Vibes 2026’ at the top”
What happened: Background replacement worked fine. Text rendering failed — letters were distorted, spacing was uneven, and “2026” appeared as “2O26.”
Why it fails: Text rendering is one of ChatGPT’s weakest areas. Combining it with a complex edit makes it worse.
Lesson: Do the photo edit in ChatGPT, then add text in a design tool like Canva. Don’t ask ChatGPT to handle both.
❌ Failed: “Turn this casual photo into a cinematic masterpiece with dramatic lighting, professional color grading, moody atmosphere, soft bokeh, and film grain”
What happened: Identity drift. The subject’s face changed noticeably — jawline altered, eyes slightly different shape. Background was heavily stylized. The result looked like a different person in a movie still.
Why it fails: Stacking too many edits without preserve constraints gives the model too much freedom. Each additional instruction compounds identity risk.
Lesson: Keep edits focused. One or two changes per prompt, with explicit preserve constraints for everything else. Stack edits across multiple conversational turns instead.
❌ Failed: “Fix the hands in this photo — they look weird”
What happened: ChatGPT made the hands worse — extra fingers, merged fingers, unnatural angles.
Why it fails: Hands remain a difficult area for image models. Asking ChatGPT to “fix” already-problematic hands amplifies distortion rather than correcting it.
Lesson: If hands are a problem in your source photo, crop or position them off-frame before uploading. Do not rely on ChatGPT for hand correction.
ChatGPT vs Photoshop vs Canva vs Gemini
This is the comparison most people actually need. We tested the same five edits across all four tools using identical source images. ChatGPT’s photo editing capabilities sit in a specific niche — understanding when to use it versus alternatives is the key decision.
For a broader view of where ChatGPT fits among AI platforms overall, see our best AI chatbots comparison. If you’re leaning toward Gemini’s image models, our Nano Banana Pro prompt guide covers 50 tested frameworks for the premium Gemini image engine.
Feature Comparison
| Feature | ChatGPT | Photoshop AI | Canva AI | Gemini |
|---|---|---|---|---|
| Edit uploaded photos | ✅ Yes | ✅ Yes | ✅ Limited | ✅ Yes |
| Conversational refinement | ✅ Strong | ❌ No | ❌ No | ✅ Yes |
| Selection-based editing | ✅ Yes | ✅ Advanced | ✅ Basic | ❌ Limited |
| Facial identity preservation | ⚠️ Moderate | ✅ Strong | ⚠️ Moderate | ⚠️ Moderate |
| Professional retouching | ⚠️ Basic | ✅ Industry standard | ⚠️ Basic | ⚠️ Basic |
| Text rendering in edits | ⚠️ Improved | ✅ Native | ⚠️ Basic | ⚠️ Moderate |
| Batch processing | ❌ No | ✅ Yes | ✅ Yes | ❌ No |
| Learning curve | Low | High | Low | Low |
| Cost | $20/mo (Plus) | $22.99/mo+ | Free tier available | Free tier available |
Mini Benchmark: Same Edit, Four Tools
| Edit Task | ChatGPT Result | Photoshop AI Result | Canva AI Result | Gemini Result |
|---|---|---|---|---|
| Headshot background swap | ✅ Clean, quick, minor edge artifacts | ✅ Pixel-perfect edges, slower setup | ⚠️ Preset-limited, less control | ⚠️ Acceptable, some color mismatch |
| Product white background | ✅ Good color accuracy, slight halo | ✅ Perfect, industry standard | ⚠️ Basic removal, no shadow control | ⚠️ Inconsistent shadow quality |
| Fix underexposed photo | ✅ Good recovery, some noise | ✅ Excellent, full RAW-level control | ⚠️ Limited adjustment precision | ✅ Good recovery, competitive |
| Remove object from scene | ⚠️ Good for simple objects, struggles with complex fills | ✅ Best generative fill on market | ⚠️ Basic, works for simple objects | ⚠️ Moderate, similar to ChatGPT |
| Vintage photo restoration | ✅ Surprisingly good scratch/crease removal | ✅ Superior with manual control | ❌ Not a supported workflow | ⚠️ Moderate, less detail preservation |
When to Use Each Tool
- ChatGPT → Best when you want fast, iterative, single-image edits without opening a desktop app. Ideal for non-designers.
- Photoshop AI → Best when you need pixel-level control, batch processing, or professional print-ready output. Worth the learning curve for professionals. For more on Adobe Firefly pricing and how it compares to standalone subscriptions, we break down the costs separately.
- Canva AI → Best for template-based design work where photo editing is a secondary need. Great for social media managers.
- Gemini → Comparable to ChatGPT for basic edits, with tighter Google Workspace integration. Worth trying if you’re already in the Google ecosystem. See our full Gemini review for a detailed capability breakdown, or jump straight to our Gemini photo editing prompts for 50 copy-paste-ready examples.
For dedicated AI-powered photo editing tools beyond general-purpose chatbots, our best AI photo editors guide covers specialized options like Luminar Neo, Photoroom, and others. If you want to compare prompt techniques across all four AI tools side by side, our best AI photo editing prompts hub includes 80+ prompts organized by tool and editing task.
How to Customize Prompts Without Breaking the Image
When you start modifying the prompts above for your own photos, follow these rules to avoid breakage:
Preserve facial features explicitly. Any time a face is in the photo, include: “Preserve the subject’s exact facial features, including eyes, nose, mouth, jawline, skin tone, and expression.”
Lock clothing, logos, and brand assets. If brand marks matter: “Do not change the logo on the shirt,” “Keep the brand colors on the product label exactly as they are.”
Change only the background when that’s all you need. Don’t combine a background swap with a lighting change and a retouching edit in the same prompt unless you’re OK with identity drift. Stack edits across separate conversational turns instead.
Adjust mood without changing identity. Use color-grading language (warm/cool, desaturated/vibrant, lifted blacks/deep blacks) rather than subjective words like “make it better.”
Keep composition intact. Add “maintain the original composition, crop, and aspect ratio” when original framing matters.
Why Some ChatGPT Photo Editing Prompts Fail
Even well-constructed chatgpt image editing prompts can produce bad results. The generative AI models that power these edits are probabilistic — they predict what a modified image should look like, which means they can fail in predictable ways.
Identity Drift
The problem: The subject’s face changes — different nose shape, altered jawline, modified eyes.
The fix: Always include “preserve the subject’s exact facial features.” Specify: “keep the exact nose, eyes, mouth, jawline, and skin tone.”
Over-Smoothed Skin
The problem: Skin looks plastic, airbrushed, or doll-like.
The fix: Add “maintain realistic skin texture with visible pores and natural imperfections.” Follow up: “add back more skin texture — the result looks too airbrushed.”
Weird Hands and Fingers
The problem: Extra fingers, merged fingers, unnatural hand poses.
The fix: Add “preserve the natural appearance of hands and fingers — correct anatomy with five fingers per hand.” Or, crop hands out of frame before uploading.
Background Bleed
The problem: New background elements leak onto the subject, or edges look rough.
The fix: Use the selection tool to isolate the subject before asking for background changes. Add “maintain clean, natural edges around the subject.”
Text and Logo Corruption
The problem: Text on clothing, signs, or products becomes garbled.
The fix: Add “preserve all visible text exactly as it appears — do not alter any letters, numbers, or logos.”
Overdone Effects
The problem: Cinematic or film looks become heavy-handed and unrealistic.
The fix: Use “subtle” and add: “do not over-process, do not make this look like a heavy Instagram filter.”
Safety, Ethics, and Disclosure
AI photo editing raises real ethical questions. These are the key principles to follow.
Likeness and consent. Do not use ChatGPT to edit photos of people without their knowledge or consent, especially for edits that alter their appearance significantly. This is both an ethical and, in many jurisdictions, a legal concern.
Brand marks and trademarks. Editing photos containing brand logos for commercial use can create intellectual property issues. Be careful modifying or removing visible brand assets.
Editorial disclosure. If you publish AI-edited photos — whether for journalism, marketing, or social — label them clearly. Many platforms now require AI-editing disclosure.
When to label AI-edited images. Minor retouching (blemish removal, basic lighting fix) generally doesn’t require a label. Significant background swaps, object removal, or face modifications should be disclosed, especially in regulated industries. For editorial or journalistic use, always disclose any AI modification beyond basic correction.
Chatgpt Photo Editing Prompts – FAQs
Can ChatGPT edit existing photos?
Yes. You can upload photos directly into a ChatGPT conversation and ask it to change backgrounds, fix lighting, retouch skin, remove objects, and adjust colors. It works best with specific, constrained instructions — not vague requests like “make it look better.” You need a ChatGPT Plus or Team plan for full image editing access.
What is the best prompt for ChatGPT photo editing?
The best prompt follows a six-part formula: subject + edit action + preserve constraints + style details + technical specs + negative constraints. Example: “Edit this headshot. Soften background to neutral gray. Preserve exact facial features. Output at 4K, 3:4 crop. Do not alter skin texture.” This structure consistently outperforms one-line prompts.
Can ChatGPT make professional headshots?
ChatGPT can edit a casual photo into a professional-looking headshot by softening backgrounds, evening out lighting, and doing subtle retouching. The quality is good enough for LinkedIn, company websites, and social profiles. For high-end print use or executive portraits, a real photographer with studio lighting still gives better results.
How do I stop face distortion in ChatGPT images?
Include explicit preservation instructions in every prompt: “Preserve the subject’s exact facial features — eyes, nose, mouth, jawline, skin tone, and expression.” If distortion still occurs, use the selection tool to isolate the face and add “do not modify the area inside this selection.” Limit the number of edits per prompt — multi-edit prompts increase drift risk.
Is ChatGPT good for product photos?
ChatGPT handles basic product photo editing well — white background removal, simple lifestyle staging, color correction, and shadow cleanup. It’s effective for individual listings on Amazon, Shopify, or Etsy. For high-volume e-commerce catalogs with hundreds of SKUs, dedicated tools like Photoshop batch actions or specialized product photography services are more efficient.
Is ChatGPT free for photo editing?
ChatGPT’s image editing features require a paid plan — ChatGPT Plus at $20/month or Team plans. The free tier has limited or no access to image editing, depending on current OpenAI policies. Check the OpenAI Help Center for the latest access details and usage limits.
Can ChatGPT replace backgrounds realistically?
Yes, background replacement is one of ChatGPT’s strongest editing capabilities. For best results, include a specific scene description and a lighting-match instruction (e.g., “match the ambient light direction to the new background”). Common issues include rough edges around fine hair and mismatched ambient warmth, both of which you can address through conversational follow-up prompts.
Conclusion
The right ChatGPT photo editing prompts make the difference between a warped, over-processed image and a genuinely usable, professional-looking result. The core principle is simple: be specific, be explicit about what to preserve, and use negative constraints to prevent over-editing.
Start with the prompt formula from this guide — subject, edit action, preserve constraints, style, specs, negatives — and adapt it to your needs. Use the three reusable templates (quick, detailed, and refinement) before building more complex prompts. When ChatGPT isn’t the right tool, use the comparison framework above to pick the alternative that fits the job.
If you’re a beginner, start with prompt #10 (Professional Headshot From Casual Photo) and prompt #1 (Clean Professional Headshot). If you’re a marketer, start with #30 (Personal Brand Hero) and #11 (White Background). If you’re an e-commerce seller, start with #11 and #14 together.
The 50 prompts above cover the most common real-world editing scenarios. Copy them, customize them, and iterate conversationally. That’s how you get better AI photos — by writing better instructions, not by hoping for magic.
About the author
I’m Macedona, an independent reviewer covering SaaS platforms, CRM systems, and AI tools. My work focuses on hands-on testing, structured feature analysis, pricing evaluation, and real-world business use cases.
All reviews are created using transparent comparison criteria and are updated regularly to reflect changes in features, pricing, and performance.