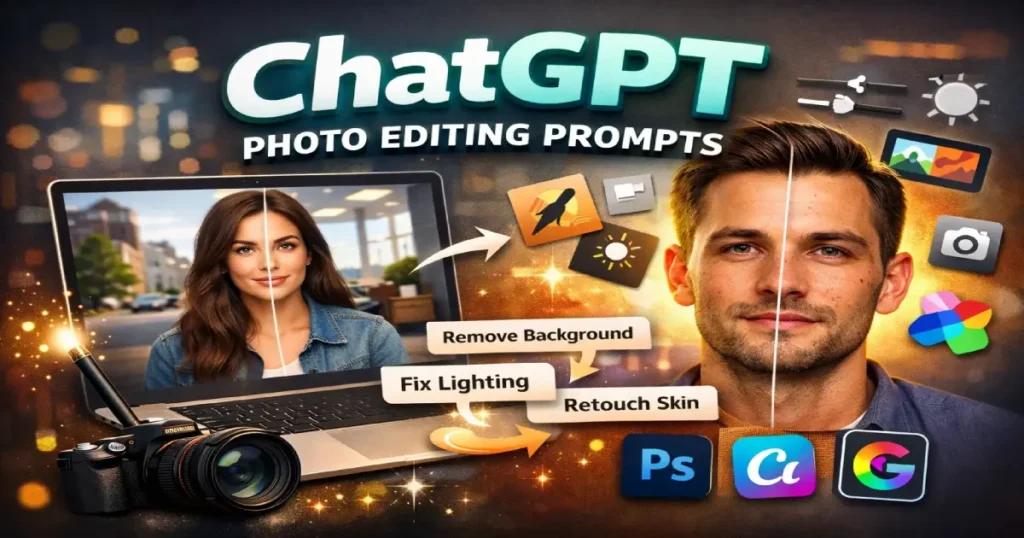
If you need nano banana prompts that go beyond a copy-paste list—with real context on why each prompt works, where it fails, and how to customize it—this is the guide to bookmark. We break down 50 production-ready prompt frameworks for Nano Banana Pro, organized by the creative jobs real users actually pay for: nano banana prompts for photo editing, professional headshots, ecommerce product shots, style transfers, text-heavy designs, and marketing assets.
This is not a prompt library. It is a review-driven prompt guide with evaluation criteria, a troubleshooting matrix, a failure library, and decision support tables to help you pick the right prompt—and the right model—for each use case.
Quick Answer — What are the best Nano Banana prompts?
The strongest Nano Banana Pro prompts combine five elements: a clear subject, a defined style or camera reference, explicit preservation instructions (for edits), lighting direction, and output constraints such as aspect ratio. The Keep/Change/How/Constraints editing formula and the Subject/Style/Camera/Lighting/Composition/Constraints generation formula consistently produce the best results across all categories.
Quick Take
- 50 copy-and-paste prompts grouped by real creative jobs, not random themes.
- Two proven formulas — one for image generation, one for photo editing — that you can apply to any prompt.
- Who this is for: Photographers, ecommerce sellers, marketers, and content creators who need production-grade AI images and edits.
- What makes this different: Each prompt has “Best for,” “Why it works,” “Edit this prompt by changing…,” and “Watch-outs.” Plus a failure library, decision tables, and before/after refinement examples that most prompt listicles skip.
- Transparency note: This is an editorial analysis. Prompts are built from official Google documentation, established prompt-engineering patterns, and observed community use cases. We do not fabricate hands-on test results.
What Is Nano Banana Pro?
Nano Banana Pro is Google’s highest-fidelity image model within the Gemini 3 family. It handles both image generation and image editing inside a single multimodal pipeline—meaning you can create images from text, edit uploaded photos with natural-language instructions, blend multiple reference images, and render legible text directly onto visuals.
It is available through the Gemini app, Google AI Studio, and Vertex AI on Google Cloud. If you’re already working within Google’s generative AI ecosystem—which you can learn more about in our Gemini review—Nano Banana Pro is the natural next step for visual content workflows. If you want to start with Gemini’s native photo editing capabilities before diving into Nano Banana Pro, our Gemini photo editing prompts guide covers 50 tested prompt templates for the standard Gemini model.
Key capabilities:
- Multiple reference images: Upload two or more images and instruct the model to blend elements.
- Web search grounding: The model can pull real-world context to improve accuracy.
- Text rendering: Nano Banana Pro generates readable text on signs, packaging, and infographics—historically a weak area for image models.
- C2PA content credentials and SynthID: Generated images carry embedded provenance metadata via the C2PA standard, supporting responsible commercial use.
Quick Answer — Can Nano Banana Pro edit existing photos? Yes. Upload an image and give natural-language editing instructions. You can change backgrounds, fix lighting, remove objects, adjust colors, and apply style transfers—all while preserving the original subject through explicit preservation prompts.
Pros and Cons of Nano Banana Pro
| Pros | Cons |
|---|---|
| Industry-leading text rendering on generated images | Slower than Nano Banana 2 and Flash Image |
| Strong identity preservation during edits | Can still produce identity drift on complex multi-element edits |
| Multi-reference image support for compositing | Long text blocks (7+ words) can still distort |
| Built-in C2PA / SynthID content credentials | Higher compute cost through Vertex AI |
| Handles generation AND editing in one pipeline | Style transfer can over-stylize without careful constraints |
| Available free via Gemini app | Advanced features require API access (AI Studio / Vertex) |
| Photorealism rivals Midjourney and Flux | Smaller community prompt ecosystem compared to Midjourney |
Editorial take: Nano Banana Pro’s biggest competitive edge is the combination of editing + generation + text rendering in a single model. No other major model does all three at this quality level. Its biggest weakness is speed and the learning curve for writing effective preservation instructions.
How This Article Was Prepared
Transparency is core to this guide’s credibility. Here is how we built it:
- Reviewed official documentation. Model capabilities, availability, and technical specifications are sourced from Google Cloud’s Gemini image documentation and related API docs.
- Analyzed leading ranking pages. We studied the editorial structure, prompt depth, and gaps across the top 15 ranking pages for Nano Banana prompt queries.
- Grouped prompts by real user jobs. Categories reflect actual commercial use cases—photo editing, headshots, ecommerce, style transfer, text rendering, marketing—not arbitrary themes.
- Separated editing prompts from generation prompts. Most guides mix these. They require fundamentally different prompt structures, so we treat them as distinct disciplines.
- Editorial judgments are marked separately. Where we offer an opinion—such as model comparisons or “best for” recommendations—we label it as an editorial take, not sourced fact.
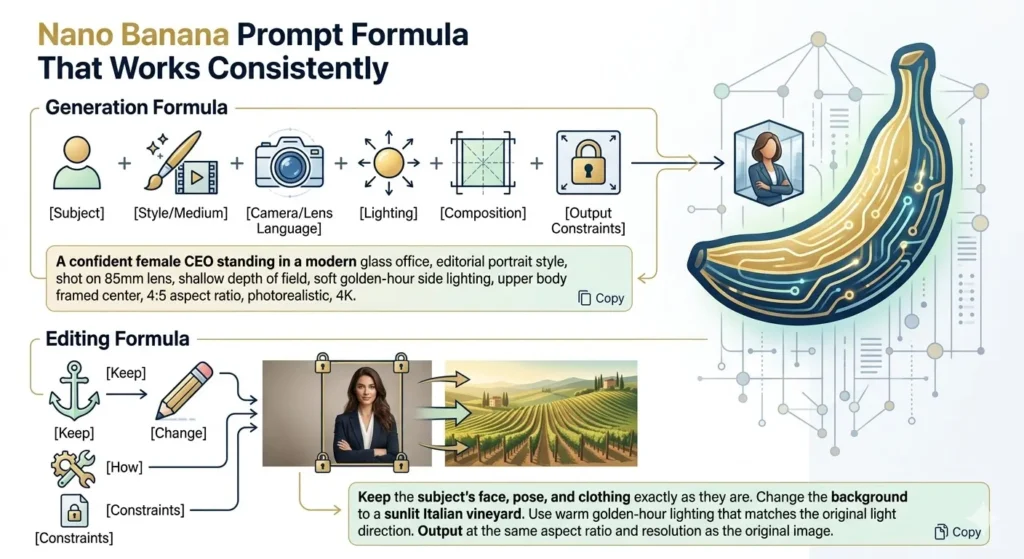
Nano Banana Prompt Formula That Works Consistently
Before jumping to the 50 prompts, learn the two core formulas. Every prompt in this guide uses one of them.
Generation Formula (for Creating New Images)
[Subject] + [Style/Medium] + [Camera/Lens Language] + [Lighting] + [Composition] + [Output Constraints]Example:
A confident female CEO standing in a modern glass office, editorial portrait style,
shot on 85mm lens, shallow depth of field, soft golden-hour side lighting,
upper body framed center, 4:5 aspect ratio, photorealistic, 4K.
Editing Formula (for Modifying Existing Photos)
Keep [what stays unchanged] + Change [what gets modified] + How [specific instructions] + Constraints [output specs]Example:
Keep the subject's face, pose, and clothing exactly as they are.
Change the background to a sunlit Italian vineyard.
Use warm golden-hour lighting that matches the original light direction.
Output at the same aspect ratio and resolution as the original image.
Why this matters: Most prompt failures in AI photo editing happen because the user gives the model a destination (what they want) without giving it boundaries (what must not change). The Keep/Change/How/Constraints model solves that.
Quick Answer — What is the best Nano Banana prompt formula? Use Subject + Style + Camera + Lighting + Composition + Constraints for generation. For editing, use Keep + Change + How + Constraints. These two structures produce the most consistent results across all prompt categories.
50 Best Nano Banana Pro Prompts
Photo Editing & Enhancement Prompts (1–10)
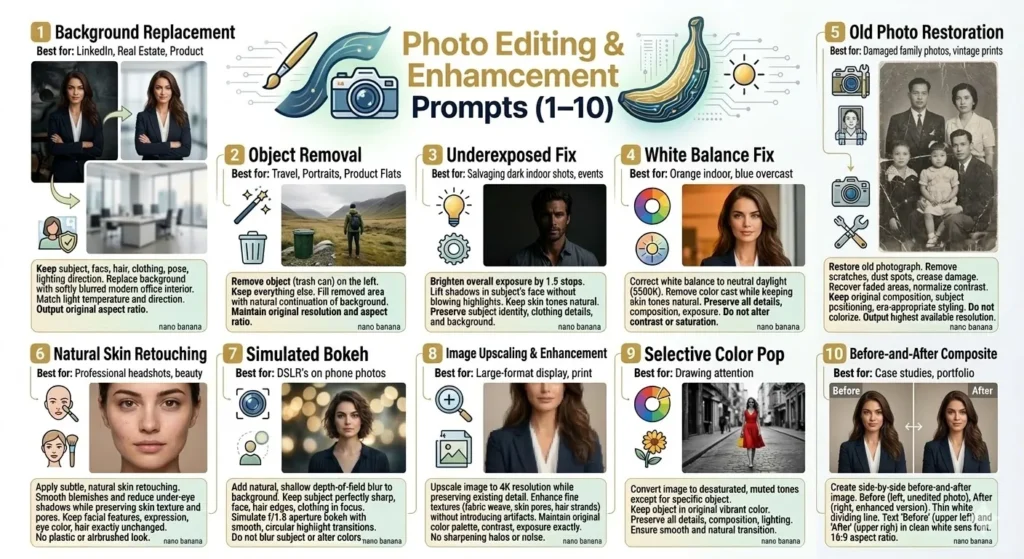
These nano banana editing prompts focus on non-destructive edits: background swaps, lighting fixes, color correction, object removal, and image restoration. The editing formula applies here.
If you’re also exploring prompt templates for other AI image tools, see our guide to the best AI photo editing prompts for cross-platform comparisons.
1. Clean Background Replacement
Best for: Real estate, LinkedIn photos, product shots on white.
Keep the subject exactly as they are—face, hair, clothing, pose, and lighting direction unchanged.
Replace the background with a clean, softly blurred modern office interior.
Match the light temperature and direction of the original photo.
Output at the original aspect ratio.
Why it works: Explicit preservation instructions prevent identity drift. Matching light direction avoids the “pasted-on” look.
Edit this prompt by changing: “modern office interior” to any environment—beach, studio backdrop, cityscape.
Watch-outs: If the original has strong side lighting, a front-lit background will look inconsistent. Specify the light angle.
2. Object Removal (Clean Erase)
Best for: Removing distracting elements from travel photos, product flats, or portraits.
Remove the [object, e.g., trash can] from the left side of the image.
Keep everything else—subject, lighting, background texture, and colors—exactly the same.
Fill the removed area with a natural continuation of the surrounding background.
Maintain the original resolution and aspect ratio.
Why it works: Naming the object and its location gives the model a precise target. “Natural continuation” prevents smeared inpainting.
Edit this prompt by changing: the object name and position. Be specific: “the red car in the background” beats “the car.”
Watch-outs: Complex removals near the subject’s body can cause warping. For objects overlapping the subject, consider masking separately.
3. Lighting Correction (Underexposed Fix)
Best for: Salvaging dark indoor shots, event photos, or poorly lit selfies.
Brighten the overall exposure of this image by approximately 1.5 stops.
Lift the shadows in the subject's face without blowing out highlights.
Keep skin tones natural and maintain the original color temperature.
Preserve the subject's identity, clothing details, and background.
Why it works: Quantifying the adjustment (“1.5 stops”) gives the model a measurable target instead of vague “make it brighter.”
Edit this prompt by changing: the stop value. Use 0.5 for subtle lift, 2.0+ for heavy recovery.
Watch-outs: Extreme brightening can introduce noise or flatten contrast. Add “preserve contrast and texture detail” if needed.
4. Color Correction (White Balance Fix)
Best for: Fixing orange indoor lighting, blue overcast casts, or mixed-light scenes.
Correct the white balance of this image to neutral daylight (approximately 5500K).
Remove the [orange/blue/green] color cast while keeping skin tones natural.
Preserve all details: subject, background, composition, and exposure.
Do not alter contrast or saturation beyond what the white balance correction requires.
Why it works: Specifying a Kelvin target plus a “do not alter” constraint prevents the model from over-processing.
Edit this prompt by changing: the Kelvin value. 3200K for warm tungsten feel, 6500K for cool overcast look.
Watch-outs: If the original color cast is intentional (e.g., golden hour), this prompt will neutralize it. Add “maintain warm undertones” if needed.
5. Old Photo Restoration
Best for: Restoring damaged family photos, vintage prints, or faded scans.
Restore this old photograph. Remove scratches, dust spots, and visible crease damage.
Recover faded areas and normalize contrast to resemble a well-preserved original print.
Keep the original composition, subject positioning, and era-appropriate styling unchanged.
Do not colorize. Maintain the black-and-white or sepia tone of the original.
Output at the highest available resolution.
Why it works: “Do not colorize” prevents unwanted creative interpretation. “Era-appropriate styling” stops the model from modernizing hair or clothing.
Edit this prompt by changing: Add “Colorize with natural, realistic tones” if you want color restoration instead.
Watch-outs: Heavily damaged areas near faces can cause identity drift. For severe damage, process in stages—fix background first, then face.
6. Skin Retouching (Natural)
Best for: Professional headshots, beauty shots, and portrait cleanup.
Apply subtle, natural skin retouching to the subject's face.
Smooth minor blemishes and reduce under-eye shadows while preserving skin texture and pores.
Keep the subject's facial features, expression, eye color, and hair exactly unchanged.
Do not apply a plastic or airbrushed look. The result should look like a well-lit, unedited portrait.
Why it works: “Preserve skin texture and pores” and “no plastic look” set a quality floor that prevents over-smoothing.
Edit this prompt by changing: the retouching intensity—”very subtle” for minimal, “moderate” for commercial beauty.
Watch-outs: Over-retouching is the single most common failure. If results look synthetic, add “keep all freckles and natural skin variation.”
7. Background Blur (Simulated Bokeh)
Best for: Turning phone photos into DSLR-quality portraits.
Add a natural, shallow depth-of-field blur to the background of this image.
Keep the subject perfectly sharp—face, hair edges, and clothing all in focus.
Simulate a f/1.8 aperture bokeh with smooth, circular highlight transitions.
Do not blur the subject or alter any colors, lighting, or composition.
Why it works: Specifying an f-stop gives the model a photographic reference. “Circular highlight transitions” guides the bokeh shape.
Edit this prompt by changing: the f-stop value. f/2.8 for moderate blur, f/1.4 for extreme separation.
Watch-outs: Hair edges are the hardest part. If hair looks artificially sharp against blur, add “ensure natural feathering on hair edges.”
8. Image Upscaling and Enhancement
Best for: Enlarging low-resolution images for print, signage, or large-format display.
Upscale this image to 4K resolution while preserving all existing detail.
Enhance fine textures—fabric weave, skin pores, hair strands—without introducing artifacts.
Maintain the original color palette, contrast, and exposure exactly.
Do not add sharpening halos or noise.
Why it works: Naming specific textures tells the model what “detail” means in context.
Watch-outs: Extreme upscaling (e.g., 480p to 4K) will always involve hallucinated detail. Be realistic about source quality.
9. Selective Color Pop
Best for: Drawing attention to a specific element—a red dress, a product, a flower.
Convert the entire image to desaturated, muted tones except for the [red dress/blue car/yellow flower].
Keep the [object] in its original vibrant color.
Preserve all details, composition, and lighting exactly as they are.
Ensure the transition between color and desaturation is smooth and natural.
Why it works: Selective color is a well-understood photographic effect, and naming the exact object prevents ambiguity.
Watch-outs: If the target color appears elsewhere (e.g., red lipstick + red dress), both may stay saturated. Be specific about which instance.
10. Before-and-After Composite
Best for: Social media content, case studies, and portfolio showcases.
Create a side-by-side before-and-after image.
On the left, show the original unedited photo.
On the right, show the enhanced version with [describe specific edits].
Add a thin white dividing line in the center.
Add the text "Before" on the upper left and "After" on the upper right in clean white sans-serif font.
Maintain a 16:9 aspect ratio.
Why it works: This is a generation prompt, not an editing prompt. It instructs the model to compose a layout. Text rendering in Nano Banana Pro makes the labels feasible.
Watch-outs: Text rendering may still have minor inconsistencies. Review the output text before publishing.
Portrait, Headshot & LinkedIn Prompts (11–18)
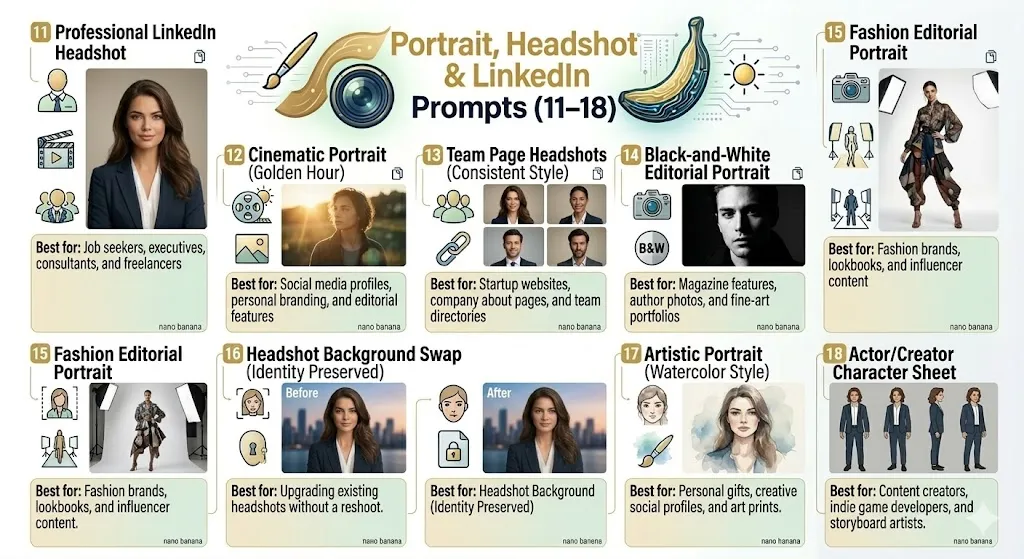
These nano banana prompts for portraits cover professional headshots, cinematic portraits, and identity-consistent character shots.
Quick Answer — Which Nano Banana prompts work best for headshots? Use a clean background, 85mm lens reference, shallow depth of field, warm studio lighting, specific wardrobe direction, and upper-chest centered framing. See prompts #11–#16 below.
11. Professional LinkedIn Headshot
Best for: Job seekers, executives, consultants, and freelancers.
Professional corporate headshot of a [age range] [descriptor] professional.
Wearing a [navy blazer / dark suit / smart casual shirt].
Clean, softly lit studio background in neutral gray.
Shot on 85mm portrait lens, shallow depth of field.
Warm, approachable expression with natural smile.
Upper chest framing, centered composition. Photorealistic, 4:5 aspect ratio.
Why it works: 85mm is the standard portrait lens reference. Specifying wardrobe and expression prevents generic outputs.
Watch-outs: If generating a specific person’s likeness, use a reference image. Without one, the model generates a fictional person.
12. Cinematic Portrait (Golden Hour)
Best for: Social media profiles, personal branding, and editorial features.
Cinematic portrait of a [describe subject] standing outdoors at golden hour.
Warm, directional sunlight from camera left, long shadows, lens flare subtly visible.
Shot on 50mm lens, f/2.0, with creamy bokeh in the background.
Subject looking slightly off-camera, contemplative expression.
Color grading: warm highlights, teal-shifted shadows. Photorealistic, 3:4 aspect ratio.
Why it works: “Teal-shifted shadows” is a specific color-grading reference that gives cinematic depth.
Watch-outs: “Lens flare” can be overdone. Add “subtle, natural lens flare only” if results are excessive.
13. Team Page Headshots (Consistent Style)
Best for: Startup websites, company about pages, and team directories.
Generate a professional headshot in the exact same style as the reference image.
Match the background color, lighting setup, framing, and color grading exactly.
Subject: [describe person or use reference image].
Same crop: head and upper shoulders, centered.
Maintain consistent skin tone rendering and shadow density across all outputs.
Why it works: Character consistency across a series is one of Nano Banana Pro’s strengths with reference images.
14. Black-and-White Editorial Portrait
Best for: Magazine features, author photos, and fine-art portfolios.
High-contrast black-and-white editorial portrait of a [describe subject].
Dramatic side lighting with deep shadows on the opposite side of the face.
Shot on medium format, 80mm equivalent, f/4.
Crisp detail in skin texture, fabric, and hair.
Slight film grain for analog feel. Classic 4:5 portrait ratio.
15. Fashion Editorial Portrait
Best for: Fashion brands, lookbooks, and influencer content.
High-fashion editorial portrait of a model wearing [describe outfit in detail].
Studio lighting: large softbox from above, fill light from below for catch lights.
Clean white seamless background.
Dynamic pose: slight lean, one hand on hip. Confident expression.
Shot on 70-200mm at 135mm, f/2.8. Rich, saturated color.
Full body framing. 2:3 aspect ratio. Magazine-quality photorealism.
16. Headshot Background Swap (Identity Preserved)
Best for: Upgrading existing headshots without a reshoot. This is an editing prompt applied to an uploaded photo.
Keep the subject's face, expression, skin tone, hair, and clothing exactly as they appear in the uploaded image.
Replace the background with a [describe: e.g., softly blurred downtown skyline at dusk].
Match the lighting on the subject to be consistent with the new background environment.
Maintain the original image's framing and aspect ratio.
Watch-outs: Extreme environment changes (indoor → beach sunset) look artificial if you don’t also adjust the lighting instruction.
17. Artistic Portrait (Watercolor Style)
Best for: Personal gifts, creative social profiles, and art prints.
Transform this portrait photo into a watercolor illustration.
Maintain the subject's facial features, expression, and overall likeness.
Use soft, flowing watercolor washes with visible paper texture.
Limit the palette to muted earth tones and soft blues.
Keep the composition and framing identical to the original photo.
18. Actor/Creator Character Sheet
Best for: Content creators, indie game developers, and storyboard artists.
Generate a character reference sheet for [describe character].
Include four views: front-facing, three-quarter left, profile left, and three-quarter right.
Consistent lighting, proportions, and outfit across all four views.
Clean white background. Flat, even studio lighting.
Label each view with small text: "Front," "3/4 Left," "Profile," "3/4 Right."
16:9 aspect ratio for the full sheet.
Product Photography & Ecommerce Prompts (19–26)

These prompts target ecommerce listings, marketplace product shots, and lifestyle visuals. For a broader look at AI-powered editing tools for product photography, our best AI photo editors roundup compares the leading platforms.
19. White Background Product Shot (Amazon-Style)
Best for: Amazon, Shopify, and marketplace product listings.
Product photo of [describe product] on a pure white (#FFFFFF) background.
Even, shadowless studio lighting from above and both sides.
Product centered, filling 85% of the frame.
Crisp detail on textures, labels, and materials.
No reflections, no props, no lifestyle elements. 1:1 square aspect ratio.
20. Lifestyle Product Shot (In Context)
Best for: Social media ads, brand websites, and pitch decks.
[Product] placed on a [describe surface: marble countertop, rustic wooden table].
Surrounded by [2-3 contextual props: fresh flowers, coffee cup, notebook].
Soft, natural window light from camera left. Shallow depth of field.
Product is the hero—sharp focus on product, props slightly soft.
Warm, inviting color palette. 4:5 aspect ratio for Instagram.
21. Product with Reference Image (Brand Consistency)
Best for: Maintaining visual consistency across a product line using multi-reference workflows.
Generate a product photo of [new product] using the exact same lighting setup,
background, angle, and color grading as the uploaded reference image.
Match the shadow direction, highlight intensity, and overall mood precisely.
Product should be framed identically to the reference—same scale, same position.
22. Flat Lay Product Arrangement
Best for: Beauty brands, subscription boxes, and curated collections.
Overhead flat lay of [list 4-6 products] arranged in a balanced, editorial layout.
Clean [marble / linen / colored paper] background.
Even, diffused lighting with minimal shadows.
Color palette: [specify]. Include small decorative elements: [dried flowers, fabric swatches].
1:1 aspect ratio.
23. Packaging Mockup
Best for: Pre-production visualization, investor decks, and design reviews.
Realistic 3D product packaging mockup for a [describe product].
Show the package at a three-quarter angle on a [surface].
[Brand name] printed clearly on the front in [font style, e.g., bold sans-serif, white on matte black].
Subtle studio lighting with a soft shadow underneath.
Photorealistic materials: [matte paper, glossy foil, kraft paper]. 4:5 aspect ratio.
24. Product Comparison Layout
Best for: Review blogs, comparison pages, and buying guides.
Create a side-by-side product comparison image.
Left: [Product A] on white background. Right: [Product B] on white background.
Identical lighting, angle, and scale for both products.
Thin dividing line in the center.
Labels "Option A" and "Option B" in clean sans-serif text at the top. 16:9 aspect ratio.
25. Food Product Photography
Best for: Restaurant menus, food delivery apps, and recipe blogs.
Appetizing food photo of [describe dish in detail].
Overhead 45-degree angle. Soft, diffused natural light from camera right.
Shallow depth of field. Visible steam or moisture for freshness.
Dark moody background: slate board or dark wood surface. Warm color grading. 3:4 aspect ratio.
26. Product in Multiple Colorways
Best for: Ecommerce listings showing color options, apparel mockups.
Show the [product] in four color variants: [color 1], [color 2], [color 3], [color 4].
Arrange in a 2x2 grid on a white background.
Every variant uses the same angle, lighting, scale, and position.
Product design, shape, and proportions must be identical—only the color changes.
1:1 overall aspect ratio.
Style Transfer & Creative Transformation Prompts (27–34)
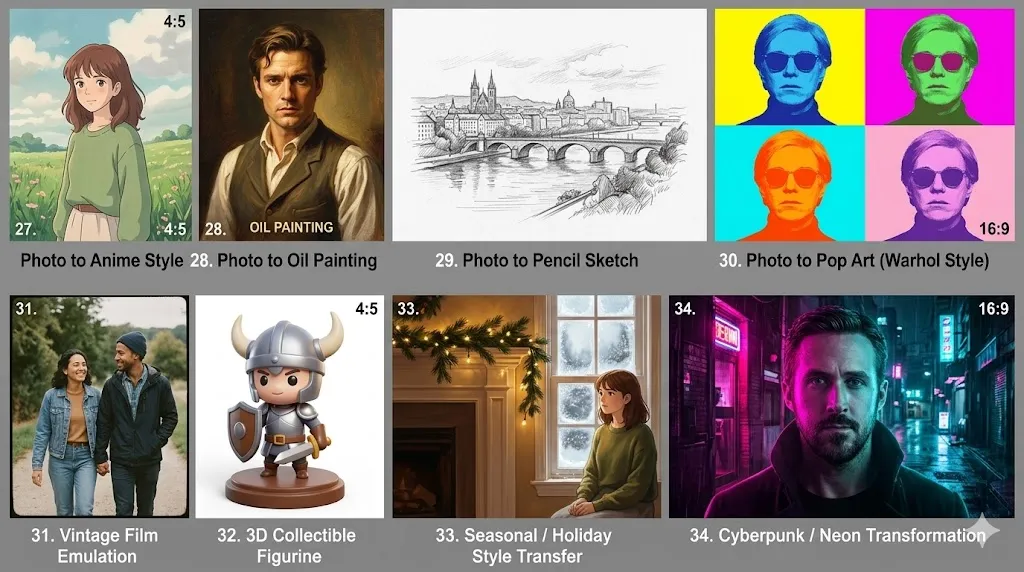
27. Photo to Anime Style
Best for: Social media virality, fan art, and creative profile images.
Transform this photo into a Studio Ghibli-inspired anime illustration.
Keep the subject's facial features, hairstyle, and outfit recognizable.
Use soft pastel colors, hand-painted textures, and a dreamy natural background.
Maintain the original composition and framing. 4:5 aspect ratio.
Watch-outs: Anime-style outputs are prone to identity drift, particularly in eye shape and skin tone.
28. Photo to Oil Painting
Best for: Home décor prints, gift portraits, and fine-art display.
Convert this portrait photo into a classical oil painting.
Impasto brushstrokes, rich color depth, and canvas texture visible.
Maintain the subject's likeness, expression, and clothing details accurately.
Use Rembrandt-style chiaroscuro lighting with warm golden tones.
Keep the original composition. Output at the highest available resolution.
29. Photo to Pencil Sketch
Best for: Architectural renderings, portrait gifts, and minimalist wall art.
Convert this image into a detailed graphite pencil sketch on white paper.
Use varied pencil pressure: heavy lines for contours, light hatching for shadows.
Visible pencil texture and paper grain. No color—pure grayscale.
Maintain accurate proportions and all key details of the original subject.
30. Photo to Pop Art (Warhol Style)
Best for: Brand merch, event posters, and bold social content.
Transform this portrait into Andy Warhol-style pop art.
Create a 2x2 grid with each panel in a different bold color combination.
High contrast, flat colors, halftone dot texture.
Maintain the subject's facial features and basic outline across all four panels.
16:9 aspect ratio for the full grid.
31. Vintage Film Emulation
Best for: Instagram aesthetics, nostalgia content, and retro branding.
Apply a vintage Kodak Portra 400 film emulation to this image.
Add subtle film grain, slightly lifted blacks, and warm color shift in highlights.
Desaturate blues and greens slightly. Boost warmth in skin tones.
Maintain all original details, composition, and framing.
32. 3D Collectible Figurine
Best for: Personalized merch, gaming avatars, and novelty gifts.
Generate a 3D collectible figurine of [describe character] standing on a round display base.
Chibi proportions: large head, small body. Glossy plastic material finish.
Detailed outfit: [describe clothing in detail].
Clean studio lighting, white background. 4:5 aspect ratio.
33. Seasonal / Holiday Style Transfer
Best for: Seasonal marketing, holiday social posts.
Transform this photo to look like a [holiday/season] scene.
Add contextual elements: [snow on surfaces, warm string lights, pine branches].
Apply a warm, golden indoor color grade with soft ambient lighting.
Keep the subject and main composition unchanged.
34. Cyberpunk / Neon Transformation
Best for: Gaming content, tech brand visuals, and futuristic social posts.
Transform this portrait into a cyberpunk scene.
Add neon lighting: magenta from the left, cyan from the right.
Dark urban background with rain reflections.
Keep the subject's identity, facial features, and expression unchanged.
Rich contrast, deep blacks, saturated neon highlights. 16:9 cinematic aspect ratio.
Text Rendering, Logo & Infographic Prompts (35–42)

Text rendering is where Nano Banana Pro significantly outperforms its predecessors and most competitors.
35. Event Poster with Headline Text
Best for: Concert posters, conference promos, and workshop announcements.
Design an event poster with the headline "[Your Event Name]" in large, bold display font at the top.
Subtext: "[Date] | [Location]" in smaller clean sans-serif below the headline.
Background: [describe visual theme].
Text must be sharp, centered, and fully legible. 2:3 aspect ratio.
Watch-outs: Headlines longer than 5-6 words are more likely to have rendering issues.
36. Motivational Quote Graphic
Best for: Instagram posts, Pinterest pins, and office wall art.
Create a motivational quote graphic with the text:
"[Your quote here—keep it under 15 words]"
Attribution: "—[Author Name]"
Clean, modern sans-serif font, white text on a dark gradient background (deep navy to black).
Text centered vertically and horizontally. 1:1 square aspect ratio.
37. Logo Concept Generation
Best for: Early-stage branding exploration and pitch deck concepts.
Generate a minimalist logo concept for a brand called "[Brand Name]."
Industry: [describe]. Style: clean, geometric, modern.
Use a maximum of two colors: [color 1] and [color 2].
Include the brand name in a clean sans-serif typeface below the logo mark.
Show on white background. 1:1 aspect ratio.
Watch-outs: AI-generated logos are concept starters, not production-ready files. These need vectorization by a designer.
38. Infographic Layout
Best for: Blog posts, reports, and data-driven social content.
Create a vertical infographic titled "[Title]."
Include 5 sections, each with a numbered icon, a heading, and one line of text.
Section content:
1. [Heading]: [One-line fact]
2. [Heading]: [One-line fact]
3. [Heading]: [One-line fact]
4. [Heading]: [One-line fact]
5. [Heading]: [One-line fact]
Color scheme: [describe]. Clean layout with consistent spacing. 2:5 vertical aspect ratio.
39. Social Media Banner with Text
Best for: YouTube thumbnails, Twitter headers, and Facebook covers.
Design a YouTube thumbnail with the text "[Title—Max 5 Words]" in large, bold, white font with a dark drop shadow.
Background: [describe].
Text positioned in the left two-thirds of the frame.
Vibrant, high-contrast colors. 16:9 aspect ratio.
40. Business Card Design
Best for: Quick business card concepts and personal branding mockups.
Design a professional business card for [Name], [Title] at [Company].
Front: Name in bold, title below, company logo area in the upper right.
Back: Contact details in clean small text, left-aligned.
Color scheme: [describe]. Realistic card mockup on a dark surface. 16:9 aspect ratio showing both sides.
41. Product Label Design
Best for: CPG brands, food products, and cosmetics packaging concepts.
Design a product label for a [product type, e.g., artisan honey jar].
Brand name "[Name]" in [font style] at the top.
Flavor/variety: "[Flavor]" below the name.
Include a small illustration of [relevant visual].
Show the label wrapped around a [jar/bottle/can] in a realistic 3D mockup.
42. Conceptual Data Chart
Best for: Presentation slides, report headers, and blog featured images.
Create a clean, modern bar chart visualization showing [describe data concept].
5 bars in ascending order, each in a slightly different shade of [base color].
Clean white background with thin gray gridlines.
Title text at the top: "[Chart Title]."
Do not include specific numbers—this is a conceptual visualization for editorial use. 16:9 aspect ratio.
Watch-outs: AI-generated data visualizations should never be presented as real data. Always label them as conceptual.
Storyboard, Social Media & Marketing Prompts (43–50)
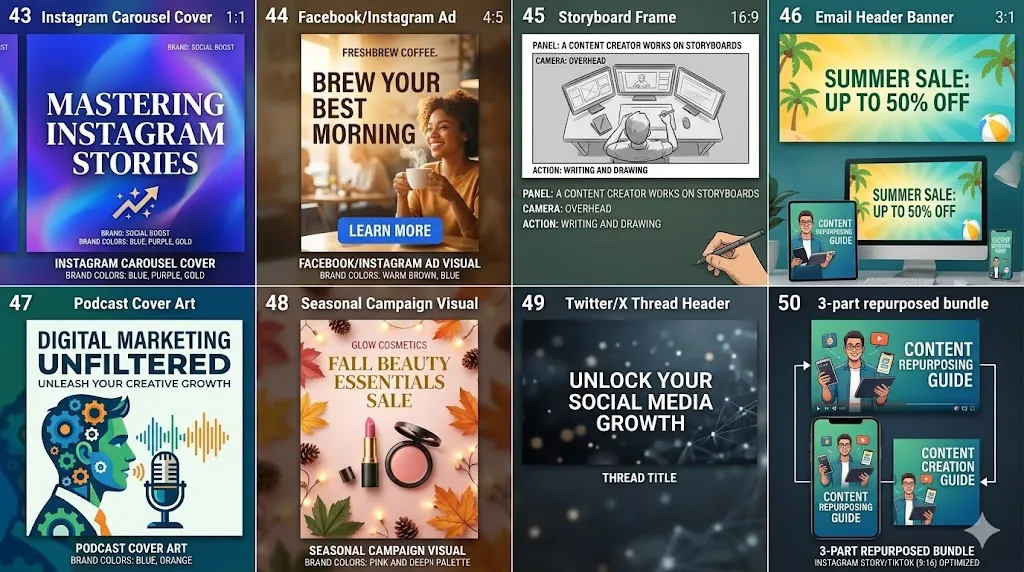
43. Instagram Carousel Cover Slide
Best for: Educational carousels, brand storytelling, and lead-gen content.
Design a bold cover slide for an Instagram carousel titled "[Title—Max 6 Words]."
Large, centered text on a [describe background].
Include a small icon that relates to the topic below the title.
Brand colors: [specify]. 1:1 square aspect ratio. Text must be fully legible at phone screen size.
44. Facebook / Instagram Ad Visual
Best for: Paid social campaigns and A/B testing ad creatives.
Create a social media ad image for [product/service].
Headline text: "[Max 5 Word Headline]" in large bold font.
Call to action area at the bottom: "[CTA, e.g., Learn More]."
Hero image: [describe product or lifestyle visual].
Brand colors: [specify]. 4:5 aspect ratio (Meta recommended).
45. Storyboard Frame (Single Panel)
Best for: Video pre-production, ad pitches, and creative briefs.
Storyboard panel: [describe the scene in one sentence].
Camera angle: [eye level / low angle / overhead / close-up].
Action: [describe what the subject is doing].
Simple, sketch-like illustration style with light shading. 16:9 widescreen frame.
46. Email Header Banner
Best for: Newsletter headers, promotional emails.
Design a clean email header banner for a [seasonal sale / product launch / newsletter].
Text: "[Headline—Max 5 Words]" centered in bold font.
Background: [relevant lifestyle image / abstract gradient].
Clean and professional. 3:1 wide aspect ratio.
47. Podcast Cover Art
Best for: Podcast launches and special episode covers.
Design podcast cover art for a show called "[Podcast Name]."
Show name in bold, clear font at the top.
Subtitle: "[Tagline—Max 8 Words]" below.
Visual style: [describe]. Must be readable at 55x55 pixels. 1:1 aspect ratio.
48. Seasonal Campaign Visual
Best for: Holiday sales, seasonal launches, and themed promotions.
Create a [holiday/season]-themed marketing visual for [product or brand].
Feature the product in the center with seasonal elements surrounding it.
Text overlay: "[Sale Headline]" in festive but readable font.
Brand colors integrated with seasonal palette. 4:5 aspect ratio.
49. Twitter / X Thread Header
Best for: Thread openers and long-form social content.
Create a Twitter header image for a thread titled "[Topic—Max 7 Words]."
Bold, clear white text centered on a dark blurred background.
Minimal design—text is the hero. 16:9 aspect ratio.
50. Multi-Platform Content Bundle
Best for: Marketers who need one visual repurposed across platforms.
Create a [describe visual concept] optimized for multiple platforms.
Generate in three versions:
Version 1: Instagram post (1:1 square).
Version 2: Instagram Story / TikTok (9:16 vertical).
Version 3: YouTube thumbnail / Twitter (16:9 horizontal).
Same visual style, color palette, and text content across all three.
Watch-outs: You may need to generate each version individually using the first as a reference image for tighter consistency.
Nano Banana Prompts for Photo Editing: A Deeper Look
Photo editing is where nano banana prompts for photo editing differ most from visual generation instructions, and where most guides fall short.
How to Preserve Identity in AI Edits
The single most common failure in AI photo editing is identity drift—the subject’s face subtly changes during the edit. Always stack explicit identity locks:
- “Keep the subject’s face, expression, and skin tone exactly unchanged.”
- “Do not modify facial features, eye color, or hair texture.”
- “The subject must be recognizable as the same person in the original.”
Quick Answer — How do I keep the face unchanged in Nano Banana? Stack multiple preservation instructions: keep face, expression, skin tone, facial features. The more explicit you are about what must NOT change, the stronger the identity lock.
How to Preserve Lighting and Composition
- “Match the lighting direction and temperature of the new environment to the original.”
- “Maintain the original framing, crop, and aspect ratio.”
- “Do not reposition the subject within the frame.”
Multi-Reference Image Best Practices
Nano Banana Pro supports multiple reference images—one of its strongest differentiators:
- Upload a product photo + a background scene → composite the product into the scene.
- Upload a headshot + a style reference → apply the style while keeping the person’s face.
- Upload two brand images → generate new content matching both aesthetics.
Multi-Turn Editing Workflows
For complex edits, use an iterative, multi-turn approach:
- One major change per prompt. Change the background OR fix the lighting—not both.
- Review after each turn. Apply one edit, check the result, then apply the next edit.
- Constrain aggressively. Use “do not alter” and “keep unchanged” for everything you are not editing.
This iterative prompting approach consistently outperforms single-prompt “do everything” instructions.

Bad Prompt vs Better Prompt: 5 Real Refinement Examples
This is where most prompt listicles stop. Below are five real refinement patterns showing how small structural changes produce dramatically better results.
Example 1: Vague Prompt → Improved Prompt
❌ Bad:
Make this photo look better.✅ Better:
Increase exposure by 1 stop. Warm the color temperature to 5500K. Lift shadows in the subject's face. Keep skin tones natural. Preserve all other details unchanged.What changed: Replaced a vague instruction with measurable, specific adjustments. The model now has four clear targets instead of zero.
Example 2: Identity-Destroying Edit → Identity-Preserving Edit
❌ Bad:
Put this person on a beach at sunset.✅ Better:
Keep the subject's face, expression, skin tone, hair, and clothing exactly unchanged. Replace the background with a tropical beach at sunset. Match the light direction: warm golden light from camera right, consistent with the new sun position. Maintain the original framing and aspect ratio.What changed: Added five explicit preservation instructions and matched the light direction to the new environment.
Example 3: Long-Text Design Prompt → Short-Text Poster
❌ Bad:
Make a poster for our annual technology conference that says "Join Us at TechForward 2026: Innovation, AI, and the Future of Business—Register Now at techforward.com"✅ Better:
Design an event poster with the headline "TechForward 2026" in large bold display font at the top. Subtext: "Innovation · AI · Business" in smaller sans-serif below. Dark gradient background with subtle abstract tech elements. Leave the bottom quarter clear. Text sharp and fully legible. 2:3 aspect ratio.What changed: Cut the text from 20+ words to 5 words. Removed the URL (better added as a design overlay). Gave explicit layout instructions.
Example 4: Over-Stylized Prompt → Balanced Photorealistic Prompt
❌ Bad:
Ultra hyper realistic 8K HDR cinematic dramatic epic masterpiece portrait with volumetric god rays.✅ Better:
Professional editorial portrait of a [describe subject]. Shot on 85mm lens, f/2.0, natural window light from camera left. Subtle fill light. Photorealistic. 4:5 aspect ratio.What changed: Removed hyperbolic adjectives. Added specific, actionable photographic language. One style direction instead of six competing ones.
Example 5: Weak Ecommerce Prompt → Catalog-Ready Product Shot
❌ Bad:
Product photo of shoes.✅ Better:
Product photo of [white leather sneakers with green accent stitching] on a pure white (#FFFFFF) background. Even, shadowless studio lighting. Product centered, filling 85% of frame. Three-quarter angle showing the side profile and toe box. Crisp texture detail on leather and stitching. 1:1 aspect ratio.What changed: Named the product in specific detail, defined the background to marketplace standards, specified the angle, and added texture requirements.
5 Prompt Mistakes by Use Case
Headshots
| Common Mistake | Output Symptom | Prompt Fix |
|---|---|---|
| No lens reference | Flat, phone-camera look | Add “shot on 85mm lens, f/2.0, shallow depth of field” |
| No wardrobe direction | Random, inconsistent outfits | Specify exact clothing: “navy blazer, white open-collar shirt” |
| Saying “professional photo” | Generic stock-photo result | Add specific lighting rig: “single softbox from upper right” |
Photo Editing
| Common Mistake | Output Symptom | Prompt Fix |
|---|---|---|
| Missing “keep” instructions | Face changes, pose shifts | Add 3+ explicit preservation statements |
| Mismatched light direction | “Pasted-on” composite look | Specify “match light direction of original: key light from [direction]” |
| Too many edits at once | Compound errors, low coherence | One major change per prompt. Iterate. |
Product Shots
| Common Mistake | Output Symptom | Prompt Fix |
|---|---|---|
| No background spec | Gray-toned or inconsistent background | Specify “#FFFFFF background” or exact surface description |
| Vague product description | Wrong product, wrong angle | Name product + materials + color + angle explicitly |
| Missing scale reference | Product looks wrong size | Add “product filling 85% of frame” or “shot next to [reference item]” |
Text Rendering
| Common Mistake | Output Symptom | Prompt Fix |
|---|---|---|
| Text longer than 6 words | Misspellings, line breaks | Keep headline text to 5 words max |
| Requesting cursive/script fonts | Illegible, distorted letterforms | Use “clean sans-serif font” for reliability |
| No size hierarchy specified | Flat, same-size text blocks | Specify “large headline” + “smaller subtext” explicitly |
Style Transfer
| Common Mistake | Output Symptom | Prompt Fix |
|---|---|---|
| No identity preservation | Face changes completely | Add “maintain the subject’s facial features and likeness” |
| Vague style reference | Generic, confused output | Name a specific style: “Studio Ghibli,” “Kodak Portra 400,” “Rembrandt chiaroscuro” |
| Conflicting style + realism | Muddy, inconsistent aesthetic | Choose one direction: full stylization OR photorealistic |
Best Nano Banana Pro Prompt by Use Case
| Use Case | Best Prompt # | Prompt Name | Key Strength |
|---|---|---|---|
| LinkedIn headshots | #11 | Professional LinkedIn Headshot | Clean, corporate-ready output |
| Product white background | #19 | White Background Product Shot | Marketplace-compliant (#FFFFFF) |
| Old photo restoration | #5 | Old Photo Restoration | Era-appropriate preservation |
| Posters with text | #35 | Event Poster with Headline | Reliable text rendering |
| Background replacement | #1 | Clean Background Replacement | Strong identity preservation |
| Cinematic portraits | #12 | Cinematic Portrait (Golden Hour) | Professional color grading |
| Ecommerce lifestyle | #20 | Lifestyle Product Shot | Product-hero composition |
| Storyboards | #45 | Storyboard Frame | Sketch-style simplicity |
| Brand consistency | #21 | Product with Reference Image | Multi-reference matching |
| Social media ads | #44 | Facebook / Instagram Ad Visual | Platform-optimized sizing |
When Nano Banana Pro Is Overkill
| Task | Better Option | Why |
|---|---|---|
| Quick social media drafts | Nano Banana 2 | Faster, cheaper, good enough quality |
| Batch brainstorming (20+ concepts) | Gemini 3.1 Flash Image | Speed-optimized for volume |
| Simple background removal only | Dedicated tool (remove.bg, AI photo editors) | Purpose-built, faster —see ourtop AI image generators for alternatives |
| Artistic illustration (no photo editing) | Midjourney | Stronger illustrative aesthetic |
| Photoshop-integrated workflows | Adobe Firefly / Generative Fill | Native integration,check Firefly pricing |
| Casual image generation | ChatGPT with GPT Image | Lowest friction, conversational interface |
Editorial take: Use Nano Banana Pro when output quality, text legibility, identity preservation, or content credentials matter more than speed. For everything else, a lighter model or a dedicated tool is probably faster and cheaper.
Where Nano Banana Pro Still Falls Short
No model is perfect. Here are the areas where Nano Banana Pro has documented or commonly observed limitations:
- Long text blocks. While text rendering is industry-leading for short text (1–6 words), anything beyond 7–8 words per block becomes unreliable. Fine print, ingredient lists, and URLs are not yet feasible.
- Complex multi-element edits. Asking the model to change the background, fix the lighting, AND adjust the wardrobe in a single prompt frequently causes compound errors. Multi-turn iterative prompting is required for complex jobs.
- Speed. Nano Banana Pro is noticeably slower than Nano Banana 2 and Flash Image. For rapid prototyping or batch generation, lighter models are more practical.
- Community ecosystem. Midjourney has a vastly larger community sharing prompts, styles, and techniques. Nano Banana Pro’s community is still maturing.
- Hair-edge separation. Background replacement and bokeh effects still occasionally produce artifacts at fine hair boundaries—a limitation shared with most current models.
- Consistency across series. While reference images help, generating a perfectly consistent set of images (e.g., 10 team headshots with identical style) still requires careful prompt engineering and review.
Who Should Use Nano Banana Pro — and Who Should Skip It
Use Nano Banana Pro if you:
- Need to edit existing photos with AI while preserving the subject’s identity
- Want text rendered on images (posters, packaging, infographics)
- Require content credentials (C2PA / SynthID) for commercial or enterprise use
- Work with multiple reference images for compositing or brand consistency
- Already operate within Google’s ecosystem (Gemini app, AI Studio, Vertex AI)
Skip Nano Banana Pro if you:
- Only need quick concept art or brainstorming (use Nano Banana 2 or Flash)
- Primarily create artistic illustrations without photo-editing needs (Midjourney may be stronger)
- Need Photoshop-integrated generative fill (Adobe Firefly is purpose-built for that)
- Want the simplest possible interface with no learning curve (ChatGPT’s image generation is more conversational)
- Are cost-sensitive and running high-volume batch jobs (lighter models are cheaper via API)
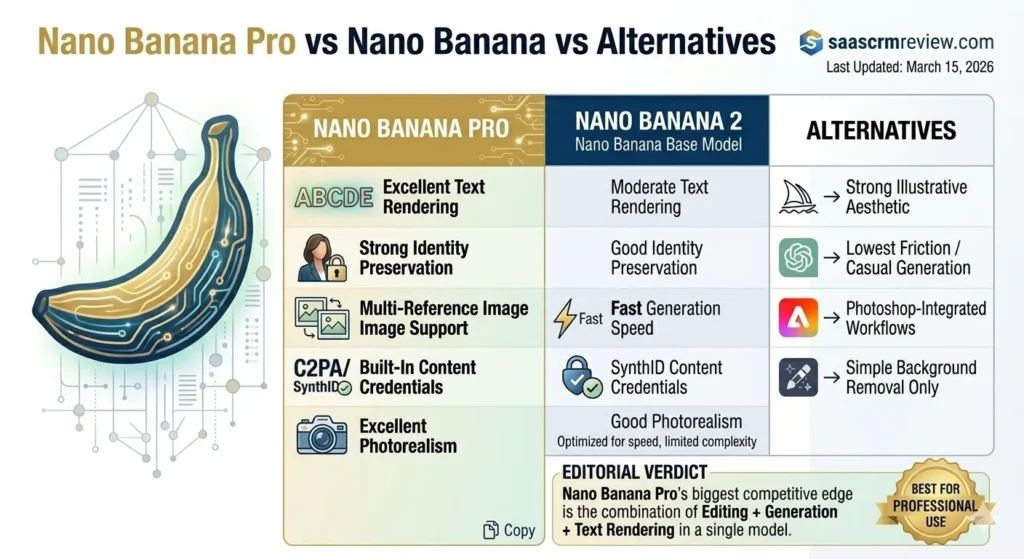
Nano Banana Pro vs Nano Banana vs Alternatives
| Feature | Nano Banana Pro | Nano Banana 2 | Midjourney v6 | GPT Image (DALL·E 3) | Adobe Firefly |
|---|---|---|---|---|---|
| Text rendering | Excellent | Limited | Moderate | Good | Good |
| Photo editing (uploads) | Yes | Limited | No | Yes | Yes (Generative Fill) |
| Multi-reference support | Yes | No | Limited | Yes | Limited |
| Identity preservation | Strong | Moderate | Strong (with ref) | Moderate | Moderate |
| Photorealism | Excellent | Good | Excellent | Good | Good |
| Speed | Moderate | Fast | Moderate | Fast | Fast |
| Commercial use | Yes (check terms) | Yes | Yes (paid) | Yes (paid) | Yes (designed for it) |
| Content credentials | C2PA + SynthID | SynthID | No | No | C2PA |
| Free tier | Yes (Gemini app) | Yes | No | Yes (ChatGPT) | Yes (limited) |
Editorial take: Nano Banana Pro’s competitive edge is the combination of editing + generation + text rendering + content credentials in a single model. No other major model does all four at this quality level. Midjourney leads on artistic illustration. Adobe Firefly wins on Photoshop integration. ChatGPT wins on accessibility.
If you’re comparing the broader landscape of AI image tools, our ChatGPT photo editing prompts guide covers the GPT Image side, and our roundup of the best AI image generation platforms provides a wider comparison.
Common Nano Banana Prompt Mistakes and How to Fix Them
| Mistake | What Happens | Fix |
|---|---|---|
| Vague prompt (“make it look better”) | Unpredictable, generic output | Specify the exact change with measurable targets |
| Missing preservation instructions | Identity drift, composition shift | Add 3+ explicit “keep” statements |
| Conflicting instructions | Confused, muddy output | One direction per prompt. Separate conflicting edits |
| No camera language | Flat, generic-looking images | Add lens, aperture, and angle references |
| Too many changes at once | Compound errors | One major change per prompt. Iterate |
| Long text requests | Misspellings, distortions | Keep text under 6 words per block |
| No aspect ratio specified | Awkward cropping | Always specify: 1:1, 4:5, 16:9, 2:3, or 9:16 |
| Ignoring light direction | “Pasted-on” composite look | Specify and match light source direction |
Nano Banana prompts – FAQs
What are the best Nano Banana prompts?
The best prompts combine a clear subject, a defined style, camera/lens language, explicit preservation instructions for edits, and output constraints like aspect ratio. The 50 prompts in this guide follow this structure across six categories.
How do I write better Nano Banana prompts for photo editing?
Use the Keep/Change/How/Constraints formula. State what must stay unchanged, what should change, how it should change, and any output requirements.
How do I keep the face unchanged in Nano Banana?
Stack multiple preservation instructions: “Keep the subject’s face, expression, skin tone, and facial features exactly unchanged. The subject must be recognizable as the same person.”
What is the best Nano Banana prompt formula?
For generation: Subject + Style + Camera + Lighting + Composition + Constraints. For editing: Keep + Change + How + Constraints.
Can Nano Banana Pro edit existing photos?
Yes. Upload an image and give natural-language editing instructions. You can change backgrounds, fix lighting, remove objects, adjust colors, and apply style transfers while preserving the subject.
How do I remove objects with Nano Banana prompts?
Name the specific object and its location: “Remove the [object] from the [position]. Fill with a natural continuation of the surrounding background. Keep everything else unchanged.”
How do I make Nano Banana prompts more realistic?
Add camera-specific language: lens focal length (85mm), aperture (f/1.8), depth of field, and lighting descriptions (golden hour, studio softbox). Specify “photorealistic” explicitly.
What is the difference between Nano Banana and Nano Banana Pro?
Nano Banana 2 is faster and cheaper, optimized for speed. Nano Banana Pro has superior text rendering, multi-reference support, better identity preservation, and higher overall quality. Both are in the Gemini 3 family.
Which Nano Banana prompts work best for headshots?
Use a clean background, 85mm lens reference, shallow depth of field, warm lighting, specific wardrobe direction, and upper-chest centered framing. See Prompts #11–#16.
How do I preserve lighting and composition in Nano Banana edits?
Specify: “Maintain the original lighting direction, color temperature, and intensity. Keep the original framing, crop, aspect ratio, and subject position unchanged.”
Is Nano Banana Pro worth it over the base model?
For professional photo editing, text-heavy designs, and multi-reference compositing—yes. For quick social drafts, brainstorming, and batch generation—the base Nano Banana 2 or Flash Image is faster and cheaper. See our When Nano Banana Pro Is Overkill table.
Model Availability and Access Paths
Based on current official documentation:
| Access Path | Availability | Notes |
|---|---|---|
| Gemini app (web / mobile) | Free tier available | Consumer-facing, easiest starting point |
| Google AI Studio | Free with API key | Developer-friendly, supports multi-image input |
| Vertex AI (Google Cloud) | Paid (usage-based) | Enterprise-grade, SLA-backed, full API access |
Note: Model names, capabilities, and pricing are subject to change. Consult Google’s official Gemini documentation for the latest specifications.
Final Verdict
This guide reviews 50 nano banana prompts across the six categories that matter most for real creative work: photo editing, professional portraits, product photography, style transfers, text and logo rendering, and marketing assets.
Nano Banana Pro is best for: Professional image editing workflows where identity preservation, text rendering, content credentials, and multi-reference compositing are non-negotiable. It is the strongest single-model option for users who need both generation and editing in one pipeline.
Nano Banana Pro is not ideal for: High-volume batch generation, quick brainstorming, or artistic illustration without a photo-editing component. Lighter models (Nano Banana 2, Flash Image) or specialized tools (Midjourney, Adobe Firefly) are better fits for those jobs.
Where it beats alternatives: Combined editing + generation + text rendering quality. Content credentials for enterprise compliance. Multi-reference compositing accuracy.
Where it still struggles: Long text blocks, compound multi-element edits in a single prompt, hair-edge separation, and speed relative to lighter models.
If you take one thing from this guide, let it be the formulas. The generation formula (Subject + Style + Camera + Lighting + Composition + Constraints) and the editing formula (Keep + Change + How + Constraints) are the foundation. Master those two patterns and you can build effective nano banana prompts for photo editing, headshots, ecommerce images, and beyond—without memorizing 50 prompt templates.
Start with 3–5 prompts from the category most relevant to your work. Adapt them using the “Edit this prompt by changing…” notes under each entry. Iterate one change at a time, and always specify what should not change.
Editorial Disclosure: This article is an editorial analysis based on official Google product documentation, published developer guidance, and established prompt-engineering patterns. We have not fabricated hands-on test results, screenshots, or performance benchmarks. Where editorial judgment is applied, it is clearly marked. Model capabilities and availability are subject to change; consult official Google documentation for the latest specifications.
About the author
I’m Macedona, an independent reviewer covering SaaS platforms, CRM systems, and AI tools. My work focuses on hands-on testing, structured feature analysis, pricing evaluation, and real-world business use cases.
All reviews are created using transparent comparison criteria and are updated regularly to reflect changes in features, pricing, and performance.